| Home | |
| Adventures | |
| Specification | |
| Diary | |
| Photo Album | |
| Contact Us | |
| Feedback | |
| Hints & Tips | |
| Polish Words | |
| Web links | |
| Problem | |
| Polish Yachts | |


Boat Move 2000, Replacing Platform Steps 2002, Work in Cockpit area, and buying Flexiteek 2003
22/01/00
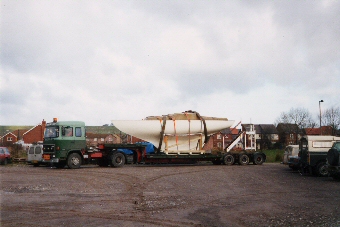
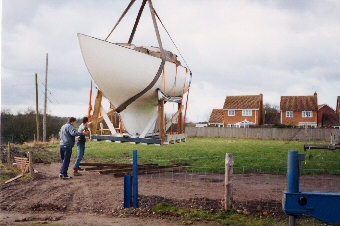
Woke quite early, anxious of the days events to come i.e. the move of our Boat from one end of the Marina to the other. We put some last minute things into the van – spade, rain-jackets, it was raining cats and dogs early on. Arrived down at the boat at 09:30am. No sign of anyone, and neither of the proprieters. Checked all our straps – they had tensioned off a bit. Re-tensioned them. A couple of other owners arrived in cars unaware of the boat move. One person was to remove a van, which had not been moved for two years, except he’d been asked to do so, in connection with re-surfacing work to be done in this area where our boat is, starting next week !!. He towed the van up to the top car park. Just as well because the crane and lorry will need every inch to manoeuvre down here. The lorry when he arrived, had to knock down all the stupid short wooden posts at the entrance way. The driver took Lance’s advice and reversed down the track to the bottom – after the crane had gone down first and set himself up. It was the same crane driver who placed us there three years ago. He remembered doing the job. Lorry trailer was a low level one – with adjustable back-end piece. Turned out ideal for accommodating the steps as-well on the back. All was loaded up in ½ hour. Picked up all our 4” x 4” posts and pads etc. The Lorry moved over, to allow the crane to pass and set himself up at the top car park area. No real organisation had been arranged up there by the Marina. One car and motorbike parked near to the gate, meant the crane had to stand off some-what. The Lorry got into place, and all craned up, and over the other Yacht she went. Camera on our faces would have shown gob-smacked. We thought he would swing around over the car-park. Anyway over she went. The posts quickly placed where we wanted the cradle. The crane just managed it – to the maximum radius he could. It now sure showed just how uneven the ground was. Chocked up the starboard side of the cradle with pads so weight was supported all around on all four corners of the cradle. Steps then off loaded and placed alongside. And that was that. We both thanked the lorry and crane drivers. The Lorry driver commented that it was the strongest cradle yet, that he had ever seen. We then left the drivers to settle up the bills, with the Marina. We left as it was 11:45am to catch the hire shop before it was shut at noon, to hire two toe-jacks. We will try claim the costs of the jacks back as a months free rent. Then we had a cup of tea back at home, relieved at having accomplished the move reasonably smoothly in the end and without hiccup. Decided to take back with us the best of the two old cradle side pieces (this was to be used to level up the front of the cradle), the three support posts, the wheel barrow and sack barrow. Just got it all in the van. Arrived back to the boat 12:45am, and reversed into the slipway area gateway. It was real windy today & the wind does blow here. It is exposed, but with views. We can see the hills from the boat. Spent considerable time levelling up the cradle, jacking up and chocking up with pads, forward and aft. Shovelled many barrow loads of hardcore around the starboard area, where the hardcore stopped short. It was really hard core in the literal sense. We almost had to chip at it, with the spade to break it up. Took some from close up to the fence. There was too much there anyway. We raked it out level. Then removed the straps, rope and paddings from the cradle. The hull in the cradle had not moved one inch – excellent – not even a millimetre. Lance had marked the hull and cradle so we would be able to tell if anything had moved. Removed the tiller, having untied it. It needs work on as it is delaminating. Managed to get power – only just – from a socket about 10’ above ground. Still no sign of electric pod yet. By 17:00pm we had had a good day, we were now reasonably happy with our position, and called it a day. Only concern now is the future of the bonfire. Chocking up the cradle not finished yet. Put the two centre 4” x 4” on the cradle – more chocking needed here. Also the 3 leg supports, left underneath for now. Rounded off the days hard work with a Kebab !. Not used to working below the water-line both of us banged our head a few times on the bow of the hull - forgetting it was there. !!.
 |
 |
|
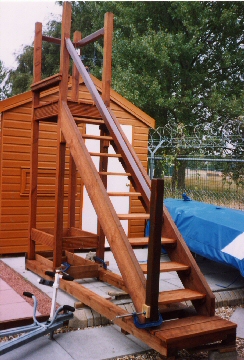
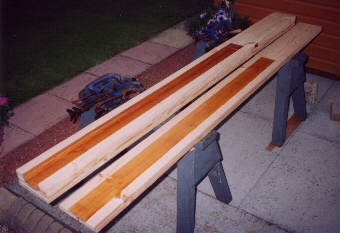
| Boat and Steps transported through the marina | Lowering the Boat
in place, and swing around 45degrees to starboard It is visible how uneven the area is, by looking at the bearer posts ! |
23/01/00
Amidst aches and pains persevered today to complete the inner two cross members to support the cradle. Rigged up the leg supports, albeit having to dig out a lump of tarmac type hardcore, which was a lump alright, smack bang where we needed to level off. Our Steps were better placed and chocked up. Miraculously we found the knob and flash lens which came off the camera, when it dropped yesterday – Ruth’s fault. Another good day and emptied the van somewhat later of all things finished with.
Benefits of where we managed to put the boat:-
Clear of the field entrance
Better access all round
Correct angle to the river & the sun
Potential of peeling the fence back and drive up the van
Room for the Mast, when fitted will go 10-15 feet aft potentially dropped
Where the Marina wanted to stick us:-
Too close to the other Yacht
Incorrect angle to the sun
Blocking entrance to the field
Because of weather, not been able to do much since January 2000, apart from keep the rent paid up. We’d had plenty to keep us occupied in the home and garden. Also we’d been awaiting proper electric and water being setup in the compound by the Marina, but their plans kept changing all the time.
08/04/01
Spent good few hours just going over the boat. Mopped up water which had settled on deck. Swilled and cleaned the cockpit area plus down in the bilges. Washed the steps quickly. Dashed off to buy Dirt-Blaster attachment for the pressure washer. Plan on giving the boat a real good clean down – as we now had access to a water tap, albeit around the back of the slip way – we needed a mile of hose but at least it was water available.
13/04/01
Good Friday. Visited the boat armed with pressure washer and all the gear to clean down the boat thoroughly. We need to tackle the deck completely now. We have received samples of Flexi-teek. Power and water were a real palaver to setup. We had been promised an electric pod and water access in the compound, but nothing at all was materialising. We had to be careful plugging into water – to ensure no-one using the tap already. We’d arrived about 11:00am, and it was 18:00pm when we left. Some parts of timber on the boat will need attention to prevent things getting worse, and try protect better from the weather where possible. There are soft areas especially in the covering board. It will all need re-routering and this time we have no staging !. All jobs we’d thought of doing all revolved back to cleaning her down thoroughly. Going to try burgess woodsealer/ or epoxy again to seal the wood until we are ready. Lots of wood fibres have come away esp on the deck plywood. We will need another 6mm ply down before the 5mm flexi teek to make up the original 13mm thickness teak which has been originally planned, but the covering board will need planing down somewhat to get back to good wood.
14/04/01
Visit to fit mast step bolts utilising rubber grommets drilled out to hopefully create a water tight seal. Water was managing to seep down the bolts and staining the plywood etc inside the boat. Sanded down and cleared the groove on the bridge deck both sides of the companionway and squeezed in some balcotan expanding glue. Also the ply edge of the bridge deck/cockpit well side was sanded down and some glue squeezed in. Water had been finding a way in here, through the driving rain.
16/04/01
Visit to the boat to further clean down with Oxiclean – a newly found product with astonishing results, and also we were to wash again in the bilges. This done then set to cleaning the cockpit well area i.e the plywood sole. Looked real bad in places so spent time chopping out the bad areas back to good wood, with a view to filling the voids with epoxy to level it back up. The bedding of sikaflex alone, had not kept all the water out.
17/04/01
Lance spent all day drying the cockpit well area, sanding down & hoovering out – the hot air gun was used to dry the timber. Ruth acetoned the perimeter framework of the cockpit sole teak. Lance had fitted and drilled screw holes in this perimeter teak. Epoxy gear was setup and by evening Lance had epoxied in place the whole of the cockpit sole ply, plus levelled up with epoxy the areas chopped out, then epoxied and screwed into place the perimeter teak. By17:00pm cleaned and tidied up the van, and the tools etc to remove traces of epoxy etc, and clean brushes and pots. Then called it a day.
18/04/01
Visited the boat around 19:00pm. Had to route around to get power. None available on the normal socket. Cleaned out remaining epoxy from the grooves in the cockpit sole teak framing, which were to be sikaflex’d. Hoovered all out, then epoxied in 20 teak dowel plugs in screwholes, then epoxied the cockpit sides plywood to protect from the weather. Not easy to do in such a confined space. Had had snow just earlier on, and needed to use the hot air gun to dry out the teak from the snow. Left about 21:00pm. My was the acetone cold when washing hands with gloves on!. So far been lucky with rain keeping off somewhat. We’re getting along well at moment. Steps badly need attention now though – they’ve weathered badly, but then they were never built to be outside for so long.
20/04/01
Lots of phone calls all round reference compressors, nailer/stapler's, flexiteek etc and how would we tackle the deck area, lots of pattern making and could we assemble a deck pattern down the side of the house to make up the flexiteek deck. Headaches all round !.
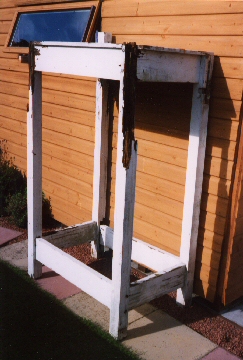
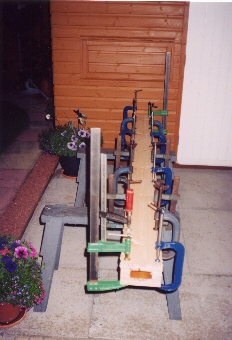
May 2001-Dec 2001
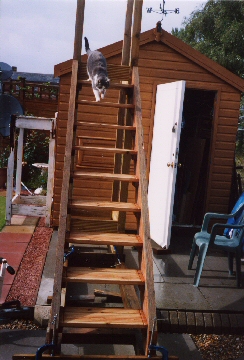
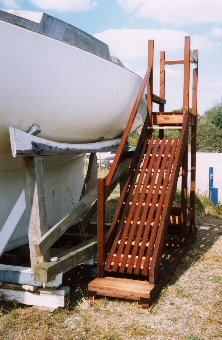
We have a gap in the notes here. We did not get anything else done on the boat , but what did we do that summer. We visited the boat each month, but if it was not the weather, it was cars and people in the way, and it was all very de-motivating. The next decision was the steps. They needed replacing now. They had served us well, but having been built originally for internal use, they had well past their date. We dismantled them and returned to the back garden, we set to constructing a complete new set of steps – utilising the fence post base which the old steps sat on. Used pressure treated timber building joists, plus timber decking, and once we’d figured out how to make the steps section, we were well away. Gave the neighbours something to think about, stairs aloft, the top step nearing the level of the garden workshop apex top. We took time to do the job well, and construct a set of steps which would last many, many years. The new van had already come in handy as a work horse, shifting timber and then transporting the completed sections down to the boat. It had all been constructed with a view to transporting it within the van. Once erected and in place, they looked real splendid, and were a pleasure to climb. The original step racking ( to prevent intruders climbing up in our absence) was very easily adapted to fit the new steps. This done then could concentrate better on the boat. By now though 2002 has just about passed.
 |
 |
 |
| Original Steps platform ! | New Steps getting approval from the Ships Cat ! | Side view of completed new Steps |
 |
||
| New Steps in place at the Boat |
22/04/03
Not much can be done on the boat over the winter season – too cold, damp and short days. Earlier in the year we had read up further about Burgess Woodsealer and products, and ordered one of each type, with a large container of the woodsealer itself. It could save the day for us. Water based it provides a waterproof membrane whilst allowing the wood to breath. It seals, coats and UV protects bare wood. Given all the epoxy was now gone from the exposed woodwork, on the top sides, decided it would be ideal stuff to seal, protect and give a near finished look to the wood. When we visited, armed with all cleaning gear, the wood was dry, no need for oxiclean or fungicidal wash. Gave forward cabin front a good sanding, and painted with woodsealer. Sanded main cabin front, and painted on woodsealer. About 3 coats, seemed adequate. The main cabin front was badly cracked, so Lance spent time with the cracksealer, filling cracks. Also sanded and painted the forward cabin sides.
23/04/03
Sanded both main cabin sides and painted with woodsealer. Again 3 coats done all round. Combination of palm sanding and hand sanding done. In the cockpit sole, the plugs were planed down level. A start was made on the starboard side of the bridge deck corner, where it meets, cockpit sides, cleaning out the old epoxy in the deck joints, ready to refill with epoxy. The woodsealer is really bringing life back to the wood on deck. The plan is to sand down all the exposed wood, and coat with woodsealer. We wish we had had the stuff available before we had to move the boat outside. The benefits of the Internet today for research.
24/04/03
Rain today. At home sorted all the timber in the workshop to uncover all plywood pieces, teak, mahogany etc and reassess what we actually have.
25/04/03
Rain forecast, so decided to visit and remove main hatch to work on, and cover amidships with a tarpaulin. Whilst there a cardboard pattern made of starboard inner cockpit corner ( where cockpit sides meets the main cabin sides). Needs completing as water had been penetrating through to the cabin via this unfinished joint. At home pressure washed the main hatch, and side pieces after unscrewing the side pieces and the stainless steel runners. Oxiclean was used as well before the final pressure wash. Hatch was then put into the lounge to dry out, perched on four nail pads, too allow air to circulate all around. Further sift through the workshop was needed as there was another piece of timber, which had been cut and tooled up to be fitted at the aft end of the underside of the hatch, to facilitate opening and closing from inside cabin, and to butt up to the drop board when the hatch closed.
26/04/03
Forecast rain threatening again, but it stayed dry, overcast and sunny, so we set to sanding by orbital and hand the main cabin hatch. Once sanded and hoovered satisfactorily then coated the underside with two coats of woodsealer, and the top lats with two coats, with the sides and upper frame having three coats in the end. The main hatch wood was being resurrected, and it was exciting to see its true colours again. Then sanded down all the outer edging stips of Iroko. The coated these with woodsealer also. These were then affixed to the now dry hatch, with screws and sikaflex. Nearly forgot we had taken the stainless steel runners off the hatch as well. These were cleaned down, and refitted on sikaflex. The four nail pads came in handy again keeping the hatch up from the plastic mat on the floor, until the sikaflex had gone off. Dug out sufficient Iroko plugs for all sides of the main hatch. Made a start on cutting first piece of plywood for the starboard cockpit corner section, which needs finishing. Used the ‘old’ marine plywood sheet – about ¾” thick, I think it is.
 |
||
| The Starboard Cockpit corner, seen in this photograph, has had several pieces of ply cut to shape and fixed in place. |
27/04/03
Epoxied in place the 33 plugs into both sides and aft pieces of Iroko edging strip of main hatch. It is surprising how large the main hatch actually is when is it in the living room, and it is quite substantial in weight.
28/04/03-30/04/03
Planded down (after cutting off the excess with the pull saw) all the plugs on all four sides of the main hatch. Cut down and sanded the excess sikaflex and prepared the pieces for painting with woodsealer. Being outside makes it more awkward for taking lots of photographs. Concentration is on getting the job done, before it goes dark, or it rains etc.
03/05/03
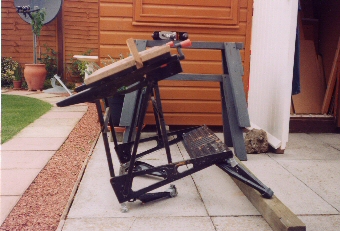
Visted boat am and to keep the rent paid up. Checked out and fitted starboard cockpit corner piece made up last weekend. Needed a touch planing and final cutting top and bottom and it fitted a treat. Cannot see how snug it fits on the portside edge as the cabin side lats obscure the view. Tried to obtain the angles for the 2nd piece of ply here, but working area too small for the bevel. Ideally need a miniature one. Ruth sanded down the Iroko main hatch runners, whilst the hatch was off, and the outer edges cleaned up. They are now ready for a coat of woodsealer. After cup of coffee, took some further measurements for next cockpit corner ply piece, and packed up for home midday. Weather overcast and temperature quite nippy. In the evening cut up the 2nd piece of cockpit corner plywood. Lance devised a novel way of planing an angle along the edge of wood. Drop the back two lower legs of the workmate, and prop the forward two up on a plank of 3” x 3”. Planing is now more or less on a level plane. Ingenious and practical solution.
 |
||
| The ingenious idea ! |
04/05/03
Today worked from 11:00am to 18:00pm. Fair day forecast, so we’d made prompt start to shape and fit into place the 2nd piece of ply for the cockpit corner starboard. Whilst Lance doing this, Ruth sanded down portside cockpit sides (inner and outer) and when Lance tooling the plywood on the workmate, Ruth sanded down the starboard cockpit corner area – ready for epoxying soon. Two other small motor cruisers in the compound with us now. Once couple doing some painting, so lucky we have dust collection box on the Palm sander. Fitting the 2nd piece of cockpit corner ply starboard was not easy because of the main cabin side lats already in place. By about 16:00pm ready for epoxying. Approx 7 squirts of epoxy in all. First two made a basic mix which was painted on all areas to be glued. 2nd, 3rd and final mix of two added some microfibres. 1st piece of ply had two screws in it, 2nd piece of ply had three screws in it. Whilst epoxying – filled also the foot of the corner piece on the cockpit deck ply, which had been dug out previously ready for epoxying. As there is often some surplus epoxy when working with it, we always try to have ready, small areas into which this surplus epoxy can be put. Concentrating on filling up level this area, because rain was leaking in around here. Completed sanding portside cockpit sides, and gave 3 coats of woodsealer. Back home gave the main hatch edges a couple coats of woodsealer.
05/05/03
Bank Holiday Monday today. Because where the boat is, right at the entranceway to the Marina, we were the first people which people saw when visiting. Four people today asked us for directions to tourist spots !!. We took electric meter reading. Worked another day 11:00am through to 20:00pm. Non stop apart from cups of tea. However before we went to boat, we had decided to sand down the drop boards, at the boat, and paint also with woodsealer. Took with us old marine ply offcuts to continue work on the starboard cockpit corner. Also dug out the belt sander. Reassessed the main cabin hatch, as maybe it is ready to be re-fitted later. Down at the boat, Ruth set to sanding further the starboard and aft cockpit sides, inside and out, whilst Lance set to cutting the next piece of 1” old plywood for the starboard cockpit corner. Chisselled out the expanding glue in the joints. In the end cut out also the lower batton starboard end. This piece of batton goes port to starboard over the bridgedeck, and the main companionway frame sits on it on the exterior. Not happy now with this piece anyway. Had to cut back a few millimeter, the main cabin side timber protruding into the cockpit area, to be flush with the two pieces of plywood now fitted into the starboard cockpit corner area yesterday. This took some doing with the palmsander, block plane, spoke shave, and pullsaw. Whilst using the plane Lance had to ask Ruth to stop with the sander. Lance could not hear whether he was cutting with the plane or not !. Skills of the trade. Took up the starboard and after locker hatches, so the sides and back of cockpit could be sanded better at the bottom edge. By evening ready to paint three coats woodsealer on cockpit back and starboard cockpit side – inside and out. Just completed all and tidied up before dusk set in. (made up the next piece of ply to fit on the inner side of the cockpit corner starboard – not time to screw and fix into place.)
06/05/03
17:30pm to 21:30pm. Packed offcuts of 12mm plywood and main hatch into the van. Visited the boat after Ruth finished work. Set-up shop to fit the hatch back into place. It seemed to run smoother since its big cleanup. Then set to sanding down the cockpit corner area where the plywood pieces are to go. Sanded down, after it had been prepared for screwing, the next piece of inner plywood (1”) for the cockpit inner corner. Screwed in place then cut the next piece of 12mm ply, prepared for screwing then sanded it. Just managed to epoxy in place these two pieces with 2 + 1(+filler) + 2 squirts of epoxy resin. (1½” x 10 3 of A4) + (1” x 8 3 of A4) screws used. Things going well. Started sanding port main cabin in cockpit area.
09/05/03
5pm to 8:30pm. After buying a 12” steel rule visited the boat & set-up shop. Lance set to cutting further pieces for starboard cockpit corner area. Ruth continued sanding portside of main cabin in cockpit area. Had to bring with us an extension lead so power could be accessed below on the workmate and on deck. Lots of people stop to say she looks nice and looking good, and bearing in mind, that all these people can actually see is the hull, and a little wood of the topsides from down below. What they see also is only in the cosmetic painting. We need to make sure she is safe and structurally sound. Painting areas is to keep the appearance looking as if something is happening, whilst we are beavering away on tasks that people will never see. Three additional pieces cut and screwed in place, in the cockpit corner. Cold wind tonight – decided to leave epoxy work until tomorrow, Saturday.
10/05/03
Rain stopped play. Visited the boat twice when thought all clear and both times it started raining !. Decided we ought to have a barometer, but could not get one locally. Both of us felt real down today. Difficult to focus on anything else, now we have the momentum of going to do work on the boat.
11/05/03
Forecast better today. Enthusiastic we set-off at 9:00am for a good start. Lance set to cutting the final three pieces of plywood for the cockpit starboard corner area, whilst Ruth sanded the forward hatch frame. Had to bring with us some mahogany for the final piece to complete the cockpit corner. This done, then completed the chopping out of the starboard bridge deck and edging up against the main cabin. Then Ruth set to sanding of all the corner bits of plywood cross-grain ready for epoxying, whilst Lance painted the forward hatch frame with woodsealer. Then Lance chopped out the portside bridge deck and edging up against the main cabin, then Ruth sanded the area. Then got all set up for Epoxying. Used 8 of s/s 8 x 1” screws, plus 1 of s/s 8 x 1½“. We got the 2nd of the eight pieces of ply in place with epoxy, when, blow us, clouds really came over, and it spitted with rain. Determined to complete this corner we carried on, putting some tools away out of the rain, well most of them. 20 minutes later Lance had just completed the starboard corner piece when it threw it down. Frantically grabbed rest of tools and epoxy stuff, and shut hatch, and covered the boat with the tarpaulin, which was at the ready of course. Just in time. All we needed was another ½ hour, and we could have been finished with a coat of epoxy on the portside inner cockpit corner which had been sanded in preparation. Worked 9:00 to 17:00.
June 2003.
Problems getting power – as only one socket available. Visited to sand down port and starboard bridge deck corners, and coat with epoxy. Lance investigating the mast step decided best idea was to remove it to treat it etc. no sooner said than it was done, and luckily it came away in one piece, and just took the top laminate of plywood with it. Belt sanded down the exposed deck and plugged the bolt holes(where the bolts go) with 10mm softwood dowels, for ease of removal later. Was not until we got home – realised we would now need a water level when we come to fix the mast step back down. Obtained a professional water level during the week, and Lance had fun trying to fill 30m of pipe with distilled water and food colouring. Spent hours chiselling off the old epoxy from the underside of the mast step. Oxi-cleaned it then further pressure washing before leaving it to dry. Once dry lots and lots of sanding, then re-routered the top edges. Put two coats of wood sealer onto the wood, the filled the cracks with woodsealer, then once gone off, chisiled off the excess cracksealer, then gave a further good sand, before coating with woodsealer followed by top gloss. Realised though once we put the base plate of the tabernacle on the mast step, a touch more sanding was needed to make it 100% flat, for seating the tabernacle on . Assembled the tabernacle plus the mast-stump. Lance then made wooden guides with 10mm dowels in to seat into the tabernacle base holes, and the guides were cut out such that the tabernacle sides seated in, for alignment prior to welding. Visited a local Stainless steel engineers, who seemed very helpful, and pleasant. One chap had a motorboat, and he could relate to what the tabernacle actually was. We decided to give them the welding job. Thursday it was.
30/06/03
On Monday had phone call that after welding, the ‘cut’ seams had expanded as expected, but not contacted as much as expected, and thus would not fit into the wooden guide pieces Lance had made up. The corners of the flares met the edge of the base. This should make the sides stronger still. The rest of the week went by, tensions building as we waiting the call to say the tabernacle done. Was it going ok, any mishaps. By Friday we called and it was late pm before Lance got to speak to the chap, who said it was ready, could collect Monday. Ruth on leave Friday evening now for 2 weeks. Sunday visited a Boat Jumble. Lots of stalls, several roller boom fittings found, but all too small for our boom to be. Should we though go for a aluminium mast and boom etc. That way all fittings would be ready placed and setup. We are thinking about it. Overwhelmed by goods on offer at Boat Jumble, and what we lacked was knowledge of the prices in chandlerys etc. Lance managed very well three hours at the boat jumble, with a stop for beef-burger and Tea half-way. Afterwards visited chandlery in the area, and took a quick walk around the boat-yard. Stayed that night for beers and eats. We both enjoyed it – long time since been to coastal marina on the evening. Pleasant.
07/07/03
Had to make a journey to pick up a drum of Acetone. Then visited a costal chandlery. Spotted some hatches – plastic but flat ? Would these do for the cockpit area hatches ?. Noted the details to investigate further if they can withstand being stood on. Visted another Chandlery, then onto Wessex Resins stockist. Found they had not so much stock now – no 1½“ brushes, no masks with filters. Did get some woven matting though. Left and set off back to collect the tabernacle. What a pleasant surprise we had. The tabernacle looked really, really good, and it stood in the corner of the workshop, and further inspected revealed a very well done job. We left £264 poorer, and looking later we had paid £262 for the pieces of stainless steel in the first place. Getting on for 17:00pm now. Home bound we went, tired, hungry and thirsty for cup of tea, feeling like we had had a good break and been and done quite a bit – complemented by now having had the tabernacle welded up, and looking good. The total length of weld (1 run) was 3m55cm (10’ ¼“).
08/07/03
Ruth has these two weeks of work. Neighbours are out, so set to planing down the mock mast a couple of mm. After welding the tabernacle plates had sprung in a mm and the wood mast piece needed a small amount of planing. Half-expected this to happen. Pleased it was just only this small amount. The only slight snag was the small amount of contraction in the base plate. The bolt holes into the mast-step – only three of the now lined up 100%. For the others, the plate was out by 1mm. Had to ream out the plate holes, and drill out at 1mm larger to overcome this. Could not re-drill the wood for the four mid-ships holes as drill could not be got in straight now the tabernacle welded together. Today found some softwood timber to make a 7’ temporary mast. This then could double up with a light on the top, and also allow a temporary boom to be erected to allow covers to be draped over.
09/07/03
Neighbours out again, so set the lounge up for planing down the six lengths of 2.5m softwood, purchased yesterday. Then set to gluing them. Before doing so though, Lance had thought on making the bottom 28” solid, but thereafter do away with one piece, and cut one into four. Two battens each side would make a hollow centre section. Then where the base solid section starts, cut out a 45degree angled hole from centre to outside. This will accommodate any cable we wished to put up the short mast. Both bench saw, and radial arm saw utilised today. Using Balcotan Rapid glue and all the clamps we had, set about gluing the pieces together two at a time – 10 minutes working time, and about 20 minutes curing time. Good stuff, Balcotan, for getting jobs done quickly. By 10:00pm we had got final piece glued in place. After glue cured – all clamps removed and the short mast brought into the lounge and cleaned up.
 |
 |
|
| The making of the short Mast length | ||
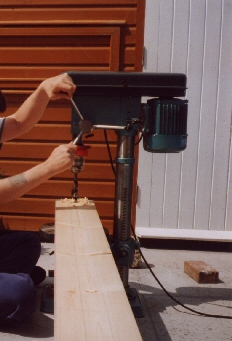
10/07/03
Weather could not be better at the moment. Fine, dry, sunny with a bit of a breeze. Again neighbours out, so set up the lounge to plane and thickness the now made up temporary mast. 87½“ (2m 225mm) long it is. Quite a bit of weight in timber. Spruce and Douglas Fir is used for making real masts i.e. it is much lighter, but strong wood. By mid-day this done, and them marked both ends of temporary mast, the lower edge angled i.e. the mast heel, the enable it to be self-lowering, and the top cut flat and square. Had to use pull-saw for these. Next to drill the bolt holes. Our only option was to get out the Pillar Drill from the workshop and setup outside. Had to drill 20mm holes halfway, one side then turn over and drill same in from the other side. The contemplating how to round the four corners best. How should a wooden mast (stepped) be made anyway where base is square/rectangle, then it tapers to round ?. No pictures or information either in books or magazines. We downed two bottled of wine tonight, and still talking about jobs on the boat, needed to note in the diary, to ask the mast maker where to put the ‘traditional’ good luck coin which goes under the mast ? Decided to draw the mast profile onto the end of the timber, then utilised the bench saw to take 45degree off each of the four corners, to cut down on the amount of planing needed to meet the profile. Only just managed it with the bench saw in the doorway of the workshop, to give the clearance behind the bench saw. Then cleared up and setup the temporary mast in the tabernacle with an inch to spare to the lounge ceiling. A good day we had had, and although I wrote this after we’d had the wine, it was a reflection on what we’d done earlier today.
 |
 |
|
| The making of the short Mast length | ||
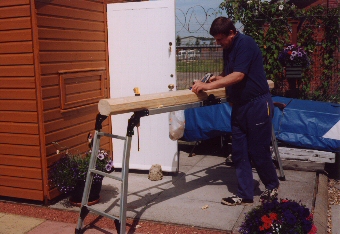
11/07/03
Lance had idea of using a piece of guttering the size of the mast circle diameter, and about a foot or so long, attach a handle on top, and using self-adhesive sandpaper stuck on the underside. Visited the builder merchant for off-cut of guttering. Found some although shortest length was 2m !. Decided to get it, it cost about £5. Back home the idea materialised very well. Made it long enough to fit four pieces of this adhesive sand paper on the underside (81mm side paper). Offcut of 2”x1” made the handle, attached by plaster board screws, sunken in. Lovely job. Further planing needed first, for the mast side. Lance setup the ladders, like a large tressle, with the mast across it. The four quick release clamps bought at the builders merchants this morning, came in handy right away, and very very useful. Wonderful weather – no rain for a week now. Finished planing about 22:00pm and Ruth picked up all the shavings in the garden!.
12/07/03
Spent the day sanding down the temporary mast – using the new guttering sander. It took time, but it was worth it to get the best possible finish. The idea was that this short mast piece, would allow us to make up the boom and attach with the proper fitting to this mast piece, to allow if needed a tarpaulin to go across the boom, and cover the boat mid-shops etc, or even to put a light on top of the mast for working on the deck etc. We also now have a very good idea and feeling for what is involved in making a wooden mast. It surprised us both though, once sanding completed, and brushed down, then routered the bottom edges to round them off, that the mast fitted in the tabernacle on the mast-step with an inch to spare from the lounge ceiling. It will be in the lounge for some time now, whilst varnishing is done, and the rest of the fittings to the tabernacle worked on, before the tabernacle is electro polished. Need to reseat and fix the mast-step back on the boat as soon as possible, as it is bare wood where we sanded it, and for this we bought the water level to ensure that the tabernacle and mast when seated on it are perfectly level all around. 1mm out at the bottom of the mast, will be something like 33mm at the top. !!
13/07/03
Visited another boat jumble. Spent 2½ hours looking around. Not as big as expected. Picked up signalling cone and ball, and two mast-eye type hooks with curved plate. Needing to devise a method of attaching the aluminium mast off cut we have found, which is over 3m, to make this a temporary boom. This will enable us to put sheets over the boat better, and keep the sheet off the woodwork. £1 off voucher used to day and and bought a classic boat magazine. In it was advert for a well known mast makers. Still 50-50 contemplating wooden or aluminium. Did some searching on the Internet for this mast makers web site, plus other aluminium mast sites. Also at the boat jumble - picked up a stainless steel 10” cleat. The idea is to seat this on the forward of the mast step – so it can be used for tying to, and also in event the hatch opens up beyond its limits, then the eye-bolt forward of the mast-step will not go through the glass, but rather the brass bars will hit the cleat first.
14/07/03
Hottest day of the year so far. Too hot to do much in the garden as it is a sun trap. The short piece of mast was put on the tressles down the side passage in the shade, and sanded down and them varnished 50/50 Epifane and Turps. Moved it into the Sun to dry off. Then sanded and 2nd coat varnish - adding more varnish to the existing mixture. By evening still not dry enough to sand. Made space in the workshop, and supported it to dry thoroughly.
15/07/03
Decided to visit a stockist to further enquire about flexiteek, with a view to ordering what was needed. Pleasant surprise that the jointing system has been amended again and for the better. Went with the van prepared to stay overnight somewhere. Had to buy a local Map book, and we seemed to be going all round the globe, once into the town, with the one way systems. Found the place, and parking was 30 mins only etc. However we were assured Traffic Warden, as and when they appear will just ask us to move on. Deliveries are happing all the time on the front. Discussed what was available, shelf-life's, how to, costs etc. Pleasant surprise no 2 was that the price had some down since 2001. Opted for 10 rolls ( 3 sizes), plank-plank adhesive, caulking sealant, spatula’s. Unfortunately no stock of any rolls and estimated carriage charge would be £50. Thinking about re-visiting ourselves to collect. Must have been in the shop about 1½ hours. Left our order and contact details, and visited local Chandlery, just up the road. Looking through the books, Ruth picked one up, and opened it right on a page on how to correctly lay a teak deck. Wow just what we needed. Lance had only been asking the other day had we a book detailing how to lay a teak deck – and we didn’t. What is very noticeable visiting various chandleries, is the varying prices for the same thing, especially glues and epoxies. By now nearing 5’o’clock. Too soon to go home. Decided as we had passed the sign for it, visited the Quay. It turned out to be where we had visited a timber stockists couple of years ago. Visited the chandlery, asking about placed for fittings like goosenecks. Chap mentioned a person, in a small workshop opposite, he may be able to help, or know who. Trundled over to garage looking workshops. They can make up fittings from patterns, but there as not photographs of examples of work done. Drove around the marina, and visited the Yacht Club Bar. Had a pleasant couple of beers, sat outside, overlooking the marina and estuary, coupled with lots of packets of scratchings. We had not had any for years it seemed. This rounded off the day nicely. Got home about 20:00pm.
16/07/03
Forecast rain today. Do need some, but just during the night. Headache this morning working out how we would achieve a traditional looking teak deck using flexiteek. The design was such that it was not catering for snaping in pieces. The pictures the brochure showed were in fact not the correct way of decking. We want ours to be done correctly. The stockist did give us some small off-cuts of the planking to take with us, to study. We both feel confident flexiteek will be the best choice for us. Do we start from the covering board or the cabin side ?. Which way round does the planking go, caulking seam on which side ?. Several ideas discussed, and more options looked into. Still undecided about wood or aluminium mast. Lance put two lighters in his clenched hands, and asked Ruth to pick one. After three goes, Ruth kept picking the lighter for Aluminium. Ruth did same for Lance, and two out of three goes came out with the lighter for Aluminium. Our faces said it all, disappointment when we did not select wood for the mast. Wooden mast its going to be.
17/07/03
Heavy rain persisted, could not give the temporary mast any more coats of varnish. Re-assed how much flexiteek we had ordered and realising we’d ordered probably just enough for the deck itself, decided to order another two rolls, to work on the coach roof, and possibly the cockpit area. This would be middle of the following week to arrive at the stockist. Planned for week Monday 28th July to visit, pay for and collect the flexiteek. Meanwhile phoned Adhesive manufacturer to confirm that their polyester resin would stick to epoxy, which is what we are about to use, to seal and level up in places the deck plywood as it is. Although they had not tested the particular application, they could see no reason why it would not, and for our own satisfaction recommended doing a test sample first. This is now coming up to the end of Ruths fortnight holiday. Contemplated further how and where we were going to make up the flexiteek deck. Measured the Garden and we would be able to get a 30’ length down the side of the house, doing half the deck lengthways at a time, providing – and there is a catch – we need to demolish the two old small sheds down the side passage and replace with a new one at the bottom of the garden. Decisions thought over and we went for it. By Sunday 20th, we’d visited a shed manufacture, and ordered a shed of our liking, and a few changes. This would take a fortnight to make. We shifted all stuff out of the two existing small sheds, having a good clearout at the same time of old timber, fence panels. Before long there was a growing pile on the front driveway of rubble, timber and soil all neatly piled as well. All shed timbers were cut down a manageable lengths of 3-4ft (x 3-4ft for panels).
28/07/03
Last four weeks or so have been hectic. Having sorted out the old sheds, then decided to complete the job, by replacing posts and fence panels down the side out to the front, and also the panel adjoining the side gate. A lot of work to prepare the side passage so we could make up the Flexiteek decking from templates. No use trying to do it on board, the weather and lapse of security is against us.
16/08/03
We had just about done, shattered and exhausted and luckily weather had been sunny, hot and dry. Meanwhile the new shed arrived, and this took a few days to prepare the site for it i.e. a slab base, paint the shed panels, assemble it and the sort things out to put in it. At the end of the day it was a excellent job done. There is now more space in the big workshop to move around and use the tools etc. It has all been worthwhile, at expense though, and should allow us now to progress on Emerald.
17/09/03
Having contemplated further whether or not to ply the deck further before laying flexiteek and whether to cut down the covering board, if not plying the deck further, and fit stanchion bases in the cut outs, we decided it would be best to utilise 6mm anchor marine plywood and then lay the flexiteek. This would then give a sure good key for flexiteek, and also get over the problem of after sanding the epoxied plywood, how to fill and level up all the voids and dips etc. Visited marine plywood stockists, having 1st rang to check prices. New offices since our last visit some years ago and more stringent health and safety rules. What we weren’t told on the phone was there was no Kayha 6mm Anchor ply, only Sapelle. Managed to get a look at a sheet of sapelle. After contemplation and asking for good price, decided to get it, with 2 x 12mm sheets of Anchor Khaya ply, and oil tempered hardboard, and a new catalogue. Discovered when we got home, we’d been charged near normal price of Khaya for the Sapelle. Felt we had been done. The Sapelle was a poorer grade than Khaya, and was leftover old stock from when Khaya was short supply over a year ago. We’d had to empty the van to accommodate all the ply, and having by now tidied up the workshop enormously, we now had space in the workshop, to put the plywood. Now things could go back into the van in readiness for further trips down to the boat. In the meantime purchased a Rapesco Nailer/Stapler electric, and was having a headache locating stainless steel staples and nails for it. Was considering using this nailer/stapler for fixing the deck plywood down, along with epoxy.
- - - - - - This is the end of Diary Section 31 - - - - - -
![]()