| Home | |
| Adventures | |
| Specification | |
| Diary | |
| Photo Album | |
| Contact Us | |
| Feedback | |
| Hints & Tips | |
| Polish Words | |
| Web links | |
| Problem | |
| Polish Yachts | |


Repair Cradle, Prepare to Move & Tabernacle in the making 1999
5/4/98
Work done on the cockpit floor hatch. Used the mitre saw to mitre the frame joints, then with the pillar drill drilled and countersunk the holes for screws and plugs. 17of 1” x size 8 stainless steel slot screws used.
 |
 |
|
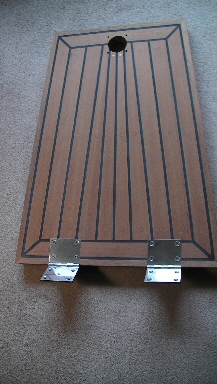
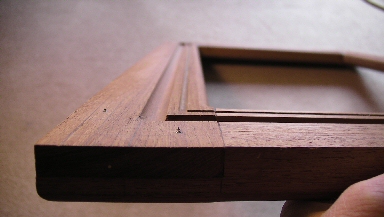
| Cockpit Hatch underside (Plywood) | Cockpit Hatch - topside (Teak frame and Teak Lats, with Sikaflex seams) |
6/4/98
Made up some epoxy and glued up the frame to the plywood of the cockpit floor hatch.
7/4/98
Made up some epoxy and glued into place the mahogany plugs into the frame of the cockpit floor hatch.
Easter Weekend 1998
Planed down and sanded down the hatch once epoxy on plugs gone off. As a trial the hatch was painted with cuprinol 5 star (preserver ). Of the engine we had taken photographs with the camcorder and transferred them into the PC, and printed them out. They were lots of photos of the engine components which we had recently had apart. Putting these into the workshop manual we have for the engine, for future reference. Sanded down the bracket for fuel filter and bosun cable fitting and painted it with thinned down black hammerite paint. Touched up various places of the engine with the spare perkins blue paint. It thinned nicely with white spirit. Had a hammerrite texture when stirred. Sanded down also the engine mount brackets and the additional spacers made, and painted these to to match the mounts. Then coated the anealing/galvanising plating on the engine feet with black hammerite paint. List of requirements knocked up for the engine. Also setup a project board, and pieces of paper representing parts of the project with details of requirements and jobs to enable progress. When working to a budget need to constantly review the situation and the further down the line projects get, there is more that can be done.
18/4/98
Ruth made a list of Chandlerys, Engine Dealers, Timber places, Stainless Steel stockist, Rubber stockist etc all in a 60 mile area. Decided to visit this Saturday to investigate. Found signposts for 'Quay', down residential streets, strikingly noticeable nearly all the neighbours got a small day boat in the front garden. We’re on the right road !. Keeping up with Capt Jones !. The Quay marina was a sight. Nothing but boats of course. Followed the sign for the main carpark, but ended up finding one spot in a dead end area. Dead end because of the way boats and cars were parked. Looked around and as luck would have it, we had parked up at totally the opposite end to where the businesses were. The engineers were by now closed. The timber place was open and we were welcome to browse. Lots and lots of Marine ply off-cuts and sheets. Lots of off-cuts of mahogany, Iroko, Teak all sizes and shapes with prices marked on. Decided best for us, because of the lengths we need, to rummage around the teak lumber. Found 5 pieces in the end with which we should be able to complete the cockpit flooring and the hatch. Also picked up a piece of marine plywood to make a temporary main hatch out of. All this came to Ł169, gulp!. No sign of discounts on bulk or anything. Teak for decking would work out at Ł1.60 per foot for 4” x2” lumber. Lance not too well by now, so Ruth dug out the van, and brought it around to the timber yard to load up. Then visited the chandlery. They had balcotan & Sikaflex 221, and also some s/steel m10 x25mm bolts, and spring washers(10) = Ł43 in total. Time was now 16:30pm so decided done for today, and parked up near the clubhouse to sit watching the boats and eat our chicken sandwiches and drink pop. Then drove around the port and headed home. It had been well worth the visit today.
19/04/98
Made space, measured and recorded sizes of teak lumber then put it into the shed. Brought in the planer out of the shed, and the dust extractor. If only all that mahogany we have in the shed had been teak !. Anyway stop dreaming.
20/04/98
Lance made phonecalls about our spare engine parts. Needed to fax through the photo’s of the link arm, which in the end only printed out as shadows therefore had to print it out that evening and post on Tuesday am. Lance had taken more photos of the link arm, for clarity.
21/04/98
Planed down two of the pieces of teak. Cut to size, and the cut at a chamfer, the piece for framing the cockpit sole, outer edges. The circular saw worked just right for slicing at 3” height. The 2nd worked on piece of lumber is for the cockpit hatch latts. Worked out this evening how many pieces of 45mm x 16mm +3mm sawcut, could be achieved and how many were needed to latt the hatch. It was surprising that 75% of this beautiful piece of teak would disappear in just the hatch.
22/04/98
Sliced up the lumber for the latts. Needed 4 latts, but did a 5th anyway because need some of the same, to fit on the cockpit floor around the hatch frame. These were cut to fit within the hatch in a symmetrical fashion. Used the mitre saw to cut the ends off at correct angle. Used 51mm holesaw to start off the hole where the hatch clamp catch will go, forward.
23/04/98
Used plywood clamped on the workmate top to form a jig, up to which to push on with a latt positioned so that a 6mm rebate could be routered along the respective edges to form a caulking groove. The plywood also helped balance the router. Did have a look for some hinges last weekend whilst we were out and about, but there was only pressed plate, which was not strong enough. Did a complete tidy up and hoover up all the wood dust in the lounge, and then got the pillar drill put to drill the holes for the screws. 9.5mm flat bit used. Pillar drill handy because drilling is vertical and depth can be set.
24/04/98
Phone call received regarding engine parts, confirming they had located the link arm we needed, about Ł14+vat. Comes in a complete unit though. They will contact us when all parts have arrived. All the leftover bits of teak were ideal for making plugs with the pillar drill. 50-60 plugs made up. 30 holes drilled out in preparation for the screws, which were s/s 1” x no8 possibly. 4 gripfast used on the narrowest point of the innermost 4 latts. These will be underneath the hatch locking lever. Screws were left in place, just into the latts, to ease fixing once lats coated in epoxy for glueing in place. All the latts, plus plywood on the hatch were degreased, with acetone and left to dry. Then epoxy gear at the ready, set to epoxy the lats in place. Utilised a decorators scraper to spread the epoxy on the ply. Then painted epoxy onto the underside only of the lats, and placed them into position before screwing. Doing it in the lounge, with plastic mats protecting the carpet, the epoxy was going off too fast. Rapid action was needed. Once all latts in place, then screwed them down. We noted for the screws however we would be better off with Pozi heads. It is all too easy for the drill to slip with a slotted screw, and the plug hole area get damaged. More epoxy oused out into the latts seams than expected. Had not coated the latt sides, but sufficient was underneath to come up the seams, then to give it a good wipe down with acetone. Had a rest, and a beer, then mixed more epoxy to glue in the 30 dowel teak plugs. Made a little too much mixture and close to finishing it started to smoke. Quickly completed all the plugs, and rushed the pot to the tap, and filled with cold water. Phew !. excellent progress. Plugs are best done there and then whilst there is epoxy oozing into the holes anyway, which would be a real job trying to clear the holes afterwards.
25/04/98
All the epoxy gone off ok. Lance took of the tops of the plugs, carefully with chisel and hammer. Hoovered up this mess. Handy having the VAX hoover with a dust extraction pipe on designed for the router. We use this on the bench saw as well, extracting sawdust from the hood over the saw. Thoughts were now on how to take down the plugs completely without damaging the surrounding wood, and also the frame is just 1mm proud all around. Ideally need a random orbital sander. But with the cost of the engine parts being needed this week hopefully, Ruth unable to release funds. Engine parts will be Ł100, router bits needed are Ł100, this orbital sander Ł100, lets hope Ruth can get a pay rise with the new job description. In the mean time utilised the pillar drill to cut out completely the 51mm hole on the hatch for the locking device. Took time to do slowly, with bouts of smoke and burning smell, as we were going through teak, plywood and epoxy. Turned down the drill’s belt from D5 to A3. Finally got it cut through all thickness of the wood. Hoovered up and put Pillar Drill back in the shed. For future reference Cockpit Hatch caulking seams = 303˝” total @ 1 ˝ tubes sikaflex works out at 200” per tube sikaflex = 17’
26/04/98
Ruth awoke to find that Lance had been up all night sanding, sanding and sanding the Hatch, by hand. It all needed another good hoover now. It took great care and perseverance to do the sanding, so as not to leave cross-grain marks. The caulking seams where then sanded out to remove the sheen off expoxy in places, then the whole hatch was washed down in Acetone (degreaser). Once this was dry, Lance taped up all the seam edges with masking tape. Then set to caulking the seams with Sikaflex 221. Sikaflex is a task to try clean up, especially if it is black – prevention is better, so used lots of masking tape to tape up along the seam edges, and then caulked up the seams with sikaflex, using a decorators scraper to smooth it out. In the end quite a quantity gets wasted, and it took just over 1 tube of sikaflex to complete it. With the taping up, could have done with tabs on the ends, to facilitate ease of removal, because it was now all gunged up in Sikaflex. Removed all tape and left Sikaflex to cure. Tempted to squirt water over it, as it cures with moisture. It can be sanded in a month once fully cured.
27/04/98
Lance set to planing and cutting up the pieces to make up the cockpit floor hatch framework, 3” x 1”. Then contemplated how to do the corners. Mortice and Tenon, or half Tenon.
28/04/98
Rearranged the lounge furniture, to allow joints to be cut on the bench-saw. The neighbours new job is keeping him away lots, which works in our favour. It suits us as we can make a noise whenever – and you’ve guessed it the bench-saw is in the lounge. Decided to do half-tenons because of the groove to be routered in, to channel water away from the framework.
29/04/98-01/05/98
Cramped and screwed together the cockpit sole hatch frame. Rearranged the lounge again to use the saw to slice off a few mm, off the two long edges of the inner cockpit sole frame.
 |
 |
 |
|
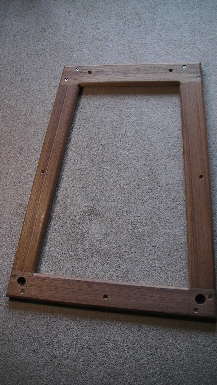
Pieces for frame of the Cockpit Sole Hatch |
Underside of Frame for the Cockpit Sole Hatch | Topside of Frame for the Cockpit Sole Hatch |
02/05/98
Contemplated visiting the boat, but in the end did not, weather not good. In the evening, in the lounge, utilised the round edging router bit to take off the edge of three of the four sides of the frame.
03/05/98
Ruth very anxious to visit the boat to check all over. Its been 4 months since been near the boat. We have had nothing but rain over the weekends. This weekend looking promising. Put a selection of tools in the van, plus the cockpit hatch pieces, and visited the boat about 13:00pm. Nippy wind, but warm in the sun. Cars everywhere. Could not get right up to the boat initially, but so far everyone is pleasant enough down there. Electric is still a problem for us. Going to see if we can get hold of our own metered lead. The boat was ok. Wedges needed knocking in around the cradle, a bit. Will need to clean the hull down soon. The mild recent weather meant all water dried up, but it did look like the cockpit must have been ˝ full of water during recent heavy showers. Tide marks gave the game away. Brushed down the cockpit sole area. Lots of wood fibre dust around from the deck ply. Hatch (Main cabin) is totally weathered. All traces of varnish have disappeared. We had used teak oil on this at one point. (don’t recall mentioning when this was oiled or varnished ?.) Drilled and screwed the hatch inner frame in the cockpit. Meant Lance having to squeeze down the cockpit hatch hole to get underneath with the drill and screwdriver. Once screwed in to place, placed in place the cockpit hatch itself. Looking like it will be a perfect fit, all by measurement !. Measured lengths and angles and cut to fit the cockpit sole outer frame, of teak. Utilised the mitre saw we had. Awkward for four out of eight cuts because the angle was < 45degrees. Had to use the saw out of the mitre frame, as this was the only saw we had with us. Kept going with cups of coffee, and survived the nippy winds. At least it was sheltered within the boat. Measured up whilst there, for making up a temporary hatch, so the main one could be taken away to work on.
04/05/98
Bank Holiday. Rang around a few places to source a sander, router bit, plus record rollers. No-one has Dewalt sander in stock, of the one we wanted, and all said deliveries on Wednesday. Our neighbour went out eventually, so decided we could get some 50mm + 25mm wide teak decking lats out of the two planks of teak we had left. Rotated the saw and planer, and extractor around the lounge, and cut and planed down two lengths of 13mm teak. One length of 50mm, the other 25mm. These are needed to teak deck the cockpit sole itself. Got a box of beers in, to swill down the dust in the evening. We’d been utilising the vax hoover and pipe extension onto the bench saw, saw guard. We tried routering the corners of the cockpit sole frame teak pieces, but because of the slope/incline in the timber, it left the router not balanced at 90degree. In the end needed tenon saw to saw the 6mm caulking groove out. Had not got a decent tenon saw, so dashed off to the local hardware store, before it shut, and got a decent Spear & Jackson 12” tenon saw. This did the job to complete the corner caulking seams.
05/05/98
Tried calling about the engine parts ordered. Had a call back in the afternoon – it should be Thursday they arrive. Cut to approx length the teak decking we’d machined up yesterday, then routered the caulking groove in these, and the cockpit floor outer pieces of teak. Rang up to order an electric meter (for a lead) this afternoon, Ł130 inclusive for meter and 10 metre cable with 2 weeks delivery.
06/05/98
Rang to see if Dewalt Palm Sander in yet. Turned out it had some how got missed off the list ! for ordering. Would be Friday now !. Plans for today now up the shoot. Looked at router catalogues and at the bits which would help achieve the 6mm caulking groove on the main decking lengths, but with a wheel on the bit. Could not find one the right size, with wheel and negative rake. Getting rather cheesed off by now, but in event started to look deeper at how we would/could do the calking seams on the main deck, and meet up with the king plank etc. All the books & magazines we had not one detailed exactly how the measurements and angles worked. Lance set to drawing out a king plank joint, whilst Ruth searched high and low for the pattern we knew we had made of the very foreward peak on the boat deck. Eventually found it in the loft, very safe !. This then gave Lance a good idea to work from re the sizeing of the forepeak. Drew out this plan on A3 paper, and tried all sorts of ways of arranging the seam, to end up with no caulking > 6mm especially at joints, and the angle to be at right angles to the plank, not the king plank. Started off with the Kingplank measureing 3” (80mm) forward and 6” (150mm) 90” approx up to the forward cabin frontage. This meant 8mm increase every 10”. Other things to consider would be the size of the winch etc, but this could be mounted on a pad if need be. By morning Lance had re drawn the kingplank as 100mm forward, to be 170mm aft end. This did look rather more proportionate.
07/05/98
What to do today. Should we go down and hope the Perkins parts did arrive ?. Decided not to, and go Friday after Lance’s Doctors appointment. However about 11:00am that day we had a phonecall to say that the parts had arrived !. That decided the plans for today. Collated paperwork, tape measure, engine parts and shopping list of hopefuls, and tea-making gear, and arrived at about 13:15pm. Turned up, and went through the parts ordered. The only fan belt they had was the next size up, and unfortunately it was too large. Squared up for the gaskets, lever arm, and blanking nuts, and to await a further order of the correct exhaust gaskets, and also a parts manual. Left, and visited the chandlery within the compound. Quick look around, and aghast at the price of Sikaflex.221 is Ł11.50, and 290DC is Ł14.50 ! per tube that is. 290DC is what we would like to try out. Just bought 80grit 5m roll of Alu-Oxide paper, and a male & female CEE electric lead connector. Then visited further chandlerys in the area. Old haunts for us, from the days when we renovated the Captain's old 21’ wooden sloop, in 1992. Not the selection of hinges etc here we had seen long time ago. Everything now comes in packets. They had Vetus muffler, which we had got, confused we were over the waterlocks. 50S is what we saw in the catalogue. 50R was on the shelf only !. left these. No Vetus hose. Other Lloyds approved hose was wrong size. Did find some neoprene hatch seal. So got two 3m x 19mm x 6mm strips. This then left us with 2 ˝ hours until 17:30pm. Decided to try find one last chandlery we knew of. Only packet hinges at the Quay, but then the chap remembered a pair amongst some old stock items – reduced. Chrome plated brass – hefty and strong. Was Ł24 and now Ł13. Asked re box fo Sikaflex. 10% discount was their offer. Ł144 for box (12) 290DC. Whew !. They had no boxes in would need to order – because of the shortish shelf life. Took three tubes of 290 anyway to at least complete the cockpit area. Again they did not stock Vetus exhaust cable (or did I mean hose here ?). Sped off to a Vetus stockist. Had a big shop spree here. The place had only really opened up that day, and was still setting up the shop. There was only a short tape measure, stanley, and pliers when the chap measured and cut a 5m length of hose for us. Came away Ł250 less, but with 5m exhaust hose, waterlock, transom exhaust fitting, and hose connector, and 6 s/steel ‘jubilee’ type clamps. Called in at a Tool Shop, and as luck had it, the Dewalt sander we wanted was right there, and reduced by Ł5+. Decided to go for it, albeit it it was a show item. Time for home now, it was 18:00pm. Felt in the end we had had a good day out, though now penniless and tired. The evening, after Fish & Chips, was spent looking over our goodies picked up today. There was not much lounge carpet visible anyway, none at all now. All items accounted for and the database updated. After a sleep, Lance set to re-assembling the engine governor section with the new link arm, and bits and pieces. Looking at the gasket set, really there were some not in it. If doing a complete overhaul then would need one of every possible gasket. Hopefully we can identify these better once we get the parts manual.
08/05/98
Doctors appointment took care of the morning. After lunch Lance trying out the new Sander. Was needing a coarser sheet than 60 for sikaflex. Ruth rang up s/steel stockist They do s/steel tubes from 5mm OD to 24” pipes. They would send us a brochure. Then rang up Dewalt sander vacuum attachment. Will take three days to come. Rang up then to order CMT round nose router bit, Ordered it then phonecall later to say mistake, not in stock, and would not be now until 20th May – cancelled the order for now !. Ruth popped out to hardware store and got some 40 grit sanding disks. Need to be very careful with these as it really is a rough finish, and very apt to catch the edges of wood. Ideal as a starter sand. Sanded both sides of the cockpit hatch. Then laid out the exhaust pipe and items. The host is actually marked off in 500mm sections, if only the manufacture had made a decent cut at the start of the length. In writing a letter to Sika, asking about wholesale stockists, we decided to revamp the business letter header paper to utilise colour now we had a colour printer. Letter posted Saturday.
09/05/98
Decided to venture out to get some record rollers, and hopefully the router bit. However no router bit which we needed, so just came away with record rollers (pair) and some Balcotan Rapid Glue. Plenty supply of Balcotan there – good knews. Really hot today. Stopped off at hardware store on the way back to get a 45.5 litre bucket type container for use in running the engine i.e. as water in, and exhaust out. Whilst there ordered the router bit – the trend round nose bit with bearing. Should have done this in the first place – no one anywhere stocks anything we want. Same old story all round. Evening warranted a complete tidy up of the lounge – it looked like a bomb had hit is – no carpet to be seen anywhere.
10/05/98
Lance dug out the few places in the sikaflex caulking in the cockpit hatch, where air had been trapped, then filled it up with fresh sikaflex.
11/05/98
Cut an old fan belt to be 15mm longer than the original one, and stitched it up to try it on the engine, and also to use it as guide for finding another one to fit. Lance gave the propellor a good clean over with brasso etc. You can see your reflection in it now.
12/05/98-17/05/98
Catalogue arrived for the s/steel tubes as promised. Dewalt Palm Sander vacuum attachment arrived. Trend bull-nose router bit arrived Wednesday. Then Lance routered the 7mm groove in the cockpit hatch frame as planned. Saturday bought a 800size fan belt – which just does the job on the engine. Could do with one just 5mm longer say. Ordered the trend router bit to seat the weather seal strip around the hatch in the cockpit. Sunday ideas were flowing on pipework to drain cockpit sole and hatch area. 15mm pipe form hatch, 1 ˝ “ pipe from the cockpit drains. Need to map out connectivitiy – may need s/steel tube 15mm & 1 ˝” diameter, and weld the 15mm to it after cutting a hole. Also may be idea to have T junction in pipe, so water can flow port or starboard from either drain hole – depending on how the boat is listing. Saturday Lance made up a jig out of MDF board for cutting out the groove for the two hinges on the cockpit hatch. These hinges are chrome plated brass, and it turns out so is the cockpit hatch locking lever mechanism, on the surface. A Match perfect !. Both hinges and hatch lever were screwed into place. The jig was made out of 6mm MDF then piece of hardboard added to enable the router bearing to follow the MDF jig, whilst only cutting required depth with the router
18/05/98
Ordered 12 piece forstener bit set. The 15mm one is to bore the hole in the cockpit hatch frame to seat in the drainage piping.
20/05/98
Perkins parts catalogue, plus exhaust gaskets arrived, and also the trend router seal router bit arrived. It is almost Ł50 a time whatever we buy. Things are rocketing in price all round, just wish salaries would do the same.
21/05/98
Forstener bit set arrived. Lance painted up, after fitting the new exhaust gasket, the exhaust spacer plus surrounding fittings etc. Painting has been done with the perkins touch up paint we have. In the evening made the 15mm two drainage holes in the cockpit hatch frame. 2 holes partway through were completed.
22/05/98
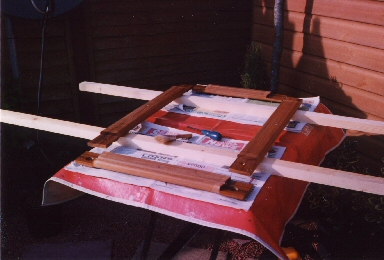
Lance routered out the underside of the cockpit hatch itself, to accommodate the 19mm x 6mm hatch seal strip. Photo of this is at top of this page.
23/05/98
Plans of cockpit drainage arrangement drawn up. Only one place so far stocks bronze fittings. Made a list of 7 items (including sikaflex 290 DC primer) @ Ł78.17. Wow !. problem is that the only one place, we've found so far, seemed to do bronze fittings. Drilled pilot holes right through centre of 15mm drain holes.
24/05/98
The frame for the cockpit could not be glued together until the 15mm drain holes completed, because need to establish how deep the hole needs to be made on the underside to seat in the 90 degree elbows. Then as part of the cockpit hatch sealing plan, planed up a off-cut of teak to be 4 ˝ mm. This is the minimum the planer will do. Then the piece had two 7mm wide slices cut off with the table saw. Needed great care the pieces being so narrow. Used the rollers for the first time today with the saw (I think we must have been practising here with off-cuts of wood). Routered then a groove in the cockpit hatch frame in which to seat the thin strip of teak so it stands proud just 3mm enough hopefully to create the seal, against the hatch seal on the underside of the cockpit hatch.
 |
 |
|
|
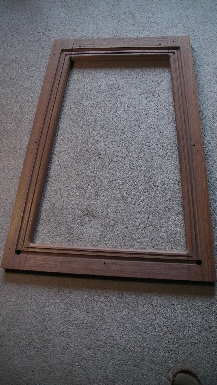
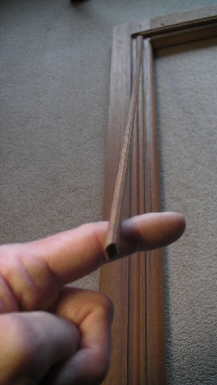
Close up of frame of the Cockpit Sole Hatch. Large rounded groove is for drainage. Narrow groove is for narrow strips (see next photo) which will stand proud 3mm, to seat against the rubber seal on the hatch itself, to form watertight seal hopefully. |
25/05/98
Bank Holiday weather drab, which is no help at all when the boat it outside. Further mapping out of the cockpit drainage fittings.
26/05/98
Metered lead arrived, and Lance fitted the power source connector plug on one end, and the 4 gang socket on the other. Meter reading 00000.5
27/05/98
Ordered the sikaflex primer and bronze fittings. Beans on toast from now on. Lance during the day wanted to stick the hatch frame together, but cannot until we have got the bronze fittings to see how long the threaded section is. Frustrating working out the job, then just as frustrating waiting to get hold of tools and materials. Lance thinking over the 3mm timber we'd made up as part of the cockpit hatch seal yesterday, and thought it would give a snugger fit, if the upper edge was rounded. Decided to go for this, and with the V groove bearing router bit, routered both edges of the strips. Had to cut them to length last night, as the timber was bending out of shape. Left over taped up to keep straight and returned to the shed. During the week the sikaflex primer, and bronze fittings arrived ok. The 1 ˝” fittings did look monsters close up. The next two months were taken up with visiting family members, plus a unexpected funeral.
16/08/98
Down at the Marina where the boat was, knews filtered through today that they were looking at making a grassed area near the entrance a hard-standing area, and another Yacht was due to arrive there end of September. The Marina were suggesting if a back-hander was given to the crane driver, he could lift us into the same area. Ruth was upset at the thought of disturbance, and amidst thinking of consequences, pointed out it would need lorry and crane to move us. It looked like the plans were set, because the Marina wanted to extend the marina, which meant our Yacht would need to be moved anyway. On another topic, it was also mentioned to us that Chris Knox-Johnston (Robin’s brother), had been to the Marina and had fallen in love with our boat, and if we were ever needing to sell, he would like first refusal. Back at home, we contemplated the potential boat move. They, down the Marina, have no idea what it takes to move a boat. It has to be planned. Here are our points of concern:- The Marina also wanted to finish the car park area where we currently were, whilst extending the basin area.
a) What is the surface of the hard-standing to be ?
b) Who is going to meet the cost of Lorry and Crane ?
c) Size of Lorry is relevant to turning circle/area at bottom?
d) Need both lorry and crane, and job to be priced up proper so it includes insurance cover ?
e) We need time to prepare cradle and straps ?
f) Hire of Tirfor winch and Toe-Jacks after move to level up the boat ?
g) No fence around the grass area to be erected until we get in – for manouvreability ?
h) Need to lay boat bow to the canal ? need to get best of sunshine on both sides of the boat ?
i) If the whole idea falls through – our time would be wasted
j) Closer to neighbouring houses ?
k) Carpet packing needing along hull-edge of the cradle & needs securing in place ?
l) Need more ratchet straps (3 at least) forward, aft and ideally one over centre & right under cradle?
Neither of us happy about the situation, will need some thought before we go down next.
01/09/98
Visited the boat and expressed our concerns about moving the boat. The other Yacht did arrive, but the Marina decided to put off moving us for now.
21/04/99
Have visited during winter months, and checked over the boat ok, could not work outside days too short and weather against us. Wedges loose at times, but re-seated those. Had to retrieve tarpaulin and sterling board pieces from underneath and take them home, due to prevailing winds which were very strong indeed. Coupled with another unexpected funeral at the start of 1999, we have had a very tough last year. Then to top things, we received a letter this week from the Marina. They now have plans to level and stone off the fenced grass area by the entrance. They would like to move us up to this area, and they will pay for the lorry and crane.
26/04/99
The Marina called, and whilst we were happy with the idea of the move, they said it would not be until the end of August anyway, to couple in with the other yacht moving out of the fenced off area. That would give us enough time to prepare. We will be given adequate notice and choice of siting nearer the time.
14/09/99
The prospect of having to move the boat really knocks us off course of doing any proper work – not to mention with electric already being a problem at the marina, we have not really had opportunity to really get going again. Made some phone calls about buying land close to us, but every door we try to open, there are obstacles before we've got our foot in. The particular piece of land close to home we were interested in, is still under review, and is likely to go to builder anyway because of the money to be made in housing. ! We did not stand a chance. Farmers at this time also were having a hard time and to rent out sheds etc was very costly and lots of stringent rules attached.
04/10/99
Letter from the Marina, following up our asking of the boat move. No further forward as the Yacht in the fenced off area is not moving yet. Will be sometime in 2000 now when our boat is moved. See what we mean. We cannot rely on other people to keep to their word, and where does that leave us – hanging on !.
20/10/99
Letter from the Marina. Change of plans !, they would like to move us sometime in November. There weren’t joking either. This stirred up so many questions and concerns, that we ended up writing a 2 of A4 page letter to the Marina. Turned out the Marina had lost our phone number, and in the mean time they had been trying to make contact to escalate the process. Added to this Lance had a very serious bout of high blood pressure. Very frightening, and it was not until a week letter nearly, that we managed to finish writing the letter to the Marina.
01/11/99
Dropped letter off at the Marina office.
03/11/99
Letter from the Marina, acknowledging receipt of our letter. They now needed to know length, height and weight of our boat. We gave them length 9.5m(30’), Height 11’, weight 4-6tonne approx, beam is 2.5m(8’), cradle length=3m, width=2.54m. This information was telephoned through as voice message. They were then to respond with a proposal and also answer our queries.
05/11/99
The new License Agreement for the year 2000, from the Marina arrived, which needed completing and returning. Gratefully they were keeping the rent at no increase.
06/11/99
Letter from the Marina. Meeting now arranged for Wed 17th Nov @ 8:30am. Us to attend to discuss the move with the crane driver, and the Marina proprieters, who will write to us separately to answer our queries.
08/11/99
Letter received from the Marina, in answer to our queries about the boat move.
15/11/99
Weather at weekends miserable, wet etc. Could not get down to the boat proper. Did manage to pick up two heavy duty ratchet straps at VAT free day, plus we got some nut splitters in anticipation of problems, where in the past we could have just done with some nut splitters. Ruth took three days of work in the lead up to the meeting on Wednesday. First job was to clean and hose down and scrub the whole boat from top to bottom. The wood fibres over time had turned the hull a green colour. It was back-breaking but it brought the boat back to its glory – reflections in the hull almost.
16/11/99
We wrote an email enquiring about flexiteek, after having read an article, in a Boat magazine, of a teak substitute.
15/11/99
More time spent cleaning and scrubbing. Especially aft of the boat and cockpit area were bad, where fibres and expoxy bits had blocked the drainage holes, water had been accumulating and resting. Not to mention the rubbish which had accumulated around the boat from careless and thoughtless individuals. A gas bottle !, ˝ dozen boat batteries and pieces of timber to name just a few. Also during this cleanup, decided to remove the stirling board from the sides of the cradle. Just as well we did as it showed the four corners of the cradle where just about rotten through. Had to utilise the nut splitters we’d bought the other week to enable to get the diagonal timbers off the cradle. The sterling board was broken up and tied into bundles for the bin men to dispose of.
16/11/99
Came home exhausted, after having made a list now of timber and bolts we were going to need to repair the cradle. By chance discovered that the Marina had called earlier. Ruth called back and apparently, the meeting for the 17th was off !!!. The crane company had lost their computer diary, and could not keep the meeting, and had to reschedule it for wednesday 1st December !!. We confirmed this should be ok. The Marina would put it in writing to us, and they gave their apologies for such short notice. We continued phoning for timber quotations. It would be Ł111 from the local sawmills. Now needed to wait for Ruth’s next pay day next week.
17/11/99
We were both too tired mentally and physically to do much. Dug out the teak pieces and the cockpit hatch and fittings. These need to be fitted when the opportunity arises. Currently water settles just forward of the cockpit drain holes, which is not good as it is only plywood in that area at the moment.
21/11/99
Faxed off our timber order to the local Sawmill. It would be ready by end of the week. Ł111.39. Also reply letter to the Marina, confirming our attendance at the meeting, and advising of our need to repair the cradle.
25/11/99
Sawmill called to arrange delivery of the timber, which was now ready. Arranged for Friday. Shock horror to discover Ruth’s pay not in the bank. Checked Direct Debits and we could take out enough to pay for the timber. Phew !.
26/11/99
Lance waiting all day for the timber, which finally turned up at just after 17:00pm !!. Heavy it was too, as it was still moist. Stocked it up with bricks between and left until Saturday before covering over with Polythene to keep the rain off and allow it to start to dry out further, ready for tooling.
27/11/99
Phonecalls around to locate galvanised coach bolts the length we needed. It appeared zinc is the thing today. Galvanised only in short lengths. Visit to nuts and bolts unit local place, and Ł64.20 later we had 28 Zinc oach bolts. Back home we realised we did not have 12mm wood bit long enough to get through 11” of timber. Phonecalls again and located a ˝ “ x 16” length wood bit at local Power Tools shop. Ruth took off for this, whilst Lance rested. Spending money makes us both feel off colour. Next though was how to cut this timber. Checked over all our saws, none of which were rip saws. Sunday this was by now, and took a visit to local hardware shop to checkout Pullsaws (Japanese). As we were looking at them in the catalogue – one was advertised on the television home shopping channel !. Out of choice of 2 we found, decided on 1, and also bought a real christmas tree. First time either of us has bought a real christmas tree. After all this, christmas was a big event as we moved towards the ‘Millenium’, and all the possible chaos it might bring. This was enough excitement for today. Ensured the timber down the side, was still covered up ok, as rain was in the air, and forecast for the evening.
Forgot here ** Visited the Marina Paddock area midday on Sunday. The grass was being cut, and we checked this area out for measurement, and assessed where best in the field we would like to be. Found an existing water pipe, and also an electric cable which appeared to go no-where. Marked these on a drawn map of the Marina, and also measured up the fence posts and marked on the map where we would like the boat. We were being asked to pick our position. Our only concern was the bonfire which would be very close to our boat – this was the marina workshops burning waste wood and materials. Did not hang around though. Weather is very bitter and cold. During this Sunday, was watching the television shopping channel and saw the Grinding Discs again – guaranteed for life they were – could be very useful, so decided to order the set. Made up a short list of things to put into the van e.g. posts, wedges etc.
01/12/99
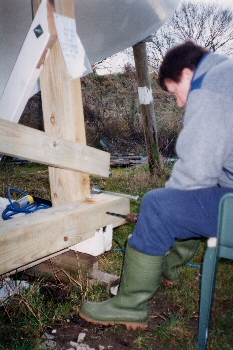
Still no response from Flexiteek company, Ruth printed out the email last night, with view to posting it this morning, and a letter arrived this morning !!!!. Got up extra early this morning to be at the Marina for 08:30am. Crane driver was already down there, measuring up the hull etc, as the Marina proprieters had not arrived at 08:30am yet. We drove down to the boat, to chat with the Crane driver. Young lad, from a haulage company, based a good 120 miles from here, of all places. He left us a card, with their address and photo of one of the lorries. It was a flatbed lorry with a crane on it.!. Looking at it, it was very doubtful whether it would be suitable for us. The chap certainly needed to take many measurements to weigh it all up. No doubt they will forget about the tight ‘noddy’ entrance way into the marina. The Marina proprieters turned up very soon afterwards, and very quickly asked crane driver if all ok – no problems etc - & should be easy enough job !!. What do people think they know about major moving jobs ?. We showed the Marina proprieters the rotten timbers we were needing to replace, and that we’d got the new timbers to repair it all. All of us then walked up to the paddock area, as they called it, with regards to the positioning of our boat. The Marina proprieters was sure they wanted us next to the fence close to the Yacht, which was still there. They said that our sanding dust onto cars, was not to be worried about. We don’t think he realises just how big a 30’ yacht will be in the paddock area. It will end up ľ into the area we were choosing. They were thinking the gate gap can be moved down!. The lorry will be the deciding point as, with a crane on the lorry, it won’t be able to swing our very far. Anyway levelling and stoning localised, we were told, would be done when they scrape off the surface off the Marina entranceway road. We did mention that an area 20'’x 30’would be needed to be hard-cored for us. Apparently an electric Pod would be setup, and water tap etc. Date for moving was left down to us, because of the work needed on the cradle. The crane company needs few weeks notice – they were not closing down for Christmas/New Year. The Marina is looking to get on and block pave the entranceway in January. They reckon that is the quietest time. Not setting a date for us was a relief – we would crack on as best we can anyway, braving the weather. The crane driver realised he needed more measurements, so he took off back down to the boat. We asked ref Insurance, and was asked to mention this to the crane driver. For electric we confirmed we could utilise our metered lead, clock up the units, and then square up for units used. Popped back home and grabbed some fish & chips before donning work clothes, and popping back to the boat to start on the first cradle leg support. Upper bolts were no problem to undo. Bottom ones though would not budge. Had to saw part through the support and then split it – which it did without difficulty. Set the tressles and marked the cutting line on the new support. The new pull-saw however prooved to be a nuisance. Cutting at an angle other than a straight down – the blade would part from the handle (the handle is designed for the blade to be swappable). Circular saw did bulk of the cutting. Chisel and Plane to tidy up edges, and then fitted it in place. All went well. Drilled for the bolt through to the diagonal, and bolted it in place. No sooner had we done this, and night closed in very quickly. Not much daylight at this time of year. Once home both of us fell asleep – plum tuckered out. We had had a very unnerving and worrying last few weeks over the boat move.
02/12/99
Popped into DIY store to get some Cuprinol Wood Hardener/heavy duty filler. When taking away the first cradle post, we found that the rot had working its way down into the bottom cross member. Going to need to strengthen this, or make do till next summer and then replace the forward and aft members.
03/12/99
This morning had to dash down to the boat to batten down the hatches, as they say. Gale force winds about and torrential rains forecast. The boat needed checking to make sure all wedges and temporary props ok. They all were – so we could relax. A touch unsettling whilst we are working on the cradle repair work, and some timbers are removed.
04/12/99
This morning looked promising. Cold wind but sun shining. Ruth sorted out the van better, so we could accommodate the 10’ lengths of 5 ˝” x 5 ˝” & 5” x 2”. All packed up and at the ready by mid-day. Asked for the electric to be turned on. All pods seem to have 16A or 6A sockets. Case of finding the closest available, given we have to trail the cable across the car park area, so we had to trail it as best we could around the perimeter to avoid cars driving over the cable and subsequently damaging it. Wind was biting a bit, but sun kept temperature and our spirits up. Mid afternoon family on a boat, with whom we had been chatting to, asked if we’d like a cuppa coffee !. Very appreciably accepted. Our Van was too full to access our stove. Afternoon went well. Completed the 2nd post. Then got the side member off. Bolts had to be cut in two places, except one we managed to extract, as it had stainless nuts which we had got off. The problem was the bolts went from underneath the bolt holes, therefore digging holes was out of the question, except for one. The new side member seemed to weigh a ton. Took both of us to lift it. The chap who delivered it carried it himself !. Marked up the side member for cutting it in over the X members. Contemplated on the bolts because we had not catered for cutting in an inch, and this means temporary we will need 8 of 1 ˝” pads., to accommodate the bolts going in from the top, and they cannot protrude below more than 1 ˝”. Once cross member notched out, then marked up for the bolt holes. These drilled out. Then quickly with cuprinol ‘5 star’ painted onto the cut surfaces of the new timber, and ends of existing timbers. Then the side member was fitted. Before we could knock it plumb/level with existing xmembers, had to notch out end of plywood fitted onto the forward edge, or forward xmember, and also to fit in place the upper cradle support member, which needed the diagonal fitting to ensure upright two support legs where in their true position. Suddenly frantic activity clamping, drilling, bolting in place these timbers. Realised in measuring 6” for upright support + thickness of upper cradle support member, we had not allowed for the bolt going in at an angle !. Managed three bolts only just. 4th will need thinner washer to pull bolt through, to be able to then put the proper washer back in place. Darkness falling fast aswell. Dug out the lead light. Clipped it to the access steps. Had to be careful with cables all over the shop, and also coping with the spongy mud right where we were trying to work. Squelch, squelch, bang, bang, cut, cut, Ugh, Ugh, were some of the surround sound noises to be heard today. Kept replacing tools in the van as we went along, to avoid misplacing anything, and by time we shut shop for the day it was 5 to 5pm. Time for home, refreshments and warm up.
05/12/99
Straightened out the van first thing this morning. Contemplated how to best do the four side cradle member bolts. Whatever was done had to look good and proper, and accommodate the fact that the original timbers could be too soft for the bolt heads, or the nut to grip satisfactorily. In the end opted for making 8 wood washers using the largest morse cutter we had, and drilling for the m12 bolts. This done at home on the pillar drill. Popped down to the boat at 13:30pm., with plans just to complete the bolts. Did a long day yesterday – having an easier day today. Plus sleet and snow is in the air – temperatures hovering about freezing and the days are very short now for daylight hours. Managed to dig holes and get three out of the four bolts which were in from underneath. Coated the pads with Cuprinol ‘5 star’, where they were to meet the original timbers, and also painted some to seep down the holes. This all went well. The fourth bolt however, will need to have a 9” x 5 ˝” pad affixed underneath. This is the worst corner of the four. The bolt will need to be affixed, and when the crane lifts us, then we can turn the bolt around and fit from underneath. Called it a day for today. In the evening, Lance had idea of using the new grinding disc to cut into the tabernacle sides a Ľ or 1/3, then bend the sides to flare them for strength, then weld back up the seams! It should work – will give it a try. We dug out the stainless steel tabernacle pieces, and tonight took a plunge with the circular saw and a new grinding disk. The idea was to cut into the stainless along the 4 ‘crease’ areas, and this should allow us to bend it, then weld up the seam again. Bear in mind how think this stainless steel is !.
 |
 |
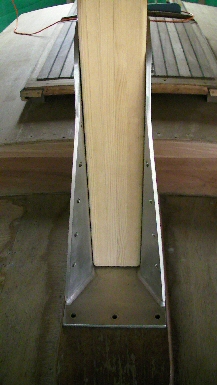 |
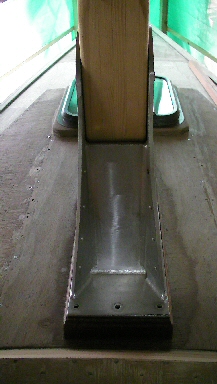
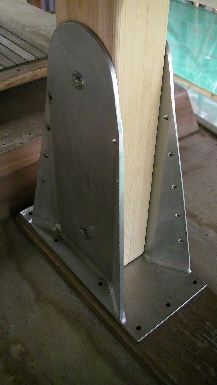
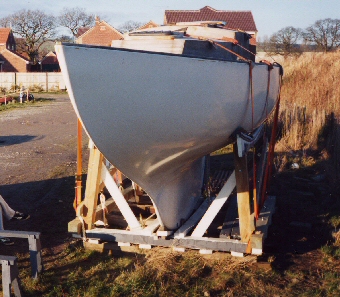
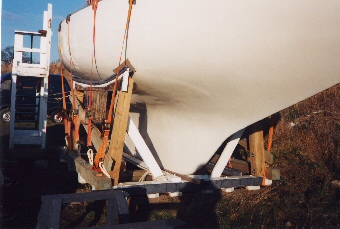
| The Tabernacle hand-made out of Stainless Steel |
07/12/99
Further cutting with the circular saw on the Tabernacle side. By now 4mm out of the 8mm had been cut through. Could we bend it ?. Tried engineers vice in the lounge but with no luck. Tried it in the vice on the work bench. Even with both of us pushing, the stainless steel would not budge. Going to need to try find engineers place with a heavy duty press. By weekend had made a start on a second cut.
08/12/99
The Marina called. they had kindly collected some carpet for offcuts – for us at the Marina. Also asked how we were getting on. Lance said we’d done one side of the cradle – hoped to crack on with the other side this weekend – weather and health permitting.
11/12/99
Rain stopped play today. Rained like cats and dogs, and through the night aswell. Did a big cleanup at home, and brought the christmas tree in, and decorated it. This gave us a real much needed booster in our batteries.
12/12/99
Beautiful morning. Got up in readiness of making progress on the boat, but then it rained. By lunchtime though clouds blown over, and we took a chance, and taking all the rest of the timber with us, visited the boat. Got the power switched on. Could have done with our wellingtons though. The area around the boat was one big pond. Moved over some spare breeze blocks, for stepping stones. All afternoon it was squelch, squelch wherever we walked. Tackled the forward leg portside of the cradle, then the aft leg also having taken off the lower side member. All the bolts and nuts came off with perseverance. The very lower posts where knocked clear of the bolts dropping through., and the bolts where bent as they came out underneath. Going to need to dig some holes again – albeit apart from the forward one again. Another one to do whilst we are being lifted.
20/12/99
Ruth got time of work now, with view to having a good long christmas holiday. Did not visit the boat this last weekend. Snowed Sat evening, all 6” of it. What a surprise, so we made a snowman.
 |
||
Temperatures barely above freezing on Monday, but with gloves, wellies and several layers of clothing, we bared the temperature to cut to shape the portside side member. Two swans flew over low, babbling away to themselves, then they flew back over. Had to put a waste boat battery next to some dog pooh droppings under the boat bow to avoid any smelly mishap. Some inconsiderate boat dog-owners there are around. Got the electric switched on. It had taken us ľ hour yesterday to de-ice and de-snow the van. All doors frozen shut. This morning took just as long except ice was on the inside of the glass.!. Filled up with petrol as well to keep us going over christmas and the Millenium. Spent about 3 hours at the boat, before it was tooo cold, and it was really getting through to us. Just managed to dig three holes for three bolts, and had to put the forward most one in from the top. Going to need plywood pads both sides of this side member forward bolt. Sawdust all over the snow!. This was a first for us, working out in the snow !.
 |
 |
 |
|
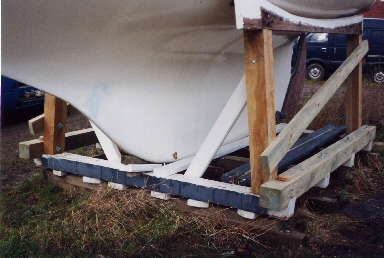
Replacing the Cradle Xmembers and Support Legs - In the Snow ! |
||
21/12/99
Having not heard from the Marina this last week, Ruth called them.Lance had called them last week, to mention about the progress on the cradle so far, but us not being happy about where they was wanting to put us, and that the best position was where we had suggested in the first place. The Marina would discuss again. When we called them today, it was to advise them that the cradle now was near enough ready for moving. They are no further forward on their part however. They know of our latest concerns about the positioning, but they have not yet responded as they are tied up elsewhere at the moment. It won’t be until New Year now, that we hear further. We will pop down on a good day and complete the last four bolts and the two plywood pads needed.
31/12/99
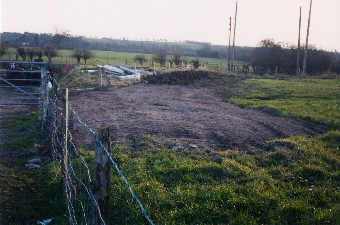
Popped down to check the boat, and noted that no levelling nor stoning had happened yet in the grassed compound where it was hoped to move us to !.
AND SO INTO A NEW MILLENNIUM.
15/01/00
The Marina called – provisional date for moving is next Saturday 22nd Jan. Confirmation will be on the Monday about time.
16/01/00
Sorted out the van, and put back tools etc we had had out over christmas. By now 11:00am, visited the marina, to tackle the last few jobs. Entranceway to the marina had been scraped, and the gravel put where the Marina want’s our boat to go.!. Area not really wide enough at all. Looks like electric cable has been pulled back – not sure where the water pipe is now !?. what a bodge job. If only they had called Lance when they were doing it. Got electric turned on, and wellies on. Completed the remaining 4 bolts on the cradle. The long drill bit(wood bit) did struggle on these – had to keep with drawing the drill, and then continuing. Cut to shape and fitted the ply pads underneath the two forward side ends of the cradle. The ends where not 100% ok, the ply pads should help spread the bolt nut and washer load. Bitter wind today. Took down the 3 support logs and washed the hull where the wedges had been. Lifted up the steps and put them onto 4 selcone blocks. Should help to dry out the base a bit. Loaded all the old timbers except the cross pieces into the van to take home. All this is left is
a) wood to go between hull and cradle to keep hull in place
b) secure packing along the cradle edge. We had purchased 6 lengths of pipe lagging, to use doubled up along the cradle edge, then secure carpet pieces over them.
c) Straps and carpet pads to secure the cradle to the hull. The crane would then lift the boat.
d) Make up some loops to enable the straps to hold the cradle – we had purchased more ratchet straps for moving.
By 13:00pm we’d had enough. Visited the new hard standing area and it really is just not what we wanted. Everything about it, is wrong. Plus there are some large lumps of concrete in amongst it, and it is not particularly level at all, not wide enough, and not long enough.
 |
||
| The Hardstanding area ! |
17/01/00
No phone-call from the Marina as promised ref timing of the move.
18/01/00
Lance dropped by to the Marina, to see if they had any rope. They only had cut off lengths which were too short. We needed to make up some loops to facilitate making it easier to attach the ratchet straps hook to, around the cradle. Lance got chatting about the boat move on Saturday, and it turned out that the wrong lorry had been booked. It had a crane on it, and would just lift the boat up and move it – with no consideration of moving the cradle with the boat !!. The chap at the Marina, was completely stumped when Lance asked him how he thought we were going to get the cradle up from the bottom to the compound ?. Lance explained that the cradle must stay with the hull and be lifted and moved as one entity, and we had had a 3 hour palava in a real boat yard, trying to get the cradle and hull in line again after they thought they knew best. The situation with the gravel not being right was pointed out, and the proprieter had apparently said to put the boat near the entrance !, so they had put the hard core there, but it was still not level, some large lumps of concrete in it, and it was not wide enough. By this time Lance was getting real high blood pressure and everything. All arrangements were just falling apart from the Marina point of view. Let the Marina to do something about the lorry, and left us bewildered, and lots of unanswered questions now. Besides it also looked like they’d buried the water tap !.
a) has Insurance been covered ?
b) has lorry driver got straps and padding ?
c) have lorry driver and crane been advised of steps to move aswell ?
d) the bonfire setup is bigger than ever, and our bow is going to be right in it ?
Later that Tuesday evening the Marina called. 10:30am on Saturday was the time!. The proprietor who called though had heard nothing about the wrong arrangements. Ruth mentioned to her about 1) lorry being wrong, 2) unsure whether insurance was covered, 3) gravel not wide enough, 4) water tap buried, 5) we are not going to be put where we want anyway, 6) the bonfire is going to have to be moved over – we’ll have our bow right in it. The Marina proprietors discuss what we'd said and get back to us. Had Lance not been down for the rope, then we would have been turning up on Saturday to find the WRONG lorry, and all a shambles.
19/01/00
Heard nothing today, Wednesday. Ruth booked Thursday & Friday off work. Lance managed to get some SISAL rope from a local hardware shop, and pressed on to make up 4 loops. In the meantime though making excellent progress setting up this website of Emerald. We both wish we could be excited and looking forward to the move. Whether it is 100yds, or 100 miles it is still the same process to go through.
20/01/00
Still no phone calls from anywhere. Two days to the move!. Decided to call the Crane company ourselves, to confirm their booking for Saturday. They had us down for 10:30am on Sat 22nd. Insurance was covered with the Crane Co for negligence etc. Mentioned to them about the steps, no problem for them. The crane is 25T and for 7 tonnes weight the swing would be 9m from the centre of crane to centre of weight. We then went on to phone the lorry company ourselves. Just as well we did because the way the chap was talking was like they would have been using a lorry with cradle on it etc. Ruth explained the cradle situation, and needed a flat-bed lorry, and chap was happy enough with the situation and confirmed they would have a 40’ flat bed lorry available – which he was sure they had already visited the marina previous – so knew of the site. They would have straps and paddings on the lorry. The steps would not be a problem. Hopefully they may fit on the lorry with the Yacht and Cradle all at the same time. The trailer is standard 8’2” wide. Thanked them for their time. Felt like not much else done today.
21/01/00
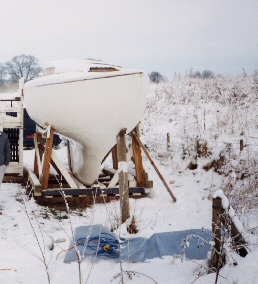
Visited the boat by 11:00am. Fitted some 2” x2” either side of the keel, and nailed it to the cradle. Need to stop the hull from slipping in the cradle as much as possible. This done set to putting two layers of pipe lagging over the upper cradle edge, then to put into 4 carpet pieces on the edge above the cradle supports. Very tight fit, which was good – what was needed. Had to prise the hull to enable the carpet to be slid in. Next dropped over the four straps and proceeded to pad up over the topsides, and loopup around the cradle, and setup the ratchets. So far so good. Tied up the tiller with a sash cord. Used a mooring rope and tied it around the cradle forward, and through the propeller area/stern of the hull. Also nailed in place the forward wedge in front of the keel. Anything to prevent the cradle and hull slippage. With a level and marker, marked the level line on the hull, both horizontally and vertically. These lines, Lance did previously, needed re-highlighting. Nothing more has happened re hard-coring. It really is a shambles the base area. If only they had called Lance when they were doing it.
 |
 |
|
|
All Strapped up ready for the move ! |
||
- - - - - - This is the end of Diary Section 30 - - - - - -
![]()