| Home | |
| Adventures | |
| Specification | |
| Diary | |
| Photo Album | |
| Contact Us | |
| Feedback | |
| Hints & Tips | |
| Polish Words | |
| Web links | |
| Problem | |
| Polish Yachts | |


Completion of Companionway Hatch and Runners. August 1995 to September 1995.
23/7/95
Excellent weather at the moment. Summer is finally here and lots of boatyard activity today. Uncovered the boat first thing and assessed next stage with the hatch. Started routering all inside edges of the outer frame. Then with fence and flute bit routered out further rebates. 9mm for ply and 6m for Iroko. Suddenly remembered on the 2nd side that we should be doing the corners taking into account the centre beams, like we were doing for the forward and aft pieces. No big problem though as we could reshape the ply to fit. Then set to scalloping out the under edge of the two inner beams to the correct curvature. The jigsaw was used to remove the bulk then the compass plane used to finish it off. Completed it with sanding down. Once both beams done, used a router bit and rounded the under edges of the two centre beams to within 3/8" of the outer edges, then sanded the lower and two side surfaces. Reassembled the frame and took it up for a fitting and further assessment. Planed down to height the upper drop board. They were only ply at present but will suffice for the time being.
During the week made excellent headway on the hatch. The lounge floor sufficed as the workshop, using mdf board to protect the carpet. Weather excellent at the moment, which enabled the planing and sanding to be done in the garden. Lots of wood shavings which all had to be picked up. The forward and aft beams were planed on the underside to the correct curvature. Then the frame joints were epoxied together. Three ply inserts were then cut out. Managed to get all three pieces out of one off-cut. Very little timber is actually wasted on the project. The ply inserts had to be very well sanded down on the underside, and the frames were given a good sanding on the upper surface. The sikaflex was flexible enough – being in the van during this heat. Had no brown – used black, but just enough to make a seal. Gripfast nails used to fix in the ply on all edges. The Iroko, pre planed lats where then cut to length, shaping them to fit the curvature at both ends of the hatch. The 17 lats were then drilled out and holes seated in, and screwed in to place with 120 screws. Odd lats were twisted slightly and needed pressure to hold in place until screwed. There were 7 lats each side. The centre piece needed to be sized to fit perfectly and then drilled , and holes seated in, then screwed in place. Next was the decision how best to do the edging, as the lats are about 6mm proud of the hatch top. With the router and using a piece of iroko screwed to the bench for butting up to, routered two lats at once. One piece was only routered halfway, this would then go with the next lat in sequence to be completely routered, and the next lat half-routered. This was to prevent the router splitting the timber on the outer edges. A awful lot of work had gone into the hatch so far, and it is really looking ‘ambitious’, as one of our boatyard neighbours put it.
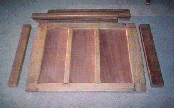 |
Underside of the Companionway hatch, the ply inserts in place. Iroko lats cut ready to fix on the top side. |
On the boat put in the two missing screws ( 2 ˝") on the two main hatch runners, and then put in the 8 iroko plugs with epoxy. Needs the boat leveling up perfectly, to enable the mast step to be sanded down perfectly level, for the tabernacle to be seated properly. Weather was so hot today, even the breeze was not enough. It was really too hot to do anything. The coolest place was sat in the cockpit. The bilges and lockers were hoovered out.
19/8/95.
Not been down the last two weekends. When we got home from the boat on the Sunday evening, two weeks ago, we set to epoxying in place the hatch lats in the back garden. Epoxy and gloves, acetone setup. 120 small (10mm) iroko plugs sorted out. The 120 screws were part screwed into all the lats in readiness. It was getting dusk, and ended up working with the garden light on. There was 15 lats in total, and the epoxy job was such that all needed epoxying in place in one job. Resin and microfibres mixed in readiness. We had to work swiftly though to get all 15 lats in place, in order, and screwed down with the Makita, being careful not to get epoxy other than where it was needed. When we come to put the dowel plugs in, what a palaver. The dowels were a tight fit, and would not go in the holes if there was epoxy already in there. So all 120 screw holes had to be cleared of epoxy, and having soaked the 120 dowels in epoxy, hammered them into place in the holes. Then as best we could we scraped as much surplus epoxy as we could. By now 11:30pm and cleared up and just in time to obtain a Chinese.
 |
 |
 |
|
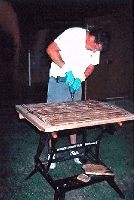
Look how big and beautiful it is. Not the Cat the Hatch!.
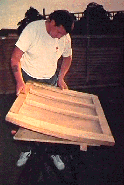
The Hatch here is ready for the Iroko lats to be fixed into place on top.
|
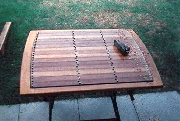
The Iroko lats now screwed and epoxied into place on the
Companionway Hatch.
|
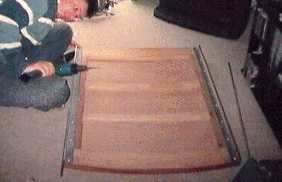
All screw holes were plugged with dowels, all 120 of them. What a
lot of sanding to be done.
|
The next weekend we had been working on the outboard. How nice it would be to get the outboard going , and get out the dinghy, and join everyone else on the river. Good progress on the engine had been made considering it had been stripped down totally and renovated. However it was the timing which was not 100%. We made a list of all the items we would like to replace on the engine especially the spark plugs, and points etc and ended up with 20 or so items. This could be an expensive shopping trip. At the end of the weekend both of us very depressed again over how much money we now need to spend. Anyway our old dustbin has come in real handy. We had made up a wooden trestle to support the outboard, and with the shaft in the dustbin, and the dustbin filled with water, then engine can be run whenever. Excellent idea. Previously we had clamped it to the workmate, with sandbags to keep it weighted down.
The following weekend (last weekend in fact) still bemusing over the outboard parts. In the yellow pages found there was a Outboard Dealers not too far away from home It said they dealt with Yamaha outboards, sales, services and spares. Seemed like a good idea, so off we sped. But could we find the boatyard. No-one we asked knew of the road. Had to ask at a pub on the river side and it just so happened a female in the pub knew of it. It was just down the road – but down a dead end. In the shop they looked on the micro-fiche and the carburetor would be Ł160+vat, fuel pump Ł50 + vat. Golly Gosh. Need we ask any further !.We left absolutely, and totally distraught. What are we going to do. It is not fair putting prices way out of the range, to force one to buy a new one. We hardly spoke all the way home. The sun was so hot our tears were evaporating. We needed a few beers that evening to try and renovate our enthusiasm.
Friday we generated enthusiasm to re assess the outboard and its timings. Our thinking now lets start with say points and plugs etc and see what results we get then. The weekend was gone before we knew it and more beers tonight to sooth our sorrows. Monday brought higher spirits, and we decided to ring a Yamaha dealer down south and get some prices from him. Left a list with him, namely the Carburetor, Fuel pump, coils and handle. He would call us back on Tuesday. How next best to spend today. Set off to in pursuit of finding a local stainless steel , and Naval Brass business. We were looking for extrusions to make up the hatch runners sections. Tried one place but they could not help except to suggest we tried a place further on where they do deal with angles of Naval Brass and stainless steel. Quick decision, and we sped off. But what we did not have with us was our Towns A-Z map. Not to worry, we will find it. But no mapbook in the van had the road on it we needed It was not within the city centre. Made our way following our noses, then finally stopped at a garage and bought a map. It turned out we were not very far away from where we wanted to be – would you have believed it. Found the company. They do do angles etc, but not of the thickness of metal we require. The chap who eventually served us though did take his time, and took photocopy of our diagram to look into it further and gave us a catalogue. Although they did do some bar suitable for us, we needed to find the angled section first. One was no good without the other. It was by now 16:45pm, we were drinking pop every opportunity and we were very hungry. Was there a chippy open – no such luck. On our way home though we passed again the Outboard Dealer. Decided to drop in and asked if they had two sets of points for the Yamaha outboard. They looked them up on the micro-fiche, and we nearly fell over with shock. Ł14.79 +vat for one set of points. Ł34 for the two. We had not got the outboard manual with us, so guessed the spark plugs we needed. Bought some but when we got home realised it was another type we needed. Having just spent Ł40 on what looked like nothing, we were hungrier still. Back home we were plum tuckered out.
During the week more trails and test with the outboard. It was actually running at its best since we got it in 1989. The chap called back from Yamaha Dealer, South. Coils were Ł40 each, Carb and pump as we already knew, but worst of all was the handle – not all sections are still made, and those that are would be expensive !. If only we had bought the handle at that boat jumble that time when we saw it.
19/8/95
It is good to be back at the boat again. All is ok except from a dinghy left right in front of our boat , and we had to shift it. Luckily the trailers are not completely locked and we are able to shift them. They could not have got this dinghy closer if they had tried. 1st thing was to uncover the boat and take the hatch up into position. It is looking good, but what to do next. Weather is hot, and having just driven down, both of us needed lots of liquid refreshment to get us into the spirit of working. Had idea of using one of the two timbers set aside for forward and aft under pieces on the hatch, and replace it with a smaller piece of timber, the idea being to use this piece for the forward hatch opening – packing piece, between the hatch runners. The piece was to be seated Ľ" into the hatch runner beams, then scribed to the compound curve of the coach roof. Then the upper edge was to be scribed and planed so that the hatch would clear it. It was cut to length and notched to fit the side hatch runners. It had been scribed to the deck and the upper surface planed down. This final upper curvature cannot be totally completed until the hatch runners have been routered to accommodate the metal bar strips. This is due to the hatch runners having to be perfectly aligned up for the hatch to slide satisfactorily. Therefore one runner is to be routered, then using the router fence with two extra long length rods, the fence will run along the routered runner, and the router will cut into the other runner exactly parallel. Need some stainless steel for the rods ideally, which can then be utilized for say making the rudder shoe bolts.
 |
||
| Fixing mahogany piece between hatch runners. This will have upper edge curvature as per the underside of the Hatch. |
Having got this far with the forward hatch frame piece, it turned out that the two centre beams on the underside of the hatch itself where slightly lower than the forward and aft beams. Both the centre beams had to be planed down with the compass plane, then the edges re-routered to add the champhered edging. This took time, because planing the hatch now meant towels had to be placed on the workmate to protect the hatch, and then it needed holding firmly, as the whole thing had a camber to it. We had our first meal on board tonight. Fish and Chips, and beers. Put the lead light onto the tiller, and in the couple of hours we were sat there a spider had made a web between the tiller and lead light.
 |
||
| Underside of Companionway Hatch |
2/9/95
We chased up the chap at the Stainless Steel place, who had been looking into things to try and track down our requirements. They did not have exactly what we needed, but trying to establish next best thing, of which they do stock, was difficult. We ended up having to scan the catalogue and figure it out ourselves and ordered some metal.
Neither of us sure what to do Saturday. Talked and talked things over with regards the boat and our immediate plans and problems, and those more long term. We really need to seek out moving house or buying land to accommodate the boat. Spiraling costs all round are a nagging worry.
3/9/95
Visited a Boat Jumble. Looking for a Yamaha 15 Handle – but our luck was not in. What we did spot for Ł5 though was a hatch locking device. Ł25 in the catalogue. Visited the boat and all appears ok. Paid up the rent for another month.
9//9/95
Naval Brass lengths and Stainless steel angled bar arrived Monday last. During the week extensive and painstakingly slow progress made on cutting the Naval Brass lengths, and cutting the stainless steel angled bar. Used some hacksaw blades to cut the angled bar. One blade was cutting one end. Enquired about silicon carbide hacksaw blades – but no-one seemed to have any. Preserved with the bi-metal HSS hacksaw blades, then used the jigsaw on slowest speed and with great care to cut down the full length of the stainless steel angled bars, utilizing the vice to clamp it. We had decided to only cut one length off each angled bar, and weld to it a length of stainless steel rod. (approx 10mm). Once cut to size and length, the angled bar needed drilling and countersinking using the pillar drill. Having got all the measurements for the hatch area written down, we were able to work out more precisely what the overhang of Naval Brass on the runners needs to be, and how deep the rebates were to be for the angled bar onto the hatch, and for the Naval Brass into the runners. Also needed to give thought as to how to try to make this joint as water-tight as possible by say a rebated water channel to the runner lengths on the inner edge of the wood adjacent to the Naval Brass. We had got 12’ lengths of Naval Brass. We needed approx 76" at Ł35 a length, but for another Ł10/15 we could get another 68". Needed some 8mm bar to make up a longer router fence rods for tackling the routered grooves on the hatch and the runners. The leftover length of copper rod we had was just the right thickness, although it was quite soft. We will see. Otherwise means buying in some lengths of 8mm stainless steel rod, and once done the hatch, to get an 8mm tap and die and thread the rod for use elsewhere. Kept all the metal (Stainless steel ) filings and put them in jar. Too expensive to throw away in quantity, and it is nice to look at, reflecting all the effort gone into the cutting and filing of the angled bars.
16/9/95
Having sanded down the stainless steel angled bar runners, the weather was fine, so set up outside to router the underside of the hatch frame , into which the angled bar will seat. Just prior to this we had redrawn a sketch of the hatch runner area, and decided to allow 1mm for getting a finished side on both the hatch runners rails on deck. and this gave 705mm as gap to the outer edged of the Naval Brass bar overhang. This also meant the angled bars were to be seated in 1mm from the sides, on the underside of the hatch, and to a depth of 3mm. Routered one side of the hatch underside – it needed several sweeps with the router to router out the 1 ˝" width. Double checked the measurements of the hatch, and it was very plumb. Routered out the opposite underside likewise, without the need for the extended fence at this point. Next step was to wire wool the stainless steel rod, cut to length and set the welder equipment up. Used a hacksaw blade on top of the naval brass bar to give the gap needed between the stainless steel rod and the angled bar. The stainless steel rod was then notched out, with a round file at the points where the screw holes on the angled bar were. The idea being to weld around these notches, then once in place, water that does get into the groove will at least be able to escape. Tack welded the rod onto the stainless steel angled bar, which had been filed at both ends to chamfer the edges. Then welded the full length of the rod, stopping and restarting where the notches where. It was just not quite hot enough really our welder, to get a smooth finish for the stainless steel , but it all went well. It wasn’t until we took the clamps off did we realise that the heat had bent the angled bar. Tried jumping on it, Lance did , with it supported on two bricks. It did not want to budge. On doing the second piece of angled bar, tack welded it first, then let it cool before doing the runs. Only managed two short runs and the wire ran out. Of all things to happen, and it is after hours on Saturday night. Called it a day – we had no choice.
 |
 |
|
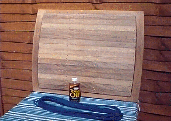
| Stainless Steel Angled extrusion cut to length and drilled and countersunk for fixing to the underside of the hatch as above. This done the stainless steel rod will be welded to the upper edge of the angled extrusion to grip over the Naval Brass hatch runners. | The finished Companionway Hatch. Just needs a fiddle rail aft for gripping and then varnishing. |
- - - - - - This is the end of Diary Section 26 - - - - - -
![]()