| Home | |
| Adventures | |
| Specification | |
| Diary | |
| Photo Album | |
| Contact Us | |
| Feedback | |
| Hints & Tips | |
| Polish Words | |
| Web links | |
| Problem | |
| Polish Yachts | |


Tying tarpaulin half naked!, making cockpit sole and cockpit hatch frame. February 1995 to May 1995.
12/2/95
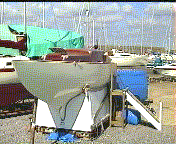
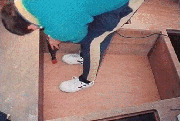
Sun awoke us early today. Uncovered the boat. We had tried tying rope from the drop boards to the tiller in all sorts of directions, but water was still collecting in the cockpit seat areas, plus aft. Sponged all this up, so it could dry. Water had been getting in through the companionway hatch area as the main companionway steps were damp. Decided to visit the chandlery and purchase a new tarpaulin. Then decided to investigate underneath the boat. A box of rags we had left under the starboard had acted like sponge, become saturated and was starting to wet the mahogany underneath. Saved it in time. Destroyed the box of rags, spread out the wood a tough to dry out, then put the wooden steps back underneath. Someone pinched them a few months ago, so we were not leaving them out now. With sealant sealed all the joints on the cradle boxing in, then with white primer undercoat painted the forward side of the boxing in fibre board. The carpet edging on the cradle had become saturated, and was making the hull damp and mouldy covered. Patches of bubbles in gelcoat generating. All marks were wiped down as far as possible, but blisters are forming on the gelcoat. We envisage that It will all have to come off anyway. Before covering up the boat we taped carpet to all sharp corners on the deck area. It took a good hour to complete the cover up job, and we left for home about 17:00pm.
 |
||
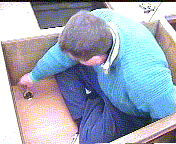
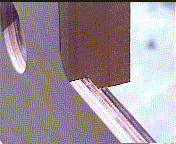
| Sealing
& painting the cradle
Carpet had to be stuck on all sharp corners of cabins to protect the tarpaulin. |
18/2/95
Down at the boat, the large 50/60’er had now gone and we could get right up to our boat. Not alongside though now as there was a boat port and starboard of us. Two eyelets on the sheet starboard had ripped the sheet and were pulling on the edging string. Popped to the chandlery, and got some brass eyelets and punch and some spinnaker repair tape (it is better than duck tape and won’t rip) and 5 metres of shock cord. Weather looking hopeless. We dare not take the sheet off the boat, it is likely to rain. Wind now stifling bitter and both of us needed more warm clothing. Out came the leg warmers and jumpers etc. Sure enough the rain came down, but in between the showers we managed to fit 4 new eyelets, and repair the two eyelets which had been ripped out. Rerouted the sash cord thru the new eyelets. We then decided to quickly sand the post at the foot of the steps to then paint it with white primer, save anyone walking into it. In the end also painted both sides of the steps section, and put a stripe of white primer on the aft shores. You take your life into your own hands walking around a marina hard standing in winter, ducking hulls, striding cables, swinging around shores, not to mention the rubbish some boat owners leave strewn around. By now dusk was setting in and we were finishing the painting in the dark.
19/2/95
Gale force wind and heavy rain during the night. We awoke hearing the tarpaulin flapping and on looking out saw that starboard bottom corner of the "rudder" tarpaulin cover was flapping. Did we not tie it down. Lance suggested to Ruth, as it was raining, to take off her legwarmers and socks, and just put on a rain jacket and captains hat, and get out there. Half naked Ruth went out and saved the day. A couple of cups of tea later and a quick dry off, we were back to sleep, only to wake later. All was silent, the wind and rain had completely stopped!. Had we been dreaming it !.
Arose about 9:30am. Weather not too promising. Wind was biting cold. Started painting the cradle portside. Set to unscrewing the sterling boards strips closest to the hull forward. Then the pip lagging was pushed on to the inner edge, the hull wiped down with a touch of anti-fungi solution, then the strips of board were screwed back into place. Made a good fit. Sure enough rain came again and just managed to fix back in place the board strips. Rain was not going to ease and it was biting cold so we set off for home about 14:00pm. Another year under cover would have seen us right. First piece of advise to anyone thinking of building a boat - make sure you have it on your own land. Second piece of advise is to have a shed big enough to house the boat.
26/3/95
Weather been very cold lately, so artic icy in fact we had pressed on at home putting and painting up garden fence panels. Today was the first day at the boat for about 3 or 4 weeks. The rent was due as well. Remarkably, and much to our delight, the tarpaulin had held itself in place. Lots of other peoples rubbish had found its way on to our patch, and it looked like someone had mixed paint etc next to our steps and on them. The cheek of it!. We collected a bagful of rubbish strewn around. Then we noticed the steps had been yanked from the step framework. They must have had problems maneuvering the boat out from next to us. We had to re-fix the steps, and then added an extra piece of ply to stop anyone lifting the steps away again. Had the whole frame not been padlocked , no doubt the whole setup would have been moved.
27/3/95
We could have taken the tarpaulin off the boat yesterday. Although cloudy – no sign of rain. Anyway too cold today and snow is forecast this evening. Too windy as well. Decided to leave the boat and search out a couple of Timber Yards and a tool place locally. Took off to International Paints to see if we could get hold of some of the International heat paint we had used the last drop of recently. It was quite an old tin which had been in the workshop when we took over the Hull project. Good stuff it was though, and we made the mistake of throwing away the tin thinking it was readily available. International did not sell it, and had no recollection of such, but then they were only the Yacht Division. If could be something in the Marine Division, or even their DIY Division, and then they do make different products in different countries. How wonderfully helpful. We then visited a Chandlery just round the corner who stocked all the International paints. Again no recollection of such paint. We asked about Cockpit drains. They had none in stock, bronze that is. The chap looked in the catalogue, and advised us to use nothing larger that 1 ˝ ". We were thinking of 2" so the cockpit would drain as fast as possible. The chap showed us a 2" skin fitting and with the flange it really did look monstrous. It decided us, yes a 1 ˝ " one be adequate. The catalogue price of bronze cockpit drains was Ł19.99, no filter though and the stem fully threaded. Looking through the chandlery’s bronze skin fittings stock we found two 1 ˝" fittings, and the chap said he would let us have them for Ł12.50 each, as they were old stock. The one in his hand was marked up at Ł25, but the second on we picked up was marked at Ł31+ ?. Let us get the two. The flange will need taking down level for the cockpit drains. Marked up price Ł62. Ridiculous. Back to base still too cold and windy to remove the boat tarpaulin. Tried to find two local timber yards without success and both of us now starving. We were now close to where we used to have the boat undercover, so got a chinese from our old favourite place and ate it in a layby just down the road from the field where we had the boat previously. Those of you who have been following the story so far will understand how we felt to drive past the field and notice that the shed, or what was left of it was still up and empty. Nothing had been done there at all and there was no sign of an other boat. We will never forgive that crowd for what they did to us. Took off home a little down in the dumps.
29/3/95
Sun was shining when we arrived today, wind calm and enthusiasm bubbling we took off the aft end of the tarpaulin. Not 100% confidence in the weather yet. After tea measured up the main companionway hatch area, then planned on making a start on the cockpit frame for the cockpit sole. It turned out a very pleasant afternoon/evening and we both cracked on. We sanded down the old inch ply cockpit inner sides. These seem to be contaminated, will perhaps need treatment after good sand down. The best piece of mahogany to use for the cockpit sole frame was the pieces set aside for the toe-rails. Decided to use a piece. Measurements taken and then cut the four frame pieces, and fitted the foremost one in place, screwing from inside the main cabin. The screw heads will need a batton to cover them later. Did more painting of the sterling board around the cradle. It was 20:00pm and just going dusk by the time we knocked off for eats and sleeps. We both slept very well.
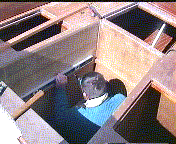 |
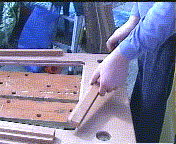
||
| Making and Fitting the frame for the cockpit well sole. Nice and snug working down the hole. |
30/3/95
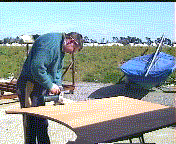
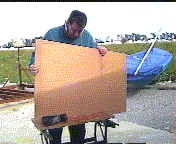
It had been icy cold last night, heavy frost on the boat tarpaulin. Ice in the dinghy next to us. Forecast looking good though. Tools and workmate setup ready. Epoxy put out into the sun to thaw and warm up. Epoxy store checked over. More acetone and epoxy/resin will be needed. Pots were cleaned up. By mid-morning wind picked up. It will be better when the tide turns. The aft cockpit frame piece fitted in place, screwing in from inside the aft locker. Neck scarves and collars are needed to stop the draught down ones neck. Third piece of framework in place (starboard). Screwed these side pieces in place from within the cockpit. Cockpit sides are actually 17mm thick. By 13:00pm the fourth piece of cockpit frame fitted. Using the remaining piece of the new 1" ply (as used for the rudder) for the cockpit sole. Dug it out from underneath the cradle. Made a hardboard pattern of the cockpit sole – starboard and measured for the portside. Marked it out on the ply, checking several times the measurements. "Measure 3 times and cut once" is the motto. Cut it with the jigsaw. Then to plane the forward and aft edges it had to be clamped in the workmate, and Lance standing on the workmate step. Times like this we miss a workbench and vice.
 |
 |
|
| Cutting out cockpit well sole. | The cockpit well sole. Quite a size!. Had to stand on the workmate step to plane the upper edge. |
Planed these sides and took the edges off all sides, then for a fitting. What a faff that was. Had we got it in the hole, could we get it out. It did not go in anyway. The extra few mm on the forward edge which had been allowed needed to come off in the end. Then for another fitting, but just before dropping in place, held it with the screwdriver. Should we or not. If we did and needed to get it out – would have to poke a stick under the main cabin steps and bulkhead to lift it up, if that was possible!. We went for it and this 2nd fitting was it. What an uplifting feeling for us. That gaping hole which we had had to get in and out of, stride over, bend down below to retrieve lost articles etc was now covered. It is not permanent yet of course. But it is certainly a major step forward. As we had the two cockpit drain fittings we measured where they needed to be forward, drilled a pilot hole and with hole cutters cut out the holes ˝" into the 1" plywood. Now we had a hole(s) by which to lever up the cockpit floor. The hole-cutter was then used to cut out the remaining ˝" of the hole from the underside. The hole edges were sanded. Marked the cockpit sole with the hatch position. Leaving ample edging for a) the remote handle clearance, and b) room for ones feet whilst the hatch is lifted. It is now 16:30pm. Clouds have come over thick now – sun is gone, temperature bit on the chilly side especially in the wind. Both of us pleased with the depth of the cockpit well. Other boats have it deeper, but need to watch the waterline on ours. We are satisfied so far and seeing the bronze cockpit drains slotted in it is really an ego booster. Another part of the boat looking more like a boat. It has been busy in the yard today. Boats have been moved around like a game of chess. Several mast’s hoisted into place. The large vessel on our starboard has been shifted into the sheds. It will be better for us now, as it was shielding the sun from us. The dinghy’s are starting to re-appear now out of the woodwork.
 |
 |
|
| Cutting out the holes for the cockpit drains. | Put some plugs in and I could have a bath in here !. Just an idea. |
1/4/95
Excellent start to the day. Sunny, warm and very little winds. Ideal working environment. Assessed the cockpit floor situation. Uncovered the boat first. Set to routering out the hatch area of the cockpit floor, using the pencil lines as the finished size, cut the outer side of the pencil lines. Router bit has not yet been replaced. Its shaft had snapped previously. Made do with a shorter shaft, but then after two passes with the router around the hatch outline, needed to drill a hole in each corner and use the jigsaw to finish cutting out the hatch aperture. Then used the router from the underside of cockpit floor, and a fluted bit with bearing, routered the edge flush. This done contemplated using more of the timber set aside for the toe-rails for the inner hatch aperture frame. They are just the right P.S.E. size, allowing for the teak decking later. The forward mahogany frame edging was carefully cut and shaped at the ends to fit into the newly routered aperture. It took 20/30 minutes. The other three sides will need the same treatment. 16:00pm and the aft frame piece in place. Both pieces have been drilled, plug-hole prepared and screwed into place. Sun is now shining on the starboard side, but now they have moved the vessel from alongside the sun is still shining on the workmate below. The van side door faces south. In all a good position for us and the boat. If only we could get rid of the southerly winds. It is now 18:0pm. The sun not yet at full height, has just disappeared behind a neighboring yacht. The third piece of frame now screwed and fitted in place. It is hard to believe looking at the frame in place now that such a complex joints could have been incorporated. It is a masterpiece. Good joints are needed especially with the cockpit sole as it needs to be watertight. Swept the concrete area of the dust we had made. Advantage being able to setup the workmate on concrete, the dust can be swept up. On gravel cannot do the same. Earlier today whilst routering, some 'posh' people were on a neighboring yacht, two boats to port. One chap on a visit down to his car, gave such a cough – must have been a touch of mahogany dust. Cannot think where from. Even though there are boats within a few feet of us, we don’t feel the same concern over making too much noise. There is so much noise anyway in the yard, and making a noise means you are very busy.!.
 |
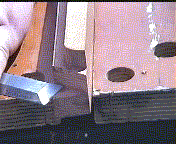 |
|
| Making frame for Cockpit sole hatch. | Close up of complex corner joint of Cockpit sole hatch frame |
 |
 |
|
| Cockpit sole hatch frame seats flush with underside of the cockpit sole 1" plywood. | Marking for mitered corners to the cockpit sole hatch frame. |
2/4/95
Concentrated on shaping the cockpit floor hatch plywood itself. Used the ply cut out from the ply cockpit sole. This had to be routered many times to get a perfect edge. 1st used rebate cutter, then turned over the ply and used a flute cutter. There was a breeze about, so moved the workmate from aft of the boat to around the side, to reduce the dust and noise. Routering this hatch ply took most of the day, and fortunately the sun as shining, and we were both pleased with progress achieved. A retired couple, who had bought a brand new Beneteau 32 , had a problem with the wiring and asked if we had any talcum powder to free a sticky cable which had got stuck in the ducting. We had some. Brut!. In the end they did not need it WD40 did the trick.
29/4/95
We had weekend off to give the van clear out and a spring clean, then the following weekend had news of a death in the family, and our father had been taken into hospital at the same time. The next weekend was taken up with a funeral and visiting relatives and Dad in hospital.
When we got to the boat we found a birds egg aft/starboard on the ground next to the cradle. About the size of a chicken’s egg, but pale blue. It looked like a pebble at first. Needed to dig out the king planks for the forward and aft deck, which we had already made up. After a lot of contemplation of how much work there was left to do still and how nice it is going to look varnished and fitted out, decided to make progress on the companionway hatch runners. Also a start was made on sanding the main cabin frontage/mast step beam inside, then along the starboard cabin side inside. Used the roughest sand paper (40 grade) on the cabin side inside as this had never been sanded whilst we have had the yacht. Getting rid off the epoxy drips, water marks etc was transforming it already, as the eye can look at the mahogany without being distracted towards blemishes. Clouds of mahogany dust were spiraling up through the companionway hatch from Ruth sanding inside, and Lance was sending down iroko shavings from working on the companionway hatch runners. They had been screwed into place and had to be planed perfectly straight and level otherwise the hatch will not slide.
30/4/95
Continued with the hatch runners and then brushed down and hoovered out the inside of the boat. Removing all the cobwebs at the same time. Then the hoover needed cleaning, including the filter. What a dusty job. It is midday now. Afternoon sanded down further in the main saloon area. A problem we had was trying to get a straight edge on the upper surface of starboard hatch runner. Difficult when we didn’t have a straight edge 6’ long. Perfectly straight that is. Not much else done as Lance got shoulder problems – with trapped nerves playing up. Sun did come out today though not for long. Spotted "Maiden" on the river. She is now being let out for charters, having made her name in the round the world fame. We redid the pencil markings on the forward deck to outline where the beams were. Problem with dinghy people in the boatyard is they take up all the space trying to rig up their dinghy sails. No-one can get in or out for an hour at least. Gear is left around whilst they are out sailing and tonight they have gone off home and left a skiff blocking us in. We will have to shift it before we go.
27/5/95
We have had a break, and got on with the garden at home. Arrived last night. Sunny start to the day, cloudy and mild. Uncovered just the aft of the boat though. Everything was ok. Since putting on this different smaller sheet air can get underneath, and through the boat and there is less damp areas developing. Mopped up the afterdeck. It had rained first thing this morning. Much contemplation on where to start and decided to fix in place the cockpit sole. This entailed fixing in first the cockpit sole frame, with epoxy. Had to undo the main companionway steps to enable further screws to be put into the frame forward. Because forward and aft cockpit side ply are only 12mm, had to screw the frame on from inside the after locker and inside the main cabin. The port and starboard frame sides were screwed from within the cockpit well. Sanded down the area of contact for the frame sections to the cockpit well sides, then set to work with the epoxy. Screws for the cockpit floor were a problem. Our stock was getting down and really we needed 1 ľ", but made do with 2" woodscrews. This task was more awkward because the port/starboard ply sides were slightly bowed out, and therefore ended up using piece of mahogany and wedges in the locker areas to push it out level a) for preparing the screw holes on the cockpit floor, then b) whilst the floor screwed into place. Used black sikaflex to set the floor on, as a gap filler as well. Wind picking up considerably now, black clouds hovering, but no rain as yet. Decided then that until we decide how best to make the hatch itself, we needed to make a temporary hatch cover to cover the hatch hole, and also to protect the inner frame planed upper edges. This was quickly made up out of 12mm ply, and iroko edgings. It is about 17:30pm now and there is the odd spit of rain. By 18:30 we had stuck the cockpit floor in place. Quickly put the tools away after and then washed and changed and popped over to the bar for eats. So far so good.
- - - - - - This is the end of Diary Section 24 - - - - - -
![]()