| Home | |
| Adventures | |
| Specification | |
| Diary | |
| Photo Album | |
| Contact Us | |
| Feedback | |
| Hints & Tips | |
| Polish Words | |
| Web links | |
| Problem | |
| Polish Yachts | |


Forepeak Strengthening. Fitted Cockpit Sides. Start on remake of Rudder. May/June 1993.
1/5/93
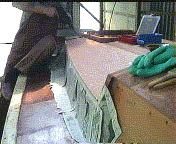
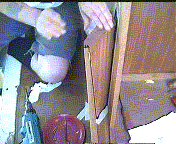
9:00am and sun shining. Could be start to another good day. One needs the sun to stimulate the motivation to get out of bed. We got our shorts out. Cut and shaped the ply section for the portside of the forward cabin deck. Had to screw almost in place in order to mark off the cabin side edge, and holes drilled for positioning of the gripfast nails. All the screws then removed, the area brushed down, paper taped to protect the cabin sides, then Epoxy mixed , two lots of 6/7 squirts. Speedily, because today is very warm and Epoxy will go off quicker, fixed the ply in place, and screwed and nailed it. This ply will really help in keeping the forward cabin frame in shape.
 |
Also the Forward Hatch Spigot was sikaflex'd into place and screwed down | |
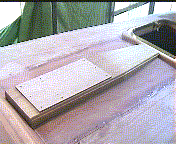
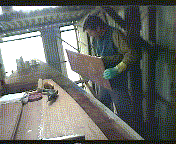
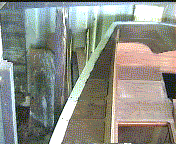
| Portside, 2nd(top) layer of ply on Forward coachroof |
2/5/93
Lance last night sharpened his chisels on the belt sander. Epoxy ruins the edges of chisels, as does oily timbers like Teak and Iroko. Iroko is not quite so bad, but once we start working with Teak, tools will need sharpening more. The timber contains very minute particles of grit. Sharpened also the smoothing plane, to take as much down as possible by hand on the outer edge of the deck ply laid last night on the forward cabin. Planing done and sanded down the starboard deck lip ready for another coat of 'levelling' Epoxy. The voids are almost level now. Then the forward hatch frame removed, and the whole hatch frame sanded down - best done properly with the frame out. Sikaflexed the hatch frame in place, and screwed it in with A4 Stainless Steel screws. Taped the frame of the hatch prior to fixing it. Sikaflex is sticky and needs a good sanding down if it gets where it should not. Wait for it to go off before finishing off. Looking around found the cockpit area cabin frontage is shrinking, and had opened up a hairline crack at the beam joints. Wasting no time nailed in some long gripfast nails. We saw a young deer in the field this evening. Again another good day today. Excellent Epoxy weather if one can work fast.
3/5/93
Spent an hour or so trying to establish how many square feet of Iroko we had - maybe we could part exchange it ?. How do you work it out ?. Square feet or feet squared. Came to conclusion each plank is about 1 cubic foot. Cleaned up the hatch frame and sanded it down. Still more sanding to be done - but it looks tidy for the moment. Another good day. Cut and planed the 6 lattes for the starboard forward cabin side and screwed them into place. Still no further mention or questions from anyone about the strange visitor in the red car the other week. Epoxied the 6 lattes in place and screwed them on the forward cabin-side starboard. With the remaining Epoxy spread it down the starboard hull lip in the voids left to be filled.
 |
||
| Starboard upright lattes epoxied in place. Will need sanding etc once cured |
8/5/93
Full moon last night or near enough waxed. It was so bright it looked like a light was on and casting eary shadows. Sanded down level the starboard hull lip. Once sanded this time it is ready for a coat of Gelcoat. Cut a ply section for the starboard forward cabin coachroof, shaped, drilled and screwed it into place and marked up with the positions of the beams. Epoxied into place the starboard deck ply, but, we forgot to tape up the cabin-side !.
9/5/93
Having looked through catalogues we were disappointed in the price of oval portholes (Ł65+vat) i.e. gunmetal. Contemplated how maybe make them up out of plates of gunmetal, plus strips for the flange - but at the end of the day we will have to buy them. Sanded down the ply epoxied in last night. John H on talking to us yesterday approached the subject of when we are ready to move the boat out - what access for lorry needed - given he is planning on making a 'fancy roundabout' just in front of the shed. We said that a lorry needs to drive straight through the gate and turn round in the field. We mentioned about maybe/probably having to dismantle the shed where it is - John H looked up. Did not dwell on the topic though. No-one is letting us in on John H's apparent plans reference a caravan site here therefore we cannot really settle until the deck is complete so that we know the boat is able to be moved into the open somewhere if it becomes really necessary. Continued tidying up the starboard ply edges with the router, plane and belt-sander. Raked up the rubbish and gave the cradle a general sweep. Opted to use the largest (widest) piece of Iroko for the forward cabin (mast step) king plank. For one moment we was sure it was Teak because of the grain. Cut-off a length, planed one edge and top-side then put it in place to access suitability. During the week disposed of many bags of workshop rubbish.
 |
|
|
| Iroko being tooled to make the Mast Step on which the Tabernacle will sit | Iroko Mast Step being planed and shaped |
14/5/95
Warm day today. We did no work today just drank tea, and discussed what we would be doing when we started work tomorrow. Had chinese and had all blankets and hot water bottles in bed tonight, it was bitter cold. Clear sky and lots of stars so hopefully fine tomorrow.
15/5/93
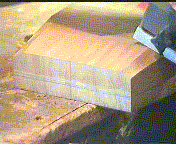
Set to making progress with the mast step timber. Re-assessed the squareness of our centre-line of the cabins. Overall only 1/2 inch out. Going to sit the mast over the main bulk-head and taper this mast step timber from the forward edge of the tabernacle down to the hatch. This piece of lumber (Iroko) 9 1/2" x 40" x 2" approx, weighed a ton. It was planed(electric), planed (hand), belt sanded, hand-sanded and orbital sanded and the upper-side edges routered. This piece now resembles a small coffin top !. It has taken considerable time to work on this piece of timber and will take considerable skill and time to scribe the underside to fit the compound curve. Made up hardboard pattern of the forward aft camber of the forward coachroof, and with the angle grinder ground out the centre underside of the mast step timber. What a lot of dust. Raining outside so had to move the job to the inner corner of the outside workbench, where it was dry - but still be able to work in the open. With patience and perseverance it was ground down, then the outer edges were belt sanded down and slowly the whole plank began to fit snugly close to the deck - accounting for the compound curve.
 |
||
| Iroko Mast Step in situation, with pattern of Tabernacle base on top of it |
16/5/93
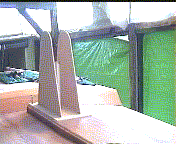
Sunny, cool and overcast. Lots of talking and thinking takes place first thing. Problems now are how to finish off the end-grain edges of the mast-step timber because of Iroko's tendency not to adhere well on end-grain, and also what mahogany are we to use for the coachroof, and how best can the tabernacle, when it is made up, be bolted to the deck, should the bolts go up or down through the deck, can we get hold of allen-key domed headed bolts ?. A lot of answers needed. Made up pattern of the tabernacle base out of MDF board 6mm thick. Tabernacle could either be stainless steel or galvanised steel. The mast will be square at the base - so drew out plan of tabernacle. It is a frightening stage now. The tabernacle is the first bit of metal-work, and it will have to satisfy the mast maker, and also be plumb so that once in the water the mast will stand vertical and not lean forward or aft at the worst. It has been a day for thought today - little activity. Going home with a headache, in a bit. After a sit down what is bugging us now is the mast-step bolt (port) which side-tracked, and is now directly underneath where the tabernacle bolts are to go. With a Makita drill and 1/16" drill tried a pilot hole on the port forward tabernacle corner. It went in. Drilled one starboard a touch and it hit the bolt. We will just manage to use the first pilot hole as the actual hole. However the next port bolt will be bang over the bolt. Will need to use epoxy and tap in a screw bolt as far as possible. Had it not been for the people disturbing us that day, both the mast-step bolts would have been straight.
 |
||
| Mock-up Tabernacle pattern made out of MDF board in situation on the Mast step |
During the week made a mock-up of the tabernacle out of 6mm MDF board. It did look quite large in the living room. The mast step plank we took home and because of the summer temperatures it began to crack. Crackling like snap, crackle and pop ricicles. It was worrying because so much work had gone into this piece. Lance rang Robbins Timbers and they suggested wood cannot be too dry, and there is not available any feeder solution for wood. We decided to coat the ends and top surface with bondex stainer. it seemed to hold the cracks, they got no worse.
23/5/95
We had spent many hours since 10:00 this am discussing life. Very warm and humid today - not working weather. Still no sign of a job for Ruth. It is very distressing, worrying and upsetting whenever we need to spend money. After many strong words spoken to the bolt that went astray in the mast-step support - finally decided to move two of the holes on the tabernacle plate base inwards to miss the offending bolt. Luckily only one bolt affected - the most forward bolt was a close shave against the bolt, but to make the holes somewhat symmetrical we moved the starboard middle bolt hole inwards as well. We have allowed for a mast base 5" x 7" anyway so as the mast is actually 4" x 6" there is scope to move the tabernacle frame inwards if need be. We now need 10 bolts. The holes are now drilled out to size. The wood depth for the bolts, are 5 at 95mm and 5 at 110mm. Add to this the thickness of stainless steel, and thread for the nuts and washers etc.
24/5/93
Took off this morning hoping to find a length of stainless steel bar - but no luck. Then decided to venture out to see if we could find a Stainless Fastenings place. The advert was in Practical Boat Owner for Stainless Steel fastenings. We missed the motorway junction we wanted ( someone moved it), and we ended up cutting back across country. Which as a pleasant surprise it took us past a large Timber warehouse. We pulled over and made enquiries. They stocked Brazilian Mahogany (2" x 6") @ Ł7.50 per foot, and Iroko (6" x 2") at Ł6.00 per foot + vat. Quite a selection of different thickness’ and lengths. Also stocked Teak. The Brazilian Mahogany is darker and redder then what we have been using, but looks like this is what we will need to use. Very hot day today. Both of us feeling dehydrated by the time we got to the Stainless Fastenings place, tucked away in the small shopping area. Very reasonably priced fastenings compared to Chandlery's. Good discounts on bulk orders. Ideally we should spend loads of money here and really stock up. We had paid Ł10 100 8x5/8" A4 recently. Here for Ł10 we got 350 8 x 5/8" A4 plus 80 10x1 1/4" A4 stainless steel screws. Talking to the chap about the Stainless Steel for the Tabernacle, he did suggest electro polishing for re-stabilising stainless after welding. Whilst out visited another Timber place. We had rang them couple of weeks ago. They stocked Brazilian Mahogany and Meranti Mahogany plus teak and Iroko. Teak = Ł55 cubic foot + vat. They do not get many long lengths of Teak though. We need to work out exactly what we need for the deck in order to get some quotes. Back to base now. Both of us felt dehydrated and unwell. The thought of the cost of Teak needed is enough to make one sick. Decided to narrow the tabernacle uprights to allow for mast base of 5 1'2" x 4 1/2" (not 6" x 5"). Mapped out the deck area measurements as a base for calculating the Teak for decking. Tidied up about 21:00pm because early rise tomorrow - Ruth got interview in London.
27/5/93
Using the measurements of the deck area we worked out that the deck side only needs 54 lengths of 12', and to do the coachroof and cockpit as well a total of 99 lengths. At Ł55 a cubic foot that makes a whopping Ł840 (vat inclusive of course).
29/5/93
Arrived late again, as John H would put it. We arrive when we want to. Noticed someone has been into the workshop and taken the bench circular saw. Must be Les H, as he is building himself a patio at the moment. 17:15pm noticed a red car pulled right into the lane at the bottom - then it decided to reverse back out onto the main road and disappeared. Very odd.
30/5/93
Grinded down the bow stem level - so plywood can be inserted from the inside and laminated up to give a solid bow area for fastening bow plates to etc. Difficult to put bolts through right forward - space is extremely limited in what will be the chain locker. Doing this screws can be used for forward then bolts through the 1st deck beam. We worked hard fast at it. 4 pieces of 8mm ply cut and shaped to fit from the inside of the chain locker area - upwards into the bow deck hole. The lowest piece of ply, 14" extended into the chain locker to go up against the king plank. Only just managed to squeeze the ply pieces into place - a very good tight fit. But what a palaver getting them out. Access into the chain locked means you are laid on your stomach, your legs dangling into the forward cabin. Ruth being the smallest does most of the marking up etc in there. Lance had to lay on his back to drill pilot holes through the aft end of the lowest ply. He was too large otherwise. We will be both glad when this job finished. Once fitted satisfactorily - next to epoxy. Used 8 squirts to wet the bow hole area and fill cavity behind the stem. Then used 10 squirts to coat the plywood pieces - quickly passing them to Ruth through the hatch and she inserted them into place. All systems were go - washing stuff in between in acetone. Then once done we realised that an 8mm piece of ply on top would be better as 8mm + left to fill, would be a bit to much to cure if just epoxy - so quickly fresh pot, brush, etc were found, another ply insert piece cut and bedded in place with epoxy - then covered with fibreglass ribbing. All was wiped down - epoxy was everywhere - even Lance's trousers - then it was tea time. Talking fumes though. Ruth whilst working in the chain locker upper area where we were epoxying kept having to come up for air - the only way out for the fumes was through the same opening Ruth went in by. Phew!.
 |
|
|
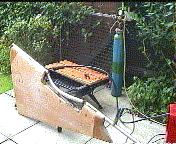
| Bow area which needs re-vamping. Here fibreglass has been cut back and ground ready for working on | Bow area after having epoxied in place several pieces of plywood to build the stem up | Levelling up the area gradually with layers of laminating epoxy and ribbon. Alternated the colours of pigment added to the epoxy |
31/5/93
Sanded down the forward peak/bow area and along the side edges to forward cabin. Cut some fibreglass ribbing lengths, mixed about 7 plunges of resin, a 1/2 teaspoon of red pigment and laminated the forward peak area. Only mixed in a small portion of fibres. It had greatly boosted our stamina getting as far as we have done on this area. The position, lack of access and space was deterring us from even starting it - but after all it went very well indeed. Mixed 4 marks of 125 resin(the laminating one) and 1 1/3 marks hardener. The resin needed thawing though. Hardener expiry was Feb 93 - but should still be ok. Making this mix Blue. Panic situations when we mixed the hardener into the resin before the colour pigment and fibres. Cut two lengths of ribbon for the side deck. The starboard side was done then the portside done likewise. Once this is dry - the bow red epoxy is already gone off where it is the thickest - the epoxy's own heat has cured it - then the whole area need sanding smooth so we can perservere and put down with epoxy the second layer of deck ply forward. It does make us feel better seeing colour on the boat at last. Tea time again and guess what. Man walking near the gates with a gun !. This is turning into a Miss Marples chapter. He turned and walked back down the lane and sat on the neighbours boundary edge firing shots across the lane into the woods. Whatever next. Now as the bow peak epoxy had gone off - sanded it down to give an adhering surface - cut many pieces of fibreglass ribbon - and with blue epoxy this time built up the last 4-6mm in line with the camber of the wood. Again another 4 parts resin to 1 1/3 part hardener. Now mixed a bit of Gelcoat - it is only a bit but the fumes could knock a giant out !. It is now 19:00pm time to clean up and make a cup of tea of course. Ruth feels happy to have accomplished this latest job - Lance not so sure what he feels, wishing we were further on.
1/6/93
Gelcoat not gone off - looks like it - but it had not and it could be peeled off. The hardener must be out of date.? Started to sand down the forward hull edges - but right forward it appears not to be full set.! Leave until next week. Continued sanding down the hull edge portside amidships. Read up about Gelcoat in the books and discovered that there are polyester pigments pastes and epoxy pigment pastes.! We have been mixing polyester pigment pastes with epoxy. Oh Dear. Maybe that is why is had not gone off totally yet. Maybe we have to grind it out again and start again. ! Problems more problems. Contemplated what we now need for gelcoating etc and visited Strand Glass to replenish supplies.
5/6/93
The epoxy at the forepeak had gone off now - and having changed into shorts, we developed a sudden burst of enthusiasm and sanded down the forepeak and sides, and after a cup of tea put a levelling up last layer of epoxy down.
6/6/93
Forecast is record temperatures today - certainly feels like it. Shorts on and sanding down the forepeak area again. Chiselled out the Gelcoat done last week. The hardener was too old.(Over 3 months), and thus the gelcoat not gone off properly. Epoxied in place the forepeak ply. It was like a train gathering momentum. Sanding down, epoxying the area, marking where the beams are on the hull lip ( for later transfer to the ply ) then mixing 10 squirts of epoxy to coat the deck, followed by 13 squirts to coat the ply with. Being warm today though, the epoxy was going off rapidly and only just managed to get the screw in and tidy up the surplus before too late. Had a cup of tea to revitalise our energy, then marked up the ply as to where the beams positions are. Decided not to gelcoat until the ply down as epoxy will stick better to epoxy. Will gelcoat the edge after. On the subject of gelcoat mixed a small quantity and touched up the starboard side of the hull edge where the four notches were. Fetched up the next ready cut piece of forward deck ply. The needed adjusting to account for the lattes now added to the forward cabin side. The ply was cut, and sanded, the deck surface acetoned, the cabin front taped up, and the epoxying began. 11 squirts on the deck, 13 squirts on the ply. Area of coverage was the same as the forepeak ply. The after edge of the forepeak ply was not flush to the deck, camber was not necessarily accurate after all the sanding - so filled up the gap with epoxy. 2nd ply section , as grain went port/starboard was lower at the forward edge. After epoxying and putting plenty on the forward edge, it was still a sliver below the edge of forepeak ply, so with a straight edge levelled it up with a thick layer of epoxy. Both of us pleased with progress. Only thing now is we are out of epoxy. Just managed to mix enough. Literally only a squirt or two left.
 |
||
| 2nd layer of ply now fixed into place on forward peak. Note the blue is where epoxy levelling has been completed along the Hull lip |
7/6/93
First thing hoovered the room and workshop. Then after a couple of cups of tea, contemplated on buying more epoxy. Sped off to Wessex Resins. Spent Ł90 odd quid on epoxy, filler, bits and bobs. We asked about the pigment. How does one know the right quantity. After much ado the chap - the expert - said that one squirt of epoxy and resin = 30gm, and you need 3-5% pigment. But how much is 3-5%, a spatula , we asked?. No said the bloke that is too much. My fingernail ? - no said the bloke - too much. What about a pea ?. Yes, that is probably about right, said the bloke. Best way is to weigh it. How can we weigh it without scales. ? . Asked if they had any spatula's or spoons for measuring such items. No they had not. It was like drawing blood out of a stone, and they are supposed to be the experts. 125grams of pigment past in a pot - how do you separate 1.5 gram. ?. Having left there, found a marine salvage yard on our way back. In we went and were confronted with two chaps - asking what we were looking for and they will tell us if they have it. Obviously browsing was out of the question here. Chap found length of 1 1/4" stainless steel shaft but he wanted Ł10 per foot . Then we spotted a shorter length that had been a shaft but had been buckled. A part curve just where we wanted it. The chap wanted Ł15 for it, and that Ł15 disappeared in his wallet faster that it left mine. Asked about portholes etc, and all he could say was they are expensive!. No inclination to show us any. They are just after big money - over the odds too. Anyway useful place to know for the odd requisite. Back at base contemplated over how we could bend the shaft to the curve we needed, bearing in mind it is 32mm. There was a hole in concrete, in the workshops steps, which had been used in the past to block and tackle a boat up with. Hole was almost 6" to 8" deep. Got our scaffold pole out and slotted it over the shaft in the hole. First one of us, then both of us swung around on the scaffold, trying to bend the shaft further. At first it seemed the concrete was giving, so drew the existing curve of the shaft on cardboard to tell if anything was giving. Sure enough after many swings on the pole, the shaft was giving. Although the scaffold pole was bending as well, the shaft did bend. Had not got the pattern of the curvature needed with us, but when we got home it was perfect.! We had had the chance to use our new fumes masks this weekend. They are worth having - when we remember to wear them. They keep dust, fumes and vapour at bay. It is not worth the risk of making ourselves ill - or poisoning ourselves slowly.
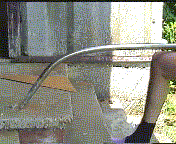 |
||
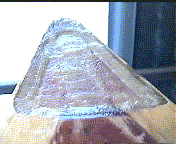
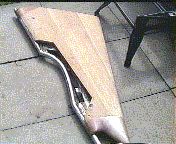
| Second hand 32mm shaft, now bent, to be cut and utilised in the Rudder propellor apeture |
8/6/93
Tackled cutting the stainless steel bar to length. The bend put into it was perfect shape. It fitted the pattern spot on. Clamped the bar into the workmate, and whilst water was syringed onto the cut, to keep the temperature down, used the hacksaw to painstakingly saw through it. It was hard work, in the sweltering hot sun, started it about 11:00 and finished it about 20:00, having stopped for lots of rests in between. Used up eight hacksaw blades, then lastly used the junior hacksaw. The junior hacksaw was actually cutting better and quicker. Because of the angle of the cut we were in fact sawing through 60mm of bar. The shaft was 32mm wide.
9/6/93
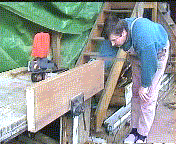
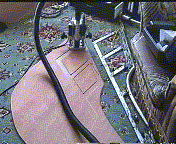
Using the vice indoors, and the junior hacksaw, cut through the other end of the stainless steel bar, in about an hour or so. Next set to removing the laminate from the rudder, so that hopefully we get some more oak, and stainless steel bands and adapt the rudder for practicality and strength. So far things have gone well with it. That night even Peppy was itching all over. Having got all the laminate needed off the rudder, it is surprising where the dust gets. Left the laminate at the two ends in place, to make it easier for laminating up again without fiddling with the end joints.
The rudder at maximum - timber and frame = 71mm thick therefore we need copper nails no less than 3/4" long. One side of Oak = 1 1/8" thick, the other side = 1 3/8" thick. Therefore pieces needed 1 1/4" thick. Rudder will be 24" wide maximum, and the strips on each side must have the joints overlapping for strength.
 |
||
| Laminates removed from the Rudder - on the Living Room carpet !!. |
12/6/93
The gelcoat seemed to have gone off on the hull edges - but the surface still tacky. However it sanded down ok should be all right. Sanded down the four patches of gelcoat we had done, then with red crayon went over the markings of the beams on the forward two pieces of deck-ply. Cut, shaped and marked up a piece of ply for port forward side-deck. Decided to use 4' width to try and eliminate excess wastage. Scribed the hull top edge as the line for epoxying up to - and edge of ply. Cut, shaped and marked up likewise a forward piece of ply for the starboard side. Spent a lot of today talking about the Boat, Jobs, Houses, Money and how are we going to do it! Damp atmosphere does not help ones enthusiasm. The deck - once ply down will leave the options open for planking deck or cascovering. It is looking good so far, slowly working aft with the plywood, coming up to needing to decide about the cockpit sides before we can finish planking the cabin side, plying the coachroof and plying the side deck.
13/6/93
Drilled and screwed in to place the port and starboard side-deck forward ply – ready to epoxy now. Portside piece of ply epoxied in place. 10 squirts of epoxy etc used. Starboard piece of ply now epoxied and screwed in place. 12 squirts this time. Tidied up. Evening we set to finishing delaminating the rudder in the living room. Blankets down, chisels out, and amidst pulling, tugging, chiselling and banging, the fibre glass was removed, in as few pieces as possible. Nasty stuff if splinters get in your clothes and furniture.
 |
|
|
| Cut, Fitted and fixed in place 2nd layer ply portside of forward cabin | Cut, Fitted and fixed in place 2nd layer ply starboard of forward cabin |
14/6/93
Ground the newly bent shaft, plus the existing shaft to make a good fit, and allow for welding. took the rudder in the back garden – set up the welder with stainless steel wire, and gave it a whirl. Really the temperature was not quite hot enough, but using the welder on the highest setting – it was progressing. Later Lance realised the flash, bright light and heat had burnt his left arm. Could have burnt a sleeve or whatever. Really needed a fireproof overall. Having welded it , it was then ground down smooth. All very good so far, the joints appear to have welded satisfactorily. The rudder could now be picked up by the newly welded section. A good strong job done. Now the rudder could be stripped down completely – which deep down we really wanted to do. More banging, cracking and pulling on the living room carpet, oak splinters all over and the oak rudder was removed from the stainless steel frame. Not a great deal in the frame, and we would like to extend the framework further – to give greater strength against whales etc.
 |
|
|
| Shaft section being welded into place |
Shaft section welded in place and tidied up.
|
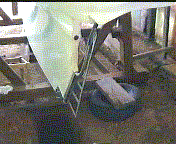
The Rudder stripped of all wood. We want to extend the framework before laminating up again. |
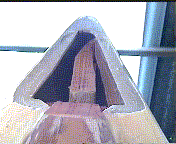
16/6/93
Paper pattern made up of the rudder shape we would like it to be , more curvature than there was before on the outer edge, and larger aperture for the propeller. Thinking about using 6mm ply to insert in-between the frame aperture, then a layer of 6mm ply on top , covered with oak, or even teak. Should be very strong rudder then after all is laminated in fibreglass again.
19/6/93
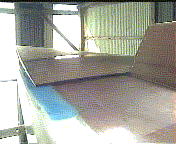
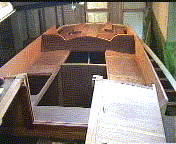
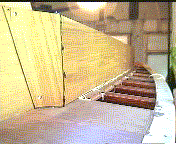
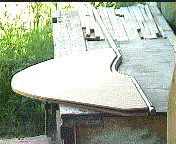
Needed to start on the after end of the boat – the cockpit before any more can be done on the side-decks. Cleaned & brushed down the after deck, and moved the lighting from up forward to aft. Prised out the ply inserts along the port and starboard edge, and prised the cockpit – side beam out. Dusted all down, then sat in place the cockpit side pieces, plus the end pieces. Really gives a boost to our ego now – to see the cockpit sides in place again. The angle and height in comparison to the main cabin sides is about proportional to the forward cabin coachroof meeting the main cabin frontage. Decided to, and drilled and screwed into place the portside cockpit side end piece. On the starboard side though – the cockpit side and the end piece are not level. Must not have finished this when we were last doing these pieces. The starboard side end piece for the cockpit side needed taking down about Ľ". The top edge was marked, then it was placed down on the bench for sawing – and was then noticed it was already marked on the bottom. Checked the measurements against the portside end piece and ended up sawing off the top edge. The end piece drilled and screwed into place likewise. Drilled and screwed both cockpit sides to the cockpit back. The starboard side had twisted itself since its original fitting a year ago so the longer it is screwed now before fixing the better. Need to work out how all four inner corners of the cockpit are to be done before the cockpit sides and ends can be epoxied in. It is not as easy as it looks. May decide to make some boxes aft of the cockpit back to help strengthen corner joints – possibly even to accommodate the gas bottles. Laid back in our cockpit area. it was mentioned about the autopilot. For us we more then likely need to fix a bracket to the rudder shaft – which for us will need to be in the after locker – and again we need to do this before we put the rudder back in. We are going to need to take the original after locker floor up because at the top of the rudder tube, the laminate is not stuck securely.
|
||
| Cockpit sides in place for final fittings before fixing |
20/6/93
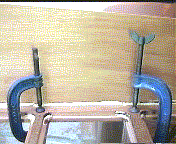
Bright, sunny start to the day today. Drilled and screwed the port cockpit side along the base and the forward edge, and screwed into place. It is 14:30 pm now and what a pantomime we have just had. Firstly made a hardboard pattern of what the cockpit side – aft end would look like – curved or straight. Settled for curved – so having cut, planed etc the hardboard pattern , unscrewed the portside cockpit side, took it down on the bench and cut to shape, the after edge using the pattern. This is the after most edge meeting the deck. Then sanded it around the cut, and also around the newly drilled screw holes Taped up the edges around where sikaflex was to go with masking tape. Took the cockpit side up on the boat, swept the area to be glued, removed the cockpit side end piece, and taped up along the deck on the inside of the cockpit. Sikaflex was put onto the deck beams, and then scraped out evenly. At this point – no wind and very mild temperature – it was beginning to cure. Needed to hurry up. Inserted the cockpit side piece in place – then amidst pushing down the side, screwing up and makita drill batteries running out of energy, switching to screwdriver, then electric drill managed to screw the cockpit side up tight, and sikaflex oused out along all joints. As sikaflex quickly curing thought now best to stick the beam in as well to squeeze up tight with the cockpit side before it goes off completely. Got out the expanding glue, the top needed cleaning out. Grabbed the gripfast nails, hammer, and punch, set up the electric drill, fetched the beam in question from up forward, and away we went. First the deck area relevant was coated with the glue, then taking the beam to the bench, clamping it, glued up the relevant edge. This stuff was going off fast as well. Quickly spread out the glue and cleaned the putty knife. Tissues were flying all over the place. Wipe up and drop it or throw it where we are least likely to stand or sit on it. Ran up the steps with this beam placed it in position and hammered into place. Not so easy. This beam was a tight fit anyway. The first joint a small corner broke off as the beam was slightly twisted. In getting it in it had to be bent slightly aft towards starboard. Knocking was not going to get the beam down flush – so clamps – where are they – in the workshop!. Ducking, striding and swinging about dashed off to fetch some clamps. Obstacle races are easier than this. Clamps on board – race against time to get a clamp on each joint. Glue oozing out all over. The underside of the cockpit side will be cleaned up once the glue and sikaflex fully cured. What excitement all that was – until we realised we have got to go through all that again on the starboard side. Next the main cabin was sanded where the cockpit side front corner piece will be fixed to, lots of sanding to remove dirt and grease etc. Taped the surrounding area up, then spread sikaflex where needed, and screwed the corner piece into place. Having done this we realised we had not taped up the back face of the corner piece – but this can, and will have to be sanded later. Had to dispose of ˝ tube of black sikaflex. Last time we used it was a year ago – and even though nozzle covered with polythene – it was too tough to dispense. Pondered over the latest work of art, and at 16:30 started to repeat the whole operation starboard. This time though more organised. By 18:30m we had stuck and fixed in the starboatd cockpit side, and the front edge piece with sikaflex, and fixed in the cockpit side beam with expanding glue. Quickly cleared up and washed hands. Decided next week, to bring down the rudder shaft, and paper pattern of the rudder to assess better the shape etc. need to empty the van this week because it is MOT time. It is surprising just how much we cart around with us in the van. It is our home, workshop and supplies store.
|
|
|
| Portside cockpit side was taped up alongside where the beams/joints will be | Portside cockpit Beams taped up and sikaflex spread along | Portside Cockpit side sandwiched in place with the outer beam which is now glued into place and clamped until cured |
|
|
|
| Portside Cockpit side forward corner section fixed into place | View along after deck of the portside cockpit side | View looking from the aft deck forward, of the portside cockpit side |
|
||
| Starboard cockpit side done same as portside |
26/6/93
Arrived 21:30pm last night, and John H & his wife got their caravan here, and they were just finishing erecting the awning. They are camping for the weekend, trying everything out before going to York for holiday. Made a start. Cleaned up the portside cockpit side, and sanded down the after deck/hull edge. Far aft will need levelling up likewise. Removed mastic from the area where rudder shoe fits. Then the rudder frame was inserted, the shoe fitted, and some temporary bolts inserted to hold it all in place. A job and half considering working over the six foot hole, and the rudder frame weighs a ton still without the wood. At least it feels like it. Stuck the paper rudder pattern , onto the frame, affixed the tiller into place. The lower welded end of the newly inserted curved section of the rudder shaft is dead in line with the hull shaping. Adequate space for laminating to marry the two edges. The shape of our pattern does not look to bad at all, in fact it looks quite good. Orbital sanded the aft portside edge deck-ply inserts then each one needed re-fitting. Since fixing in the cockpit sides – the beam forming the sandwich at the base had been pushed marginally outwards, thus all outside deck ply inserts needed trimming and planing ready for fixing. We will use the black sikaflex – no brown left. All the portside edge deck-ply inserts trimmed up and now ready for fixing. Finished sanding the hull edge around the cockpit/after deck, then started sanding the hull edge around the cockpit/after deck. Then started sanding the inner edges of the cockpit sides. The portside deck ply inserts are now fixed in. Every drop of sikaflex squeezed out of the tube and the hull/ply edges filled as well to keep water out. Literally we had been at it non stop today. Quite often for bedtime stories it was either the latest boat magazines, or the latest extracts from the Boat Diary.
|
||
| All afterdeck ply inserts now fixed in place |
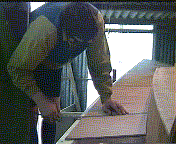
27/6/93
Both of us up at 9:00am, sunny outside, even John H's curtains not open yet. Set to seating and fixing in place, with epoxy and gripfast, the starboard edge deck-ply inserts. sweltering heat today. Removed all the newspaper filling the gaps in the shed roof, small amount of cool air circulating then. Raked up underneath the hull. Discovered some mushrooms. John H filming his plot to show friends on holiday & Gary H popped up and all he asked is had we got the mast yet ?!. We had done nine ply inserts each side, and used 65 grip fast nails each side. Swept up the after locker and removed drips of expanding glue from the hull and battens, ready for hoovering out, and also removed the rudder shoe and tiller again. Marked up some Thames 8mm ply using the paper pattern of the rudder, and cut two pieces. Used just ˝ a sheet of ply. Brushed down the whole boat, even the workshop fluorescent lighting – oh boy the dust on that – ready for hoovering. Hoovered up the boat and swept out the workshop. Cut a tapered edge on both sheets of rudder ply – the edge which will meet the shaft. Also hung a white plastic sack over the forward windows of the boat shed to keep the sun off the boat and hopefully reflect some of the heat. Time to pack up now – temperature now is just right for working and we are tired out.
29/6/93
Marked up the rudder plywood, mapping out the existing framework, and with a new Ľ" router bit, routered out the pattern of the frame, so that once both pieces done the raised sections of plywood would fit between the gaps of the frame to form a sandwich. Really needed the proper hoover attachment, but the rubber connection off the orbital sander hoover attachment, and the existing hoover tubing, made a good fit on the router for working on floor level, but really need the proper hose with a good 10’ length.
 |
|
|
| Two pieces of ply cut ready to sandwich around the Rudder framework | Routering the ply to fit snug around the Rudder framework |
- - - - - - This is the end of Diary Section 14 - - - - - -
![]()