| Home | |
| Adventures | |
| Specification | |
| Diary | |
| Photo Album | |
| Contact Us | |
| Feedback | |
| Hints & Tips | |
| Polish Words | |
| Web links | |
| Problem | |
| Polish Yachts | |


Continuing with Main Cabin Front. September 1992.
1/9/92
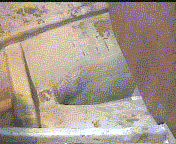
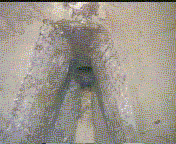
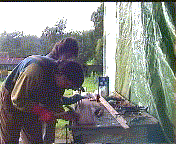
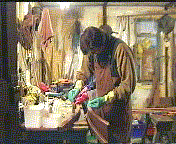
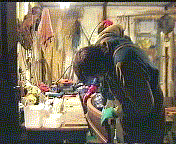
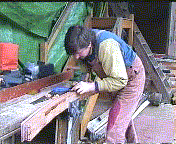
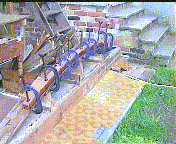
Continued chipping away the bilge paint around the sterntube area. Hands are getting sore, even with gloves on now. The fibreglass and paint is sharp and care is needed.
 |
 |
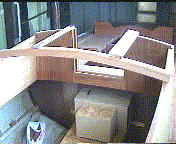
 |
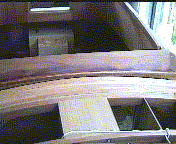
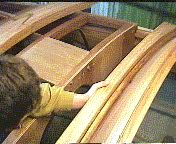
| Chipped away at the Bilge paint here..... | to enable the sterntube fittings to be..... | laminated in at a later stage. |
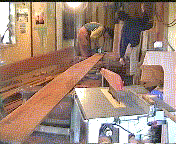
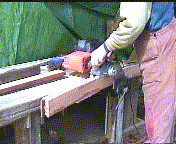
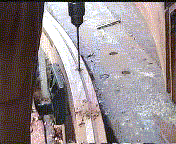
How to fix the 'wedge' insert now needed forward of the main cabin front. Perhaps 4 of 3/4" would bend both ways sufficient. In needing to cut this timber at an angle, the bench circular saw angle needed changing. This had obviously not been done before to the saw's maximum angle, because the additional exhaust riveted on, stopped the saw going beyond 290'. Had to remove this exhaust, then make a new wooden saw guide to now take the saw at all angles. Time was wasted (several hours) but in the end that saw will now cut up to the maximum angle.
The other complexity is how best to laminate the forward 'Deck Wedge' beam to the forward front on main cabin. It is giving us many headaches - as we are not being able to get on as fast as we would like, yet once this section done it will be quite a masterpiece from inside and out. Many cups of tea later, we planed and cut, on the newly angled bench circular saw, a piece of Mahogany that was in a pile of lattes given to us by Dad. It turned out to be a very hard Mahogany, but we managed to bend it to the curvature we needed. Decided to Epoxy this first mahogany piece onto the main cabin front as a guideline. Please refer to the next set of photos to see where these pieces where fixed.
We now need to make up another beam of 4". It is now 20:00pm too late to start cutting and planing timber for the 4" beam, sound travels in the country. Went for a pint, then a kebab. Plenty of chilli sauce, which cleared us out next day, and filled the portaloo. Plus it rid us of any cold that was thinking of setting in. Ideal meal when living in cold, damp surroundings.
2/9/92
The main cabin front, which was epoxied last night, had gone off OK, and when clamp removed the mahogany piece was holding good.
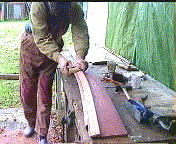
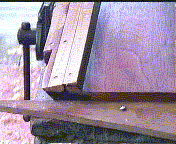
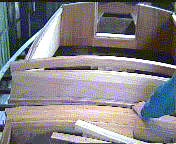
Tackled the next timber insert. After weighing it all up again, putting the main cabin front back in situation - decided on a wedge shaped piece going to nothing on the underside of the beam. A 50mm slat was cut at an angle lengthways, then cut in half lengthways. First piece was epoxied, and using pre drilled and countersunk holes, it was fixed in place with gripfast nails. Clamps no good because the under edge of the front is cut at an angle. By middle afternoon sun was out, so we were able to Epoxy outside. Still overcast though. Later epoxied on the third (lowest) wedge shaped slat into place, and also nailed it on with gripfast nails, also another piece on the upper edge.
 |
 |
 |
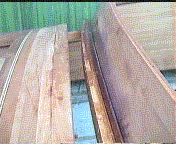
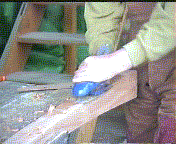
| preparing to epoxy the... | mahogany thin lattes in place. | and fix with gripfast nails... |
 |
 |
 |
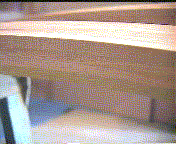
| then sanded when cured. | Finished effect... | Finished effect on Main Cabin Front. |
Pondered over the upper surface of the cabin front - there is one beam, which we had not enough large clamps for to laminate it together with the rest. We cannot clamp it now because of the angled lower edge of the main cabin front. Need some very long screws - stainless steel of course. 3 1/2" ideal and we have only got one left. Need to do some shopping. Also we needed the drill combination bit to countersink at the same time as drilling, plus a larger bit for making plugs. Also we could do with Epoxy dispensing pumps. It is not easy either, trying to pour acetone out of a 20-litre drum into 5 litre cans. Taps apparently, are only made for the larger barrels. Needs some improvisation here.
3/9/92
Cut another two wedge shaped lengths of Mahogany, each divided into 3/4" pieces respectively. At the finish they were just a fraction short in width, but we will make do somehow. Les, the land owner appeared. He had half-hour to spare. He had always shown interest in our progress. Les could see what a difficult joint we were attempting. He mentioned that as of next week, he would have passed ownership of the land onto his son, John. Oh No !. We so badly wanted to buy it ourselves, but not at Les's asking price. After hearing Les's news, we were both so depressed, it knocked us totally off our train of thoughts. And we were only 9 months into the project !. Ended up racking our brains as to what the future could bring now. Les will still collect the rent for the time being anyway.
Anyway we needed to do some shopping. We found one of the two places mentioned in yellow pages, They had good selection of piping and tubing's , plus stop (ball) cocks. They cut tube�s to length. There is a welder down the road. No screws, but they suggested another place around the back. Found a large Stainless Steel warehouse place, but they had not got a great deal of A4 screws. They suggested A4 needed only where water contact. We needed 3 1/2" screws, but they had only 4". They would do for us, so settled for 20 of them, for a mere �12. They were size 12 though.
Now we needed the size 12 screw sink, and plug cutter. Best bet would be a tool shop. Found the screw sink and plug cutter size 12, but problem now was getting a twist drill long enough. Managed to find one close enough to the required measurement to suffice.
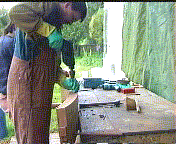
Now we still had not got the Epoxy dispenser pumps, and we need to enquire about a Epoxy filler. Had to call into WEST. After we explained the pumps we were looking for had 3:1 ratio, they said all their normal ones were 5:1 - only their special Epoxy was 3:1. A technical chap was called to the desk, and confusion straight away arose, as laminating as we spoke, was fibre-glassing in their language. To them they thought we were talking about laminating to GRP. They could not understand why we were using GLR + GLH resins etc. for laminating up wood. It appears by the book, we are using the wrong stuff. Having asked about the micro-fibres as filling - this is to be mixed with the WEST Epoxy system. This means we have to buy more Epoxy of the West type, and keep the GLR/GLH for fibreglass laminates. They were ready to shut shop. We were by now totally confused over what is what, so got some Epoxy + filler + pumps + some gloves for now. Fancied buying their own boat-building book, but it will be cheaper, they said, at the Boat show shortly. 17:30pm now and back home to base! We were both starving. Got crisps for now, and cups of tea of course.
Then we laminated, and screwed up, with the bits we had just purchased today, the last original coach roof beam to go on-top of the main cabin front. We made sure we used the new Epoxy purchased today. Once done off to the pub now for eats.
 |
 |
|
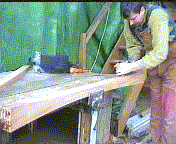
| Epoxying and Fixing with screws the remaining original coachroof beam...... | ...on top of the Main Cabin Front. Clamps not big enough to do this before. |
4/9/92
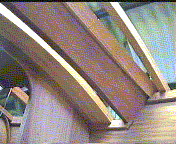
Pondered over the main cabin front latest. Decided when we got round to doing the main cabin coachroof beams , to seat them with 1 or 2 lattes protruding above the cabin side level. Routering for the ply inserts (as the deck had been done) would only be done on the beams, the ply insert going right to the edge of the cabin side.
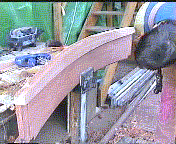
But for now we needed a 80cm wide by 52cm deep beam laminating for the top of the main cabin front. This was to be or a large enough size to accommodate the camber at its highest in the centre of the Main Cabin Front. This was done after cutting and planing the timber from a rough sheet of Mahogany i.e. 195" length of it. Had to move machines around the workshop and keep the door wide open and judge to miss the shed supports outside. Laminated it up on the jig, after having to wrestle with the hardener pump. The new pump had come apart and plunged itself into the container. Care is needed when handling resins and hardeners, and there is no time to waste. We hope there will not be too much upward spring once the beam comes of the jig!
|
|
|
| Mahogany lumber 195" in length | Laminated Beam - for fixing on top of new Main Cabin Front |
Continued with the maststep edge of the main cabin front. 48 gripfast nails used in each row of the 'wedge' shape frontage. We did a second row today, all but the bottom edge. Maybe this could be utilized for fastening of red leather. An idea we have had of using a piece of red leather on the underside of the main cabin frontage. Would have been nice to have had a piece of red leather now, to fix it whilst we are at it.
It would also have been good to have mixed colour pigment in with the resin when we laminating the bulkheads in i.e. red for port, and green for starboard. There is no colour inside the boat at the moment.
This week soon passed by, it is Friday now. Lots of thinking had to be done this week. No place for any disasters. Looking forward to the boat show next week.
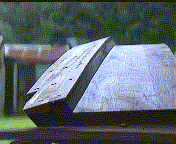
This evening especially, we are feeling a lot happier because the 'wedge' shape beam/frontage on the main cabin front is filling the gap such that it is near vertical and the middle now meets the next beam. From now on not so much bending needed. No one else unless they have attempted this kind of joint before could even contemplate understanding the trouble and headaches it has given us. The owner of the land, being a joiner himself, could see how awkward it was going to be.
 |
 |
|
| Main Cabin Front in place and the Deck Wedge Beam also in place. | The gap is getting smaller now... | Just needs the top piece on the Main Cabin Front to meet up with the Coachroof camber |
5/9/92
Need to look around for stocks of Mahogany and also needed more 1" x 14 gripfast nails. Pending the Boat Show - the chandlerys etc. would be low on stock in the shop - so best to visit them now. First thing this morning took the newly laminated beam off the jig. The runs of Epoxy were still pliable - especially when warmed up. Decided to leave the beam in the sun while we were out - to cure it as much as possible before working on it.
Dashed off about 10:30am. Called in at Travis Perkins. They only stocked Brazilian Mahogany, Swietenia Macrophylla, which when we looked in our book was of the Honduras Mahogany family. Honduras is what we thought we had, but this piece was a "orangy" red colour. Decided to get a 1.8m length of 25mm x 75mm to test planing and varnishing etc. Gasp at price of �4.58 per metre i.e. with the vat a total of �9.68 for this piece. They said it becomes cheaper in quantity. It better had do. After getting some gripfast from the chandlery, toured around from one place to another, with our yellow pages which need updating, looking for Stainless Steel fastenings stockists. Being Saturday as well by 12:30noon places had shut. We had no success. Could do with seeking out a perspex place as well soon.
Back at base tackled this new beam. It looked like it had succeeded. The Epoxy was holding. Planed, sanded it and drilled holes in it, in preparation for fixing to the top of the main cabin frontage. Chamfered off the inside edge, as there was an overhang of about 15mm. This was purposely done because of the corner joints. Used 4" screws to hold it in place until epoxied. Clamps were of no use at all. Used beeswax to try and stop the screws from being stuck in. Needed to remove the screws once cured - to plane down the top edge to the camber of the main coach roof. Once planed down smaller screws will be put back. It is looking good from inside and outside now.
 |
 |
 |
| Electric Planing helps take down the epoxy faster on this newly laminated Beam | Then planed by hand to finish the upper and lower edges. | Drilled and Countersunk the beam ready for fixing on top Main Cabin Front. |
 |
 |
|
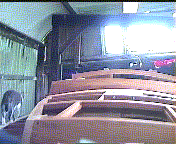
| The top Beam is just screwed in place. Looking attractive though. | Tedious work, but it is coming together well. | Roughly worked out the position of the companionway hatch beams. |
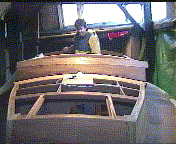
Lance contemplating corking the main cabin sides - then battening them on the inside for insulation, and to stop the timber movement. Roughly worked out the position of the hatch. It will be quite large - but the engine position determines the minimum access room needed.
During the week at home, the engine bed pattern was adjusted further.
12/9/92
We are here for another week. Ruth has got holiday from work. Planed and sanded the forward and aft surfaces of the top laminate of the main cabin front. Fitted into position, and using a spare beam, marked where the top of the coachroof will be, and using jigsaw cut at right angles the top edge of the cabin front. Then positioned in place again and marked the forward top edge with the correct angle of the slope forward. At some point this was epoxied in place. Then it had to be planed down. The 4" stainless steel screws had been removed of course, and the laminate was holding well. Once planed down etc., the screws will be replaced, but with shorter ones. Les's grandson Gary offered us a meal this evening, but we turned it down as we have a lot to do. The laminating jig was cleaned up and re taped.
Further work done chiselling the bilge paint away in the stern tube area.
 |
 |
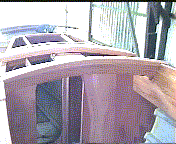 |
| Fitted, planed and sanded the top laminate of the Main Cabin Front. | What a transformation the new Main Cabin Front is... | Even on the Inside it really is looking something special. |
13/9/92
Re drilled and countersunk in the smaller stainless steel screws in the top of the main cabin front.
Racked our brains over how to make up the new coach roof beams. Shall we have an 8mm ply laminate at the top. We are struggling for lengths of Mahogany which can be used without too much waste.
Ended up using three Mahogany lattes, plus one of Iroko. The Iroko latte being the lower most latte, being visible in the main cabin coachroof beams. By 19:30pm had laminated up the first coachroof beam. Beams = 408mm x 69" long x 6 beams in total. A lot of wood in all.
 |
 |
|
| First new Main Cabin Coachroof Beam laminated | Main Cabin Coachroof Beam. Lower latte is Iroko. Rest are Mahogany. |
14/9/92
Sanded and planed the first beam (laminated last night) and laminated up a second beam. It is 8:30am !. Peppy, the cat, woke us up early this morning at 6:30am. Pondered over the final wedge piece needed on the forward cabin coach roof/ main cabin front. Decided to laminate up another beam and scribe it into place. Vertical angle is near vertical now, not so much of the two curves to account for. Out of some of the scrap pieces of Mahogany managed to cut and plane enough lattes to make this extra beam. Have to wait now before the jig will be free.
Decided to sort out things in the workshop. A good workman pays as much attention to his workshop and environment, as he does to the job. Not a corner was missed. Up came all the carpets, spiders, mice, everything. It was hard work - lifting and shifting - pulling muscles in angles rarely used. We will sleep well tonight. It was well worth it. Plenty of scrap timber for November 5th bonfire.
By 20:30pm we were in ship shape in the workshop and ready to laminate up another beam for the main cabin front. Typical weather - yesterday we never saw the sun - today sunny all day and mild. We are hoping for a good day tomorrow to go to the Boat show. Laminated up OK the beam. All we have eaten today besides cups of tea, is pot-noodles. We are ready for big Chinese nosh-up.
15/9/92
Boat Show Southampton 1992
Got up at 8.00 to let the cat out, empty toilet and replenish our water stock. Collated all our paperwork etc. Contemplated taking the shopping trolley with us - but no we'll not bother. Entered the Boat show approx.11:00 am after walking right round the perimeter to find the entrance. With advance tickets we could walk straight in. Where to start was the problem. Set off to look around every stall - initially enquiring about shafts and propellers and winches. Hard to find propeller stands. When we did find two places - both their computers came up with different results. Our gearbox is 2.79:1 ratio, nearly 3:1. We were told we would be better with say 2:1. 3:1 is standard, but 2:1 gives quieter, smoother transmission. 3:1 gearboxes are difficult to get rid off & are fitted as standard. We were told to be looking at a two bladed propeller - better for long distance cruising - but their computer programs were showing pitches like so 14:27 or 14:30 ?. They are very large blades. Someone even told us that the propeller be mounted as vertical as possible? Is this the wind-up of the day? Once we got to this stage we decided we would be better off with a 3 bladed propeller. Now we do not know where to look, or what we want. We had all our details with us, including the hull pattern. The computers were even coming up with a 17" propeller at one point, but no way we could fit it in. Spoke to Perkins, but our area rep was not there at that time. Told them our problem with the propeller and gearbox ratio. We will need to speak to our rep if not now, by phone, to see if anything can be done. Also we would need to send all details and paper plan of propeller spacing, and have some recommendations for props and gearboxes made up, then take it from there. No luck with the shaft, but then we are better off getting the shaft and propeller together - so they are keyed.
One stall had a good rep who demonstrated winches to us. They were the Lewmar ones, but at the end of it he did not sell them - we would need to find a chandlers/agent. By now it is 15:00pm. We have been around all the stalls -retraced our route several times, and are left thinking has it all been a waste of a day. Saw some winches at a Chandlery, with �60 off each one - plus a handle free. We had a cup of tea, then decided now to get the bits we really needed like Epoxy, Sikaflex, and new expanding glue on the market from Sweden - we will try some. Then we decided to go for some winches. Now we wished we had brought the trolley. We asked at the wooden dinghy stand re wooden masts. They reckoned they could make boxed masts, but need a specialist for solid ones. They came up with a place at Oxford we have yet to visit. Bought some rope also to try our winches with. The rope made our day, but broke the piggy bank. Loaded with leaflets and catalogues as well, by 18:00pm we were both tired and we staggered back to the van. Backs aching, legs dropping off. When we totalled up our expenditure, it came to �750 - and that was with a saving of �250.
16/9/92
Removed from the jig, the coachroof beam laminated last night, and cleaned the jig up, then laminated up the coach roof beam number 4. Belt-sanded, and then planed down the latest three beams laminated up.
Epoxied together the two beams, for completing the forward cabin coachroof at the foot of the main cabin front.
By about 19:00pm, rasped the main cabin side edges, so the main cabin front fits better. The coachroof beam on the jig was ready for removal now, and coachroof beam number 5 was laminated up. Just managed with the clamps we have. Not enough really, there are four at home which need cleaning up before they can be used. Still problems with the hardener dispenser pump, not priming properly. How many squirts = 1 part?. We had spent some time faffing around with the Epoxy hardener dispenser pump. We first bought it two weekends ago and first pumping with it - it all collapsed into the bottle. Managed to piece it together. At the Boat show mentioned it to West people, and they gave us another hardener pump - gratefully. We had these apart when we got back to the workshop - to see what went wrong with the original. He suspected when re-assembling the pumps that there should be ball-bearings - but none were to be found. Only by chance this morning pouring hardener from one bottle to another did we find the bearings. They were translucent. The pumps work fine now.
Assessing the engine bed situation. To get the engine down to 10degrees - going to need to make new engine mounts as well. Otherwise it means the engine coming further into the saloon!
Still pursuing further chipping off the bilge paint around the sterntube area in side the hull. All that is left now is the very bottom....
It has been exciting to study the winches - the first deck ware we have purchased, and to look further at the ropes we bought, and the catalogues we picked up. There is still plenty to learn.
Always on the look out for a job in this area for Ruth. It is a long drive two and half hours one way from home to the Boat. Got to be worth a try. We must get a move somehow - we need as much time as possible to crack on with things.
The Geougon Epoxy Book we got at the Boat show, is a very interesting book especially when we got to the pages that were blank. The book was faulty, and had several un-printed pages - which were definitely missing because the page numbers and article stopped short. We need to take this back on our next visit. Very interesting was the table of Toxic wood. Most hard woods the dust is toxic i.e. the resin etc. in the wood is toxic. What with the Epoxy dust as well, when sanding and planing - and then our curry sauces with our Chinese meals - no wonder we felt up and down, not to mention sitting on the toilet for hours at a time. The elderberry syrup we made last week tasted good too. The berries were from the trees just outside the workshop. We made two pints of syrup.
17/9/92
This morning, removed from the jig coachroof beam number 5. Cleaned and taped up the jig, then laminated up beam number 6 by 10:00am. Sanded then planed coachroof beam number 5, plus the double beam for the maststep area.
For a short while the sun shone, and it was very warm. Warm enough to start the Epoxy curing fast. Get this done and maybe we will shoot off to the mast place at Oxford. Looked at the plans to assess the length of the Boom. Plans are inaccurate (as well as being in Polish), plus incomplete. We need the boom to be 4 metres approximately to extend over the cockpit back. The main luff-sail plan showed a length of 3.4 metres, the boom plan showed just 3 metres.
Whilst sat having cups of tea in the van, we think about the propeller. Found two places in our good old Yellow Pages, who did propellers. We started reading out of the book, "Corrosion in Boats", and we tried to establish best material for propeller. Seems manganese bronze is most popular, but gunmetal is virtually corrosion free, but needs thicker propeller blades. Read more and more of the book regarding welding stainless steel etc. Really for our deck we need to stick to either stainless or bronze. Preferably bronze to give it a classy look. Could be the sheets of stainless steel we have at home are no good for welding. We decided to shoot off and find these propeller places - but peppy had disappeared. We waited half an hour and still no sign of him. Typical !. By the time he did return it was too late. We wish we had not got up this morning. It is about 16:30pm now, so we removed from the jig, coachroof beam number 6, and planed it up. Then the curvature was cut in the last beam of the forward cabin coach roof. The set-up still needs final fitting, but just putting all beams into place now - it gives us a real boost. The gap that was giving us aneurysm, is now filled up.
The small hand brush broke today. The handle was rotten anyway. Now we have got a palm brush. We looked at palm sanders at the boat show. The one we want has got to have a dustbag attachment, more than one speed, and not too expensive. There are some nice ones about. We need a pint or two tonight to wash away the mahogany/epoxy dust in the throat. One cannot wear a mask too often. It is too easy when doing a quick job not to bother.
Another Belt sander belt split yesterday. The Epoxy, when trying to remove the drips etc., was so sharp it cut through the belt. Need to take the edge off carefully when sanding at 90degrees.
18/9/92
Yesterday we talked about keeping small off-cuts of timber ends and labelling them for future reference - perhaps even to keep with the boat for when selling it. Sorted out some scrap cut-offs and marked them up today, to identify what part of the boat they were from - and we are keeping them in a separate bag.
Rest of day was spent up and down, in and out of the boat, planing and sanding the last section of the main cabin front/forward coachroof piece. The curvature had to be now fitted perfect as possible. By 17:30pm ready to Epoxy and screw the coach roof sections together. Will need some longer gripfast. to glue and fix the maststep beam to the main bulk head.
 |
 |
 |
| planing the last section of forward coachroof, made up of two laminates itself. | more planing of the last section of forward coachroof. | Final fitting of the last section of forward coachroof. |
 |
 |
 |
| epoxying the two coachroof pieces | screwing together the two coachroof pieces | the two coachroof pieces now one piece. |
Knocked off early tonight, so we could have a quick rest before getting washed & changed. Had a Chinese meal, which was very much appreciated, and a very enjoyable evening it was.
- - - - - - This is the end of Diary Section 7 - - - - - -
![]()