| Home | |
| Adventures | |
| Specification | |
| Diary | |
| Photo Album | |
| Contact Us | |
| Feedback | |
| Hints & Tips | |
| Polish Words | |
| Web links | |
| Problem | |
| Polish Yachts | |


Continuing work on Tabernacle & Main Hatch.. High Marina Charges forces 2nd move. June 1996 to May 1997.
11/5/96
After several cups of tea this morning we sparked up some enthusiasm for work. Took the hatch outside. The fiddle rail underside had already sanded down plus the hatch frontage. This was acetoned down. Lots of 10mm Iroko plugs were made. Then the fiddle rail was expoxied and screwed into place. Because the hatch had been brought home the timber was shrinking. The lats were cracking at the butt joints. It will need a good sanding down, then allow the wood to expand, and varnish it. Made up more Iroko 10mm plugs as we needed more for the Iroko hatch sides. High cost of buying timber ready machined up, and not always guaranteed the exact sizes required, we have built up a shopping list of tools to get for ourselves. First on the list was Elu Radial Arm Saw. Found a tool shop local with the model 1251 which we wanted. Unfortunately the stand was extra, but we needed it. Had long chat with the bloke, and found out some interesting and important aspects regarding the saw. And then we could not resist buying it. This must have been the first time in three days we really smiled. Because of the weight of it, it was all boxed up, we used our old TV trolley to wheel the box from the van, albeit one wheel kept falling off. Spent next 4/5 hours unpacking, setting up and working out what was what. Switched it on eventually, and it was not too noisy at all. Just like a hoover almost. Now we cannot wait to start making something. There is lots of opportunities now, with all it is capable of plus we can get attachments. The lounge looks even more like a workshop now.
12/5/96
Spent all day emptying and clearing out the shed to get the saw into it. Ideally need a shed 2’ wider and 2’ longer. This shed was 6’ x 4’. Too tired by evening to try the saw out.
13/5/96
Tried the saw out on softwood. All we need to compliment it is a planer/thicknesser. Had to spend more though and order a saw blade for quality finishes on the saw. The radial arm saw only comes with a rip blade as standard. This took longer to arrive than expected , so we were waiting again.
15/6/96
Got down to the boat about 13:00pm. It was raining quite heavy. All large boats except one, and us had been cleared from the hardstanding. The cradles had been cleared up and what trailer sailer/dinghies were there had been lined up around the perimeter. Our first relief that no-one had tried to move us. Paid the rent. and asked about updating the electric card to put it square regarding the Ł10 usage charge previously was really Ł1 usage , but then it turned out our receipt for the meter had not got the serial number on it. We needed to note the meter serial number down, and square up next time , when they will be able to dig out the meter record card!. Rain persisted and prevented us from uncovering the boat. Untied the starboard side, and we slid underneath the sheet and climbed on board to fetch the Iroko lats and plank so we can continue with the hatch at home. Nothing else we could do whilst down here.
17/7/96
What a life we lead. Since visiting the boat last, we have been shopping again. The latest addition to our family is Kity Planer. The planer was packed into a large wooden crate. A fork lift lifted the crate into the van so this meant next port of call was to get a sack barrow so we could unload it at home. Back home the van had to be almost emptied to get the crate out. It weighed a tonne. Only just managed it between us utilising the new sack barrow. Got the crate into the lounge and unpacked it. Noticed the manual and red safety guard appeared missing just before we left the shop and sure enough they were missing. After we had unpacked everything they were nowhere to be seen, neither was the guarantee card, spanner or bolts to secure the legs. Phone call to the shop next day, and all but the spanner took 10 days to arrive. With no manual it meant it took us all night to work out how to fit the planer fence, until we found the secret catch.
Talking about waiting for things until yesterday we were still waiting for the two stainless steel bolts for the tabernacle/mast. It had taken 10 weeks for them to arrive.
After waiting for two weeks for a set of wheels for our planer to arrive in the shop, we set off to collect them, and also to hear a dust extractor running. We badly needed a dust extractor in the workshop. Both of us disappointed in the racket the Record dust extractor made. Larger one was more comfortable to the ears, but was too large for our requirements. We left extractor less. Visited another tool shop on the way home. They only had one Dust extractor and we both fell in love with it at first sight. It was a Kity one, green like the planer. However it was the last one left, and had no manual with it!. We got a meager Ł15 knocked off. We had to take it, not wanting to wait, and wait for another one to come in. However the lad could not start it up, reckoned no lead and not qualified/insured to start it up!. Excuse of the week or what !. We took a gamble. A manual was ordered, we would have to wait for it to arrive!. Once home we found the hose clips for the extractor are too small. They only just fastened no leverage either way, also no fitting supplied for the machine end of the hose. With no manual yet, we don’t know what the extractor should have come with.
In the meantime, our family of tools had outgrown our 6' x 4' shed. Work had been started now in the garden to make way for a new workshop. All the tools boxes and timber out of the shed had all been carted into the house, upstairs and down. Using our new sack barrow the old shed was renovated and painted in situ, then wheeled down the side passage to its new home.
Preparation work, and completing the base area of the new workshop has taken longer , and cost more than we originally thought, but in the end we have got a excellent foundation. Had several loads of sand delivered, and on collecting the last 3 of 3’x2’ slabs, the chap at the merchants sighed and commented – the heavy ones – as he was asked to load them into the van. Ordered timber for workshop framework, and sterling sheets for lining the frame outside, then cladding to cover the sheets on the outside. The next six weeks was intensive work, every spare moment, either shopping for materials, or constructing the workshop. There was certainly some weight in the sections as they went together. The workshop base was utilised as a work area, and the lawn was storage area. Each section took a week to complete, from the frame to sheeting and painting etc. Finally 9th August, time to erect it and of all days it was windy. We managed, and what a thrill it was to see it up though. It really did look an incredible size. Getting the felt for the workshop roof was another story. Most places just sold the thin DIY garden shed felt. Once felted the workshop looked very neat, attractive and a project well done. The workshop was then lined out with polystyrene sheets. The flooring was put down and clear varnished, then the window sash glazed, and the tinting sheeting was put onto the glass. It was a thrill to see, and to be inside the workshop. Needed to workout now how best to wire electric to the workshop. It was immensely gratifying to see space in the lounge again, being able to put the saw, planer and extractor into the workshop. We had a mad night that evening and cleaned and hoovered throughout and drank a well earned Rum, sat in the workshop.
26/8/96
Bank Holiday. Popped down to the boat to pay the rent. Called in at a toolshop on the way and came away with a Clarke workbench. It needed finishing touches as it was not stable widthways, but it fitted nicely in the workshop. The plan is to have all items moveable so the workshop can be re-arranged according to work being done etc.
5/10/96
Popped down to the boat to pay the rent, but prepared for a overnight stop. Tarpaulin has now had its day. Lots of tarpaulin dust on deck, and rain had been seeping through in various places. Luckily a hosepipe ( long enough to reach the boat) was attached to the tap, so we were able to hose down the dust etc. Bought a new tarpaulin, brass eyelets and ducktape. Fortunately the weather was on our side , sunny , cloudy and cool wind. This enabled the deck to try out after washing. We set to doubling up the eyelets on the new tarpaulin. Some fresh corner pads were made up ready for covering up the boat again.
In the meantime at home we had rearranged the living room furniture and purchased some bastard files and made a start on filing down the edges of the stainless steel tabernacle pieces.
22/11/96
Had visited the boat 8/11/96 to pay the rent. The tarpaulin needed attention and some of the carpet pads needed reaffixing aft. A rope tying the tarpaulin aft was on its last thread, therefore having left the spare sash cords in the workshop at home, had to purchase 4m cord from the chandlery. Small dinghies were now out of the water and we could not get up to the boat with the van. Rain set in so we did not stay.
We spent many, many, many hours and lots of patience, filing and grinding down to shape the stainless steel tabernacle pieces. The lounge resembled a engineers workshop.
The companionway hatch was also being worked on. As we had butt jointed the lats on top of the hatch gaps were appearing along the glue joints due to wood movement. We decided that we would router out the seams and fill them with black sikaflex 221. After routering , the grooves were sanded, and given a coating of sikaflex primer. We found that acetone cleaned the brush used for primer, no problem. An attachment for the router we had bought recently which proved of immense value, was the extractor hose kit. Had to be very careful when routering the hatch. On occasions the sawdust caught alight on the hatch. Had to dampen the wood, and watch it did not set the hoover on fire as well. Then the grooves were all taped up and primed, and we used our last full tube of sikaflex. There was 14 grooves (3’ in length) and we only managed to do 11. Therefore 1 tube of sikaflex will do one length of the boat for deck caulking i.e. one teak length of 30’ approx. Very useful information. This left us ringing round where ever we could think of locally who may stock sikaflex. It was Saturday morning. No-one did, until we rang a small local boat-building business, cum chandlery, plus garage, A strange set-up. We bought two tubes, had a chat and a view around the workshop where small dinghies are made. The sikaflex tubes were cold, so put them on radiator to warm, but much to our great disappointment, both the tubes were already gone off stuff. Rang up and apologies from the chap but he had no more, and would try and get some. He never did manage to get any. No-one by default stocks it this time of year!., and he would have to buy in a box of 12 tubes, which he was not forced to be able to sell. During the week we rang Sikaflex themselves. They checked the batch numbers we had, and they estimated that it must be at least 4 ˝ years old. SikaflexTubes now actually have a sell by date on them, and the code should start 00. We would just have to get some when we were down at the boat next to pay the rent.
Now we have been contemplating the actual mast sizing. We need to make up a short length of mast a) so that the tabernacle can be welded together to size and b) so that it will facilitate then making up a makeshift boom for making up a boomtent etc. The idea then is we will be able to protect the bow and stern of the boat from the elements and be able to get on board and work during all weathers. We thought of sizing the mast up with reference to a) if we decided to go for an aluminum one first, or b) say the wooden one broke at any point and we had to settle for a aluminum replacement, then what are the standard sizings. Looked through some brochures and found one 118mmx172mm. We had made the tabernacle pieces to fit max 125mm x 172mm. Drew out a paper pattern and both of us thought this sizing looked far more substantial than the original one we had made pattern for , that was 105mm x 152mm. On our plans it shows the mast tapering to 130mm at the foot. That is extremely small. Still not sure what to do though.
21/12/96
Visited the boat the other weekend, and all is in order. Paid the rent. Noticed there was a Yacht near the marina office with a galvanised tabernacle. It was not as substantial as ours will be, and it had an eyelet welded on for the boom’s kicking strap to be attached. The mast was spliced in sections and it looked like the dark colored resorcinol glue had been used. The mast tapered aft on the forward edge throughout its length. Larger Yachts are now surrounding us, making it very awkward to get up to our boat again. Bought a tube of Sikaflex from the chandlery and the expiry date is clearly marked now. This we made sure of.
Our tabernacle pieces have been filed round and smooth on the upper side edges. The base had been filed square and smooth then tapered on both sides to facilitate a groove for welding purposes. Where the back section meets the tabernacle sides a hole was drilled out on the lower edge of each tabernacle side using a morse cutter, such that the lower edge of the hole was open. Extra care was needed whilst drilling because of the stainless steel filings/strips generated. They were razor sharp and covered in engine oil. Engine oil was the lubricant used to try keep the temperature down whilst tooling. All this done in the living room as well, with a protective mat down of course. This would be some peoples worst nightmare at any time. Once the tabernacle welded this hole will allow water to escape which collects behind the tabernacle.
We needed now to make up a mock mast section. Purchased some 25mm x 200mm PAR softwood. This was then cut into 2 foot lengths (5 of them), then these were glued together and clamped to form a solid mast base section. Used balcoton glue the expanding glue. Had to work fast though. Only just had enough large clamps. Cut the base edge at an angle to complement the tabernacle mast step angle. The mast section before planing was 200mm x 150mm and to see this mast section in 3D it did really look rather large. This was when we decided to plane it down and continued planing it down to 115mm x 160mm. A cross section on paper size wise is very deceptive of the finished thing.
Contemplated re a fixing for a potential boom kicking strap. Rather than weld a bolt head in place etc, trying out the idea of using a bolt through both tabernacle sides, with a drilled out shackle slid over, the idea then to have two pieces of tube one either side of the shackle to keep it centre. First drilled out 4 pilot holes, then opened them up to 10m, at intervals of 3" from the tabernacle base, and inset by 15mm from the edge. The burrs where taken off by a countersink. The only measurement we have not got is the position/height of the main cabin roof in relation to the tabernacle.
22/12/96
Further work on the main hatch this week. Used the new tube of sikaflex and filled the remaining grooves, having resanded them to release any dust and dirt, and hoovered them as well. A flat scraper is not totally ideal as it can leave the sikaflex slightly under level. It needed a further top up with sikaflex on each end of all the grooves. Dug out the orbital sander dust extraction attachment and using the new hose it was ideal for getting a good sanding over the whole hatch ,working in the lounge. The hose is long enough to run the hoover out in the hallway. Even Peppy, the cat, is used to all the noise we make, he sleeps right through it all. More sanding, and more sanding, and hoovering of the hatch, We noticed though there is a shaded/darker strip across the aft end of the lats plus two darker patches either side of the forward edge. Must have been a result of the duck tape covering these areas and UV faded the rest of the hatch slightly through the tarpaulin.
23/12/96
It is the night, before the night, before Christmas 96,
And all through the house,
Wreaks the pungent of varnishing,
The main cabin hatch,
The Christmas tree is glowing, streamers glisten,
And the walls are adorned,
With Christmas cards, and boat pictures,
To keep the water spirit flowing,
The tool rolls are hanging, and we’ve got our socks on,
What ever Santa can carry, will be gratefully received,
Not had contact from John W yet this year,
But the sausage rolls are cooking, the beer is in,
A new year is dawning, whatever it holds,
It won’t be easy sailing, we’ll be kept on our toes,
We’ve a goal to achieve, although it may be time yet,
Before we cast off from the mainland and sail into the sunset,
written by Ruth. December 1996.
Merry Christmas and Happy New Year 1997.
Watched most of our boat video tapes over Christmas to recap on just how much work has been done on our boat, and planned out our goals for the coming year. Pushpit, Pulpit, stanchion posts, boom and a length of mast. Then Teak Decking etc, cockpit hatches etc.
12/1/97
Weeks are rushing past. Hatch has and still is the first headache of the new year. Made progress on cutting the corners of the hatch edging strips. The two side pieces were cut to meet the forward piece, and then work was done on cutting to shape , edging and preparing and drilling to screw the back edging strip in place. The back edging strip will be in three parts because the centre section must be removable, for such times as we need to remove the hatch off the boat aft. Having got this far we then had to decide on how best to tackle the possibility of water getting between the stainless steel runners and the brass strip, and dripping directly into the main cabin. We had already routered a groove in the iroko runners on board, but was this the best idea?. Should we router that groove square, insert a piece of battening and have the groove in the hatch section itself. Or would it be better to leave the groove in the iroko runners and have a rounded top edge on the companionway hatch frame fascia boards (yet to be fitted) , and then router a groove in the hatch into which this rounded edge will slide. The whole process is not easy when one is not working from an existing item.
5/4/97
Had been visiting the boat once a month to pay the rent. Having taken the hatch with us for further fitting – the stainless steel runners on the hatch need really to be filed out a touch. The movement of the iroko runners and the brass strips, and the very tight fit of the hatch runners is causing considerable friction. When they were welded up we should have used more than a hacksaw blade as a spacer. Purchased some milling bits in the end. It took a lot of patience and many hours of work to mill out the two stainless steel runners on the pillar drill. When we visited the boat today, we both felt we wanted to stay on – but it was far too windy to contemplate taking the sheet off. Still boats around us, but we should be able to get the van up to the boat shortly.
Since then – guess what – we got a buzz for a circular bench saw. The need for one of our own is more on the increase, and although looking at a scheppach one originally, we visited the tool shop and saw the Scheppach one, and then saw the Kity equivalent which we fell in love with. We got the saw table plus a right hand extension drop leaf section. The shop chaps looked aghast when we said we would take it there and then. On leaving the technician/woodworker chap gave us a turned wooden bowl for free. Was it a kind gesture or a hint on the next visit to buy a lathe ?. Space made in the workshop to accommodate the saw, this then enabled the fascia boards for the workshop roof to be completed, and then fitted.
5/5/97
Weather still quite cold and wet. The weather and the boat being so far from home is getting to us somewhat. Not much we are able to get on with at all. On the way back from shopping one day we stopped off to look at a Canal Marina which was being setup just down the road from home. A new wooden building had been built which was signposted reception, and the pontoons had a good 30 barges moored up. Should we go in or not we pondered. No-one was about, just open a door. We went for it, and to our surprise it was inside the beginning of a chandlery with a reception desk/counter. Again no-one around. Then a chap appeared, the owner of the canal marina , and we put the question to him re possibility of bringing our Yacht onto hard-standing at the canal marina. He could see no reason why not. There was to be shortly another Barge fitting out project due to arrive. He left us with a leaflet giving details of their services and prices at the canal marina, and we left to give the whole idea thought, and to pop back sometime. The office area has a workshop behind, and it has been officially open for the last year. Lots of thought and ideas buzzing around in our heads now, not to mention the thought of financing the whole move. We visited again later in the week and asked permission to take a walk down to the far end where the hard-standing is, to see if it would be suitable for us. It certainly looked very promising although working out South and North was confusing. The canal must have a bend in it. The yacht would need to point to the canal due South. Sitting in the van just before we left we pondered over the types of characters there are likely to be in a canal marina like this. During the next two weeks gave lots of thought to the prospect of the yacht in the canal marina on the hardstanding.
3/5/97
We visited the canal marina, the owner was not around, but a member of staff gave us the ok to have a wander down again to look at the hard-standing area.
4/5/97
We popped back to the canal marina to see the owner. Hard-standing is more expensive by default than moorings. We had talks about having our charge as per mooring fees, looking initially at 3 years tenancy. Showed him the photographs of the Yacht to give him a better idea of the size of yacht etc. We left him with plenty to think about. Water stand pipes would be up there shortly, and electric pods are being setup as well, as they are due to excavate further at the bottom to complete the pontoons at that end of the canal marina.
In the meantime we had rang the same Transport company who assisted us in our last move, to see if they could help us out with transport and to get some idea of price. The lorry driver was happy enough to assist and would let us know shortly about the cost.
5/5/97
Visited the boat for the day to check things over. As we could get the van up to the boat, we ended up getting out all the timber from underneath the cradle, and had a good look at what we could take home. We had also taken the hosepipe with us to give the whole boat a good wash down. Did not stay at the boat weather was still very cold and damp. However we managed to get all the timber into the van utilising the roof rack for the longer lengths. There was just room for us inside. This saved us having to hire a trailer. It was a job well worth doing and long overdue anyway, whether we moved the boat in the end or not. Emptied the boat as well of all timbers except for the extra long lengths for the toe-rail sections. Arrived back home late afternoon, and it took until dusk to unload the van of all the timber and to stack in the shed, and down the side passage.
11/5/97
Re-visited the local canal marina to catch the owner and after further negotiations we agreed the price of hardstanding per month with electric10p a unit on top, and they penciled in the 27th of May as the day Yacht 'Emerald' would arrive. We called the lorry driver and obtained a quote from him and set the date penciled in for 27th May 1997. The local crane foreman could not be contacted at weekends.
12/5/97
Visited local Crane company The foreman said they should be able to help us and he took the details, and would let us know if the 27th May was not ok. We had spent Sunday, Monday and Tuesday knocking together a contract for ourselves. The canal Marina owner had said our situation was different from the Barges, and that the standard contract would not be totally relevant to us. They would put something together. Midweek had call from the Marina, asking if we were still interested, as they would need to get the paperwork sorted out. They were interested to hear we had done a contract ourselves and asked us to drop it in. This we did.
16/5/97
Visited the boat to arrange Travel Lift for the 27th May. Saw the Yard Manager and booked and paid for the Travel Lift. We thanked him for his help, and he wished us well. We ended up staying overnight at the boat. Got some paint and painted up the cradle to tidy it up. Tried some gelcoat cleaner on the hull to remove most of the marks. Noticed the hull is remarkably whiter, and epoxy drips had flaked off the hull where it had been exposed to the UV. Painted drop boards and cockpit well temporary hatch cover with 5 year wood stain. Seems now around our boat, that all the Skiffs have gone elsewhere and the trailer sailers, plus some larger Yachts are shored up surrounding us. Looks like their plans for the yard have changed again.
17/5/97
Emptied the Yacht completely of equipment and accessories, covered the boat up and then dismantled the access steps, and loaded them onto the roof rack to take home. Arrived home mid-afternoon and not having heard anything more from the canal Marina we dropped by. They had read our sample contract, and ended up just drafting a letter of agreement about the rent etc, and with it will come the standard Mooring/Hardstanding Terms and Conditions. We quickly read the letter through and settled for this agreement. The official copy would be sent to us once Yacht ‘Emerald’ arrived. The level base for the Yacht would be up to us, and to put it where we thought best at the eastern end. So far so good.
20/5/97
We had phone call from the canal Marina, to say that the local Crane had turned up. We confirmed that it was the 27th not 20th. Then we rang the crane office to double check. They could fit us in on the 27th it just so happened. Wrong booking somewhere!.
We had got hold of two ratchet straps, and during the week we pondered how we would affix the ratchet straps around the cradle, to strap it to the Hull. We bought 3 metres of rope (polypropolene) from the local Chandlery plus a fid and spliced up two loops.
24/5/97 & 25/5/97
Spent the weekend painting up the access steps at home, having given them a good sanding down. Needed to repair and glue up one of the tenons on the legs, which the boat Yard had broke in trying to move the steps that time. Dug out the handrail and pads and assembled the steps as they had been back at the workshop when we took the project over originally.
26/5/97 - The day before the move
Could not decide what to do about a base for the Yacht. In the end time was running out fast and there was no telling where exactly the lorry and crane would be able to set us down on the hard standing area. We would have to sort something out later.
Down at the boat yard the electric chap, happened to be in the Harbour office, and with regards to the electric meter and lead, to buy it from them it would still remain registered to them. We would be better off buying direct from the manufacturer. During the afternoon two yard chaps were checking who was plugged into the electric boxes and they were able to switch us on for the evening.
Positioned the ratchet straps over the hull, and around the cradle. Hole sawed two holes in the cradle front sterling board sheets, and put the rope loops through. Used plenty of carpet and pads under the straps and tightened them up for good. Removed the cockpit well temporary hatch cover. Tied down the lengths of timber in the boat. Took some photographs to finish off the film.
 |
||
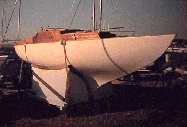
| Our ratchet straps over the hull and around the cradle ready for the move tomorrow |
Had our favourite meal (hot chicken and salad) and several pints of Guinness to make our last night at the Boat Yard Bar. The bar manager was there and when we mentioned the costs of being at the boat yard going up and up, he had heard the same thing from a lot of other people who were moving on. We will miss the bar meals, smell of sea salt and seaweed, but we won’t miss the journey etc. Had a saunter around the yard back to the van, looking at other Yachts and to see where the travel lift was.
We did hear though from two different people today that a friend of a chap in one of the workshops had been recently to the yard and was very very interested when he saw our boat and wondered if we wanted to sell it. No offer was made. It can only be a boost to think that someone else finds our Yacht, at the stage it is, attractive and wish to buy it. We slept well that night, and set the alarm clock for 6.00am. Left the boat uncovered that evening.
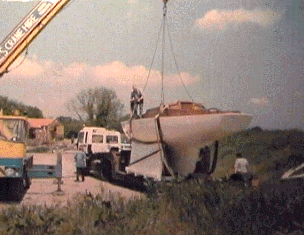
27/5/97
Alarm went off at 6:00am sharp. After several cups of tea we stirred , got dressed and washed and tidied up the van. Folded up the tarpaulins proper, and removed the forward and aft shores and loaded the van with all the remaining loose odds and ends. Walked up to the gatehouse to advise them of the arrival of the transport lorry to take our Yacht, and for them to direct the lorry in the right direction. The chaps said we would need a release note from the harbour office. So off we traped to the Harbour office, taking the electric meter cable with us to return, and get our Ł100 deposit back. All the yard chaps where there, including one of the gatehouse chaps therefore we did not need a release note, they were now all aware of the move. Handed the meter lead back, and got a written receipt for it. The deposit would be returned by post.
It was now just after 8:00am. Time was marching on and our nerves were beginning to tingle with anxiety and excitement. Then two lads turned up with the fork lift truck to move us. They had to try the fork lift to see if they could move us even though we pointed out that the cradle is wider than the flat and can only be moved with the travel lift. They finally realised this and telephoned through for the travel lift. We had paid for the travel lift. Next the travel lift arrived. We mentioned to them to take it steady on the lift as the cradle was strapped to the hull. Now we were waiting for the lorry. It was getting on for 8:30am, and we made quick call to the lorry driver. His wife answered and said he left a good while ago, and should be there anytime now. Just after ringing off he appeared. Relief. We were even happier to see that the lorry driver had brought with him a shorter trailer this time as requested. It made our day knowing what we were to be up against getting the lorry into the canal Marina very very tight entrance. The travel lift went into position and straps went on. Just managed to get a rope tied between the two lift straps, slotting it through the cradle frontage. Up she went slowly, all keeping close eyes on movements. Then the lorry was positioned and the travel lift moved over the lorry.
 |
 |
|
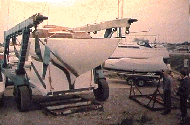
| The boat yard Travel Lift lifts us up and.... | .....lowers us down onto the lorry trailer. |
It was a little concerning to us the fact that this lorry trailer had no Yacht leg supports. It was all to be straps to hold the boat and cradle to the trailer. Our forward ratchet strap had worked loose i.e. slid down over the mast step. The lorry driver hopped on board and redid this for us, then positioned his strap around the forward cabin and one around the rudder area etc. Once the lorry driver was happy with the straps we were ready for off. It was now about 9:10am. All so far so good. Even having moved the boat before it was still a nerving experience following the lorry. Only about a mile down the road did bits of carpet and underlay fly off. The ratchet strap of ours up forward had obviously slid off the mast step again. Just before going onto the motorway the lorry driver pulled over to the hard shoulder and hopped on board to resecure the strap with fresh carpet pieces. Good job we had lots of them with us. Set off again keeping to max 60mph. We rang the crane company up when we were about 10 miles away from the canal marina to see if he could get to the marina by 11:00am. The crane was out at the moment, but would be there as soon as. Arriving at the canal marina we initially pulled up outside the entrance. The lorry driver commented "I see what you mean about the tight entrance". The lorry driver took the corner as wide as he could but ended up stuck, as we had predicted. The fence posts had to come out. We dug out our crowbar and sledge hammer, which we had brought in anticipation and post after post was removed luckily they had not been concreted in. ľ of the fence posts had to be removed to get the lorry in.
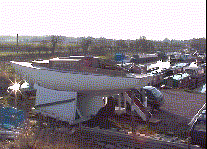
There was still cars parked at the eastern end near to where the Yacht was to go. We went in to reception to ask if they could be moved as requested. The owners aparently were not around and had not been since Friday. One owner was in Austrailia. !. What a blow. We would have to make do with the vehicles parked there. Anyway the kettle was put on and a member of the marina staff kindly made us all a cup of coffee, whilst we answered nature’s call and washed our hands. It was now 11:30am. A red car arrived and promptly parked right where the crane and lorry would be needing to park. Ruth had to walk down and kindly explain the situation and the need to remove the vehicle temporarily. Once down there as well all sorts of junk had to be shifted from where we were likely to be placed. Pipes and cables, metal rods (8’ long) and metal stakes about 10 of them 7’ long & all bits of rubbish were just strewn around. It had been promised to us this would have been shifted. Ruth set about shifting all this lot onto the bank side. Meanwhile the lorry driver had walked down to assess the area, and decided he could turn the lorry round here. So he took of back to the top end and brought the lorry down and just – give two inches – managed to turn around. Have positioned the lorry ready, the lorry driver took off looking around some of the barges for sale. He really went to town at that. Time was getting on 12:30pm came, and no sign of the crane. We made a quick call and rang up the crane company. The secretary had the driver on the line at the time and he was in the area now and would be with us in minutes. Briefed the crane driver when he arrived on what was to happen and he set off down to the bottom area. Now to find the lorry driver who was no where to be seen – hidden on one of the Barges !. We shouted and up he popped, almost reluctant to be disturbed. We all prepared for action. We decided where we wanted it, and the crane positioned itself accordingly. The straps looked rough and dirty on the crane, but then it is not a crane just used for lifting boats. The lorry driver hopped up on top our boat to position the crane straps on the hooks and up she went. Another young lad appeared from the marina and kept yapping "needs to be as close to the bank as possible – got JCB coming here in few weeks time". We pointed out that it was only hard and level up to a certain point and that was the limit up to the bank we could go. The lorry driver asked us all to steady the cradle whilst he moved the trailer out of the way, then one of us on each corner of the cradle we swung 'Emerald' 360degrees on the crane hook so she was bow to the canal. Then as she was lowered down we made sure the cradle and boat was pointing more just South-West. This little voice still kept yapping "keep close to the bank!". She was lowered down and straps removed. Probably not 100% where we would have liked it, but it would have to do. Just before the straps removed the lorry driver ensured we got the chance to move the boat forward in the cradle whilst she was suspended. This was done as best we could. She had slipped back out of the cradle some inches when lifted at the boat yard. This done all straps removed and carpets removed. We squared up with the lorry driver and thanked him, gratefully. The lorry driver had to demolish the last Ľ of the remaining fence posts at the entrance way to get out of the canal marina. Squared the crane driver up, then set off for home for a rest and cup of tea.
 |
 |
|
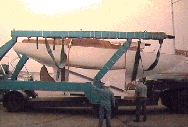
| 'Emerald' just before the crane lifted her off the lorry trailer at the Canal Marina. | The lift off the lorry trailer. |
It had all gone well in the end but almost unbelievable that it had actually happened. Nerves and tension can almost numb the reality of it all until later when one sits down and recaps the events. Had a good rest and cleared something's out of the van, and then we re-visited the boat early evening. Put up the ladder for now and checked over the boat. All appeared ok. Put back the cockpit hatch cover. Mid afternoon booked two toe-jacks for the next day to lift the boat for leveling.
 |
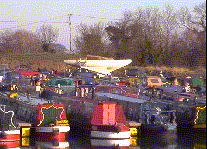 |
|
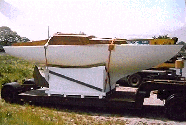
| 'Emerald' in her new site. | Surroundings with a difference. |
- - - - - - This is the end of Diary Section 28 - - - - - -
This page has been visited
times, since 7th December 2013
![]()