| Home | |
| Adventures | |
| Specification | |
| Diary | |
| Photo Album | |
| Contact Us | |
| Feedback | |
| Hints & Tips | |
| Polish Words | |
| Web links | |
| Problem | |
| Polish Yachts | |


Making up Forward Hatch. Battening Forward Cabin Front. January/February 1993,
January 1993
Mast estimate arrived in New Year. Approx. �1500 for mast, boom, spinnaker pole and spreaders, all made of Sitka Spruce, this included track on mast + boom. This is ex-works. Our boat-show tickets arrived. Can we go though ?. Can we spend anything. Ruth needs a job - we need money. Watched all our sailing videos right through over Christmas to keep up the spirits. Visited Adlard Coles book place to get a book on Understanding Rigs and Rigging. Very good book. We tore our hair out trying to digest this book and any other we had about masts and rigging. Would it be advantageous for us to have double spreaders - increasing the shroud to mast angle, and reduce the compression load of the mast on the decking. ?. We have both had a long deserved rest from the boat over Christmas and New Year. Looking forward to the Boat show and visiting the boat at the weekend.
16/1/93
First on the agenda is repair storm damage. One full sheet on forward end of shed down and one side piece. They were replaced with metal sheets. Do not want to spend too much time over the shed because it is not ours. Rained all last night. The field was absolutely waterlogged - only just got the van in, amidst swishing and swoshing around. Lots of tea breaks needed, then set to trimming up the bushes down the side of the field, best for driving the van up. Do not want to overdo it trimming the trees that are not ours - but then do not want to scratch the van. Just finished, sat down to another tea, now 16:00pm and going dusk. Found a Christmas card & present last night from Gary & his wife. In the card was written 'Sailing in 1993 then'. Wonder what was meant by the comment ! Just before darkness put in the odd slabs and bricks in the sludge grooves we had made when we got the van stuck earlier. Then used the four bags of Mahogany sawdust and sprinkled it in the tracks. Visited the marina pub tonight, and had a look at the Yachts ashore, especially the masts and spreaders. It is the only time one can look up at the masts without the sun in ones eyes.
17/1/93
Today we cut and fixed in with Sikaflex the remaining five deck-ply inserts on the starboard side midships. Put Sikaflex between the hull lip and deck ply along forward half of the portside side deck. Water getting through gaps when it rains and starting to stain the underside of the ply. Once we find out the results of Ruth's job interview last Friday we will feel better. As it happened the Interview was in London, and worked out right for visiting the boat show the same day. We quite liked the windup nautical clocks. Enquired about the shaft stripper cutters i.e. a vertical fitting one. They do not do such, but we could ask back at the office to see if they could come up with something. Also enquired about Halyards flexible coupling set-up and stern-tube inner gland fitting. Need to take some measurements of our situation. Spinnaker poles and fittings from the Mast place �35 each. Similar ones at the Boatshow �40-�50 !!.
23/1/93
Today, we set to laminating up the extra beam for the forward cabin/forward bulkhead. Enough off-cuts of Mahogany lattes i.e. 2 and one piece of Iroko. Needed the hot-water bottle on the resin, but it worked. Fixed a strip forward end of the companionway hatch opening to meet with the Port/Starboard sides. Cut and fitted the top ply for port and starboard of the companionway hatch. Needs some small corner bits fixing where cockpit cabin fronts falls short of cabin side height.
 |
 |
 |
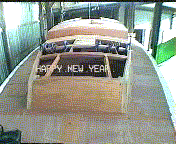
| Happy New Year 1993 | Made
up another beam and fixed in place.
|
Cut and Fitted plywood for port and starboard of the companionway hatch |
24/1/93
Quite mild - not used the gas fire this weekend, and last apart from half hour early Saturday morning 23rd. Last nights gales blew an old caravan, in the field, off its support bricks !. Our shed intact this time. Belt-sanded and planed down the newly laminated beams. Epoxy cured OK. Cut and fitted this last beam in forward cabin coachroof, centre of heads. Continued removing the remaining bulk of surplus sikaflex inside main cabin coach roof. The stern-tube area of the hull was also completed i.e. removing the bilge paint etc. Tedious job working in the stern bilgeswith the main cabin bulk head there now, space is at a minimum, Turned out warm and sunny this afternoon. Awkward fitting the latest beam on starboard - because no staging that side yet. Routered the edge of the beam in the appropriate places as per the main saloon beams. Temperature dropping rapidly here now. Put sikaflex on hot water bottle to warm, had a cup of tea, then epoxied into place this beam , after we had had a sleep.
 |
 |
|
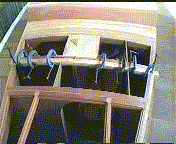
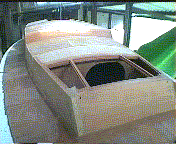
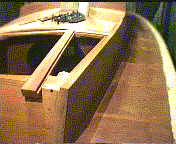
| (Looking aft from forward cabin) Fitted in place the latest Beam, having routered it as per the Main Cabin coachroof beams. |
|
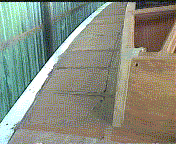
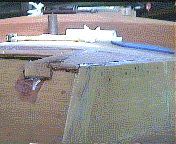
Starboard Deck now complete with ply inserts. Just needs the surplus sikaflex sanding. Note the sikaflex between the plywood and Hull lip. |
25/1/93
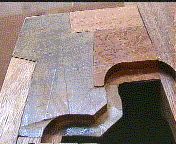
Would have liked to have continued with forward cabin coachroof, but Epoxy from last night not quite gone off fully yet. Set to sanding off the surplus Sikaflex on deck. Got round as far as possible starboard using the stageing - then decided this was it. The rest of staging on starboard had to be done. After two hours searching out some timber, without having to cut too much, managed to erect some basic staging. Made a change to walk below, and see the hull from underneath. Reminds us just how big she is. The staging is now done - a job long outstanding. Jobs not on the boat itself took some enthusiasm to accomplish. After our well earned rest, the Epoxy on last nights beam had gone off now - so planed it down level with the adjoining beam. Should be able to make progress on the ply inserts next week. Hoovered up the hull. More sawdust out of the workshop we sprinkled over the mud tracks in grass. Situation bettering - the recent winds have been slowing drying out the field. Sunny again today - but by 14:30pm sun gone in and by gum, it turned cold. Forecast big frost tonight - and gritters are out on the roads. Oh nearly forgot - after finishing the staging - we were able to complete sanding down of starboard deck side. Removed bow deck ply i.e. the 2nd layer. It was only screwed down. We needed to assess the situation underneath. There is some filling at the forward peak, which we need to remove and replace as the filling mastic was cracked and dry and the hull lip is not in line with the camber of the deck!.
30/1/93
Planed and belt-sanded the forward cabin latest beam, also on the cabin side edges of it as well. With the Elu router, routered out the forward cabin beams , excluding the hatch area, for 12mm ply inserts. Managed carefully to take down the top edges of the bulk-heads with the router so that the ply inserts can go over the bulk heads - and later beading can be fitted inside and fixed to the ply. Sanded and tidied up the beam upper edges, to ease sanding down inside later once the ply inserts fixed.
Belt-sanded down the two beam ends exposed in the companionway hatch area. Needed some more grip-fast nails approx. 3" to put some into the last forward cabin beam fitted. We dashed off to the chandlery. Only 2" gripfast now - no 3". 48 of these bought ,�3.55. Asked about brass hatches and they knew no-one who did them. Popped over to another chandlery and they had a catalogue we could have - and in it was brass hatches!. After another cup of tea set to cutting forward 12mm ply insert, i.e. just in front of the mast step. Problem marking the ply underneath because of the thickness off the ply, and the camber of the deck. Had to work in stages starboard to port. Once cut, this piece of ply when just rested on the beams gave an optical illusion. It looked bent - even though it was perfectly straight, Noticed small area of black mould underneath maststep and starboard main bulk head. Need to sand these and ensure nothing develops further.
30/1/93
We set to fixing in the ply insert cut last night. Sikaflex already warming on the hot water bottle since 9:30am. Hammered in 7 gripfast into the forward cabin middle beams. Found an off-cut of 12mm ply and just managed to juggle and cut out the two pieces of 12mm ply either side of the maststep. Then both pieces of ply fixed and nailed in place. Ground down the forepeak area - to remove the cracked sealant around the Mahogany 'strength' patch laminated in at the peak. Will need to do some laminating here as the hull at the peak is not level, and the existing Mahogany patch and deck is raised slightly to the edge of hull. Needs more thought here. Tea time again. Sun did get out this afternoon - but cups of tea still go cold quick if you do not drink it straight away. Need a hatch to finish off the forward cabin. Decided to make up and Epoxy in place the small pieces on the corner outer edge of the main cabin sides/front in cockpit area, that is where the cabin side is higher than cabin frontage. Both these pieces pinned in to place until Epoxy gone off. Rest of Epoxy used up down the side seams of the forward peak Mahogany timber. The seams where cleaned out earlier today. So far so good as regards the lighting in boat shed. One fluorescent and two 100w bulbs on extensions, which could be moved about the boat, on top and forward and aft, suspended from the rafters through the hatch areas.
 |
||
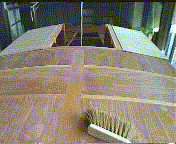
| 12mm Ply inserts fixed in place on forward coachroof. Just around hatch left to do. |
|
1/2/93
Sanded down the two bulk heads and maststep underside, where the black mould was materialising. Need to watch these areas - and in fact the whole boat. Damp and mould can get into the wood until it is sealed. Sanded down the Sikaflex, as done yesterday, up forward. Epoxy not fully gone off yet, so need to leave the cabin corner joint until next week. Looking closer at the Hull we saw that where the condensation collects - again black mould spots generating. Wiped the worst areas forward with acetone, really the whole hull needs washing again, in acetone this time. It is a year since she was washed. Have made up a tap for our Acetone drum , utilising a washing machine pipe tap. Filled up the acetone container from our new tap. It works - but only a small dribble comes out, because of the restricted air flow. Much better though than slopping it all over the place trying to get it out. Making an early finish today. Ruth got interview tomorrow. Had grinded down a section of the hull on the outside. There are certain spots where the laminate not soaked properly for the first layer, therefore need to identify all these places and fill up with gelcoat filler.
5/2/93
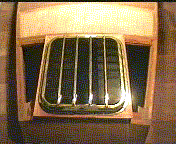
Decided to venture to Timage Ltd, Baintree , Essex to at least look at the brass hatches - 70% copper. The chap needed to get out three of these hatches before found one that was intact, and the fasteners worked. We bought it. �289. Apparently only Timage and Davey Co, 6 miles up the road, are the two dealers with brass/bronze fittings. The hatches anyway are made in Italy.
6/2/93
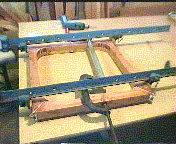
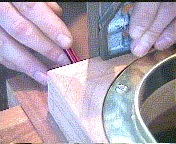
Pleasant morning. Put hatch on the bench to glisten in the sun then put it on the boat, and it looks a treat. It looks like gold. It cost gold to us. Cut and planed Mahogany pieces, 4 of them, approx. 65mm wide to construct the forward hatch framework. Lot of thought needed as to best way to do the frame before any timber was touched. Marked up and pondered several ways of doing the joints. With the frame being curved on the outer corners, the end grains will be showing, and will need to be sealed in well. 45 degree joints are not the easiest of joints to do perfectly in woodwork. Note for the book, travel lag is prominent Friday evening, plus eating fast food late- we both tend to have a rough night - especially last night, coupled with a bed which is the size of a large single bed - cuddle up or get squashed out .
Routered out two channels for 8mm ply in all four corners of the hatch frame. Had to use the Makita router twice on each slot. i.e. 32 times in all. Gets like clockwork at times the two of us working together. Cut out the centre spigot area before glueing corners together to make it easier for sanding and planing the edge to finish it.
Routered out the thin groove around the top edge of the centre spigot area so that the hatch spigot will seat down into the hatch frame. Cup of tea time now, for the umpteenth time. 22:15pm completed routering the upper edge and side edge so that the hatch spigot now seats in the frame, with allowance for sikaflex sealant. Now for eats and sleep.
 |
 |
|
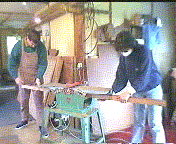
| Planing up the lumber for Forward hatch frame. | Hatch frame nearing completion. Pieces cut with 45degree angle and using biscuits. Just needs spigot pattern in centre cutting then glueing up. |
7/2/93
Cut out 8 pegs for the hatch frame corners, like biscuits. 15:15pm and we had got everything stuck up - Epoxy everywhere. The hatch frame now all glued together - all four corners - all eight pegs/biscuits. Sash clamped together, and the hatch spigot screwed into place. Tea time again. Not a great deal else done today. Left the frame in the workshop with the gas fire on. It was warmer than we were.! Hoovered up the workshop. Set to planing and sanding the corner of the cabin side/main cabin aft, where the small inserts were epoxied in weekend last. The Bee Keeper, who keeps some bees behind the workshop, had apparently been told recently where to put his bees. His hives had already been moved without him knowing. And the neighbours son, who had some farming implements stored in the field had been told to remove them swiftly.
8/2/93
Set to cleaning up the hatch frame. Got to watch the sandpaper. Have not yet found a non-cloggable sand paper. Even the atmosphere plays havoc. The slightest damp and it is no use. Even puts damp into the wood if not careful - also if it clogs with dust, it can score the wood surface. Got a chance to hoover out the van today. Even the ply boards of the van bed/bunk get damp overnight - and need airing during the day before making up the bed again. We have a box with Books in and this has got insulation foam, at the bottom to protect from damp. We do need to carry with us a quantity of books and catalogues for reading up , and for measurements etc. Cleaned the frame up, sanding and routering all but the upper exposed edge in which the frame is seated. By 15:30pm had finished off the hatch frame and cleaned up the spigot. Now to assess situation regarding the forward cabin beams made up already. More likely new ones will need making. Tried routering a straight section in the middle of existing un-fixed beam - but established hatch frame needs seating back to the bulk-head therefore the beam can be planed flat. Need a new thicker beam making up anyway. Routered out the forward beam with a level groove, in the centre, into which the hatch frame will sit. We felt it had been a good weekend. Took the hatch frame home with us. The only thing that keeps us going in this cold climate is the thought of one day cruising in the Mediterranean say - sunbathing and drinking beer! . That's the final aim anyway.
 |
 |
|
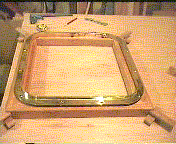
| Hatch frame glued up |
|
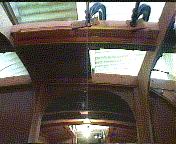
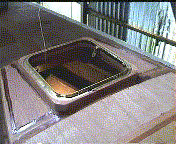
Hatch & Frame in position. Corners need rounding and frame needs seating into the beams |
9/2/93 to 12/2/93
Stripped down the brass hatch. Not happy with the following points :-
a) hinges - the pins are easily removed from the 'outside' !!
b) glass is too large. Sides are of unequal width and only 5mm glass instead of 6mm. Also consequently the rubber around the glass did not fit the frame snugly. It was disappearing underneath in places.
c) Several screws - the heads were burred.
d) Frame Inner edge too sharp. Prone to cut oneself when cleaning it.
e) Telescopic adjusters - the plate is too thin to which the adjuster is fastened to the spigot. Not much screw thread at all.
Cut a pattern out of MDF board, the size the glass should be. Approx. 2-4mm too large is the glass. Enough though. Tried sanding down some clear toughened glass we had but it would take forever and a day. The process is far too slow. We will have to get the hatch glass done professional. Not for giving up we tried to cut the hatch glass. In the living room at home, tried the tungsten tipped blade in the jigsaw. It was cutting it but extremely slow. Tried to cut it with a glass cutter. Scribed it OK on the top surface, but then tried to snip the edge with pliers. Not the right tool really. Nothing happened, then BANG, PING, and the living room floor was covered with glass-fibres. What a mess. We then thought it was the wrong type of glass for the hatch anyway. When things are made abroad, especially Italy, who is to know.
Sent away for catalogue of Brass/Bronze fittings from Davey & Co Ltd, near Chelmsford.
13/2/93
Lance not too well today. Stomach ulcers have been playing up a lot, making life uncomfortable. Laminated up a new beam for the forward cabin hatch area i.e. with Iroko to match main cabin beams. We also remembered to Epoxy up our split mallet, and with what Epoxy was left covered the exposed areas on the hull below/underneath to see if it adheres. Cut and planed up the two new Mahogany beams on which the hatch will be seated forward/aft. Measured up, and cut out, extending the original cut-out, to accommodate the new forward/aft beam. The first one anyway. Temperature is now dropping rapidly. It is now 19:30pm and we are going in for toasted tootsies i.e. warm up. Little jobs are really big jobs - they take just as long because they are fiddly.
14/2/93
Beam laminated up yesterday was ready for working on. Sanded and planed it to tidy it up, and have it the same width as the frame beam exactly. Cut out the dovetail joints for this beam in the forward cabin hatch area. Note for the book - seating in the ply on the deck also allowed us to remove any damaged edges of the beams which would otherwise have not given a perfect fit. The new beam was fitted and planed level where the hatch frame sits. Such a lot of faffing about with this beam because the jig was not really the correct camber for this job. Plus we found , when a beam was removed from the jig it had a tendency to spring out slightly. A bit of here and a bit off there, and gradually it was done. Needs fixing now, before cutting out to fit the forward/aft hatch frame beams.
15/2/93
Each month the rent was squared up with Les, and we also squared with him for the Electric Bill including the standing charge. Clamped and wedged the forward hatch area beam, drilled holes for gripfast nails, and routered the forward edge of the beam in three sections. Epoxied this beam in place.
20/2/93
Sanded down the hatch/cabin aft beam that was epoxied in last Monday, and cut out for the side beams. Started sanding down the hull inside. Both hatch side beams fitted to size, and by evening routered the hatch side beams in respective places. Cannot Epoxy them in place just yet as the Iroko corner pieces need planing first, and the cabin frontage needs attention first. The corners of the hatch frame itself were rounded. Not still sure exactly the final finish on this as yet.
Polystyrene pieces are ideal for sitting on. Need some inner soles made of the stuff for our shoes. Cold feet is a problem. It was not unknown for us to carry hot water bottles on us - stuffed down the back of our trousers. We are wearing at least two of everything, except shoes.
 |
 |
 |
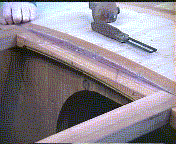
| Forward beam shaped to receive hatch frame. | Hatch
frame seated in place against latest beam fixed in.
|
Marking up for rounding the hatch frame corners. |
21/2/93
Started on planing down the Iroko cabin corner pieces forward. Could not take much off, because of the situation, no room for electric planer. Ended up just taking off the corner edge. The portside has two hairline cracks in it, and the joints ,Cascamited originally ,are opening up. Strengthening pieces will be needed inboard and on deck to protect and cover these joints. Chamfered the hatch side beams in line with camber, and then routered out for the two ply inserts, either side of the hatch. Decided to router over the complete top edge of both Iroko corner pieces, so that extra strength can be obtained by seating both pieces of ply on top of the corner pieces. The smallest flute router bit broke in half and had to resort to the larger one. Epoxied into place the hatch frame beams. Sanding down of all the beam edges within the vicinity done in preparation for the ply inserts to go in. Using up the leftover Epoxy to pour or brush onto the stringer top sides , inside the hull. The Epoxy spreads out itself and rounds off any dips in the fibreglass moulding. Having done this up forward directly underneath the hatch area, Ruth came along to clean up underneath, the beams and puts one foot right in it!. Typical.
 |
 |
|
| Portside forward cabin Iroko corner joint.... |
|
Decided to router Iroko corner joint so ply insert when fitted covers this joint completely. |
22/2/93
Prepared and cut out the ply inserts port and starboard of the hatch frame. These were both stuck down with Sikaflex and gripfast nails. All is looking good inside the forward cabin. It is all worthwhile spending time and checking all the joints. It is nearing a point now where the structural detail is complete, and all areas have been assessed, and attention needed, if not already done, has been noted. Looked at the forward cabin frontage. Decided too much faffing about to do anything like the main cabin, and we will more likely just put lattes across the existing front board.
 |
 |
 |
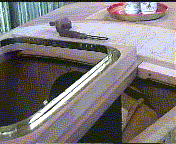
| Hatch frame and ply inserts now fixed in place | Forward cabin portside front looking aft. Joints to be sanded flush | Forward cabin front after having battened it with mahogany latts |
27/2/93
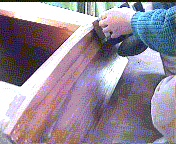
Belt-sanded down the hatch area i.e. the Sikaflex and epoxied beam etc. Set to tidying up the beams inside. Lots and lots and lots of scraping and sanding to be done. Studied the forward cabin frontage situation. It needs a 'covering' frontage of some description. Cut and planed and shaped up some lattes for the forward cabin front. By time the camber had been cut out of the lowest latte, the top latte fell below the deck height. Used the piece cut from the lowest latte and it fitted the top. Saves unnecessary wastage again. By 15:00pm ready to Epoxy, and what a race it was. 6/7 small lattes, each grip fast nailed onto the existing cabin front. Messy it was as well. Epoxy all over the forward deck area, makita drill, hammer , us and of course the cabin front. John and Gary around in the bottom shed with the lights on. Hope they realise we are footing the bill !. They have emptied the old bath now and put it around the back of the shed. Now there is no fire-water!. Some people just do not think.
28/2/93
Bitter cold, but we are surviving. Sun melted the snow puffs on the grass, but did nothing to raise the temperature. Epoxy from last night had not gone off totally yet !. Sanded down starboard deck fibreglass lip. Many places the laminate had during manufacture not been wetted thoroughly and these areas were ground down, to be refilled with epoxy. One patch mid ships was particularly bad. Each time we finish epoxying, we will use the leftover to fill these voids. Hope the rest of the hull is not as bad. Planed down, in the afternoon, the top edge of the newly laminated forward cabin front, then belt-sanded the majority of the Epoxy off the frontage, clogging up the belt in doing so.
- - - - - - This is the end of Diary Section 12 - - - - - -
![]()